
Listen to an old captain who’s spent more time wrenching on marine engines than sleeping on solid ground: dropping a heavy outboard motor on a concrete garage floor is a spectacular way to ruin your season. Yet, I see rookies take that exact risk every winter simply because they don’t have a reliable stand.
You don’t need to hand over $150 at a marine supply store. Give me an afternoon, about $40 in lumber, and a handful of screws, and I’ll show you how to build a DIY outboard motor stand that’s sturdier than anything shipped in a cardboard box.
I’ve built dozens of these over the years. This guide gives you the exact dimensions, a tight materials list, and the mariner’s tricks that separate a wobbly scrap-pile from a road-ready storage dolly. Let’s get to work.
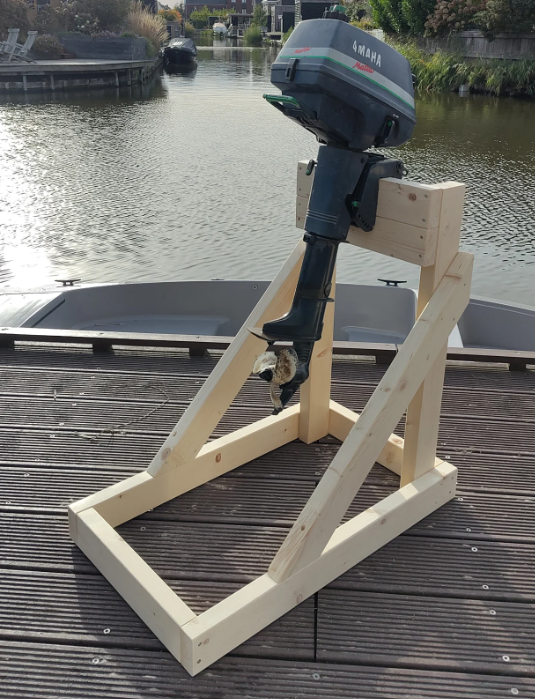
Why You Actually Need a Dedicated Stand (Take It From Me)
Outboard Motors are deceptive. Even a mid-range 8 HP four-stroke weighs a solid 80+ pounds. The 25 HP rigs we usually build these frames for easily push 150 pounds. When a motor tips over because you “just set it against the wall for a second,” you’re looking at a cracked cowling that’ll run you $150 to $300 to replace. That’s a hard lesson to learn.
Captain’s Wisdom: Both Mercury and Yamaha tell you to store outboards elevated and tilted after saltwater use so the cooling jackets drain completely. Good luck getting that angle right without a stand.
A proper stand pays for itself in three ways:
-
Safe Winter Storage: Keeps it upright, off damp concrete, and properly drained.
-
Painless Maintenance: Changing gear oil and swapping spark plugs is miserable on your knees. A stand puts everything at workbench height.
-
Controlled Flushing: Hook up the ear-muffs right in the driveway and watch the tell-tale stream with zero hassle.
The Under-$50 Materials & Cut List
Don’t overbuy. Head to your local hardware store and grab strong, straight SPF structural grade lumber. Do the “rifle scope” check: hold the board to your eye and look down its edge. If it bows or twists, put it back. You want straight wood for a straight frame.
What to Buy:
-
Four 2×4×8′ SPF boards (~$14.00)
-
One 2×8×8′ SPF board for the motor mount (~$6.00)
-
1 lb box of 3″ exterior-coated wood screws (~$9.00)
-
Optional: 4-pack of 3″ swivel casters (two locking) (~$20.00). Keep the weight rating at least 3x your motor’s weight.
Exact Cut List (Print This Out!):
|
Part Name |
Material |
Qty |
Length |
What It’s For |
|---|---|---|---|---|
|
Base Rails |
2×4 |
2 |
36″ |
Long sides of the base |
|
Front Crosspiece |
2×4 |
1 |
24″ |
Front connection |
|
Upright Supports |
2×4 |
2 |
32″ |
Vertical legs |
|
Reinforcement |
2×4 |
1 |
23.5″ |
Mid-frame stability (H-brace) |
|
Support Blocks |
2×4 |
2 |
4″ |
Cut with a 12° angle on one end |
|
Motor Board |
2×8 |
1 |
24″ |
Where the engine rests |
Step-by-Step Assembly Instructions

Step 1: Frame the Base Rectangle
Get this wrong, and everything built on top of it leans. Lay your 36″ rails and 24″ crosspieces on a dead-flat surface. Flush the ends and clamp them tight. Pre-drill your holes! Skipping the pilot hole in softwood end grain is a greenhorn mistake that causes splitting and ruins holding power.
Drive two 3″ exterior screws into each corner. Pro tip: Measure the diagonals (corner to corner). They should both read roughly 43.3 inches. If there is more than a ⅛-inch difference between the two measurements, push the frame into square before proceeding.
Step 2: Mount the Vertical Uprights & H-Brace
Push your 32″ uprights toward the back edge of the base (leaving about ½ inch). This shifts the motor’s center of gravity right over the meat of the stand, reducing the tipping hazard.
Drive three screws up from the base into the uprights in a triangular pattern to fight rotational stress. Once vertical, install your 23.5″ horizontal H-brace partway down the legs. A cross-brace positioned 8-10 inches from the floor doubles your lateral stiffness.
Step 3: Attach the Motor Mount Board
This 2×8 board is the handshake between your engine and the stand. Center it flush against the top-front of your uprights. You need a multi-point fastening grid here. I’m talking 3 to 4 screws per upright.
A bare 1.5-inch thick 2×8 perfectly handles the clamps for small-to-mid Yamahas, Mercurys, and Hondas. Bonus: Sand the sharp edges of the board. I always chamfer the edges so they don’t cut into the motor bracket’s paint under vibration.
Step 4: Install Diagonal Bracing (Never Skip This)
A rectangle without a diagonal brace is just a parallelogram waiting to collapse. When a running engine vibrates, the frame will rack. Adding a diagonal 2×4 brace introduces triangles into the geometry. Triangles don’t rack.
Cut a piece to run diagonally from the upright down to the base rail at a 40–50° angle. Fasten the top first, push the bottom down hard to put the wood under compression, and lock it in. Do this on both sides.
Step 5: Bolt On the Casters
If you’re making a rolling outboard motor dolly, flip the stand over. Only trust math here: (Motor Weight + Stand Weight) × 3. For a 150 lb motor and 50 lb stand, you need casters rated for a combined 600 lbs (150 lbs per wheel).
Keep them at the extreme outer corners for maximum footprint. Always put the locking casters on the side closest to the motor board. When you’re wrenching on the Prop, the brakes will fight the twisting motion.
Step 6: Sand, Seal, and Final Safety Check
We work around water, so raw wood in a damp garage will warp by next spring. Hit the stand with a coat of penetrating water sealer—especially the end grains. Finally, re-torque every screw, and lay a heavy sandbag on the mount before trusting it with your engine.
The Pro-Active Prep: While the Engine is Up
One of the best habits I’ve picked up? Inspecting my outboard the moment I drop it onto the stand. Since the lower unit is finally sitting right at eye-level, grab a flashlight and check your Prop.
If you notice chewed-up blades, severe pitting, or a spun hub from dragging bottom over the season, don’t just “leave it for spring.” Running a damaged propeller destroys lower-unit seals due to vibration. I tell all my guys to keep a spare on hand. I personally source my replacements from VIF Propellers. They build precise, durable props that hit OEM specs for a fraction of what marine dealers quote you. Swap it out now, and you’re fully bulletproofed for opening day.

FAQ: From the Docks
How high should my motor board sit?
Lower is usually safer. Start at 36-40 inches. Mime changing the gear oil—if you have to bend your back uncomfortably, raise it. Height should serve your back, not the other way around.
Will this hold a 25 HP outboard?
Absolutely. Provided you used 2x4s for the diagonals (not flimsy 1x4s) and properly calculated your caster load, this design easily holds modern 150-180 lb motors.
Do I have to use bolts for the casters?
For sub-100 lb motors, lag screws are fine. If your motor exceeds over 150 lbs, upgrade to through-bolts with Nyloc nuts. Vibration backs out normal fasteners.
Conclusion
You came looking for a $50 fix for a thousand-dollar risk. In spending a few hours executing these plans, you’ve built an asset that will outlast the motor sitting on it. Keep your cuts square, your screws deep, and your cross-braces tight. See you out on the water.