
Your boat propeller is stamped with everything you need to know — but only if you can read it. That small string of numbers etched into the hub tells you the diameter, the pitch, and whether your prop is working for your boat or working against it. Chasing a performance problem? Shopping for a replacement? Just doing your homework before a big purchase? Measuring your boat propeller yourself puts you in control. No marina visit required. No guesswork. No buying the wrong prop twice. Grab a tape measure and a few minutes. By the end of this guide, you’ll know what your propeller is telling you.
Understanding Boat Propeller Size: Diameter and Pitch Basics

Two numbers run everything. Diameter and pitch — that’s the whole game for propeller sizing. Once you know what each one does, the stamped code on your hub stops looking like noise and starts looking like useful data.
Diameter is the width of the circle your blades sweep as they spin. It’s twice the distance from the hub center to the outermost blade tip. A blade that measures 7 inches from center to tip? That’s a 14-inch diameter prop. Simple math, real consequences.
Pitch takes a bit more to picture. It’s the distance your prop would travel forward in one full revolution — like a wood screw driving through solid material. A 19-pitch prop moves 19 inches per turn. A 21-pitch moves 21. Same RPM, more ground covered.
Here’s how they affect your ride in practice:
-
Higher pitch = more top-end speed, slower acceleration off the line
-
Lower pitch = stronger hole shot, lower top speed
-
Larger diameter = more thrust, better for heavy or loaded boats
-
Smaller diameter = less drag, better for lighter, faster hulls
A good rule of thumb: every 1-inch change in pitch shifts your wide-open-throttle RPM by about 200 — higher pitch drops RPM, lower pitch raises it. Your engine has a recommended WOT RPM range. Pitch is how you hit it.
So read 14 x 19 stamped on a prop — that’s 14-inch diameter, 19-inch pitch, diameter listed first. Every measurement you take feeds back into these two numbers.
Tools You Need to Measure a Boat Propeller
Nothing exotic on this list. A tape measure, calipers, and a straightedge cover 90% of the job. Chances are, you already have most of these in your garage.
Here’s what to grab before you start:
-
Tape measure (16–25 ft, inch/mm markings) — use this for blade tip-to-tip diameter. Keep it calibrated and un-stretched. Errors past 1/32″ will throw off your results at this scale. Cost: $5–15.
-
Digital calipers (6″ jaw) — these measure hub bore diameter and spline count to 0.01″ precision. You need this to confirm shaft fit. Cost: $20–50.
-
Straightedge (12–24″ aluminum) — lay this across the widest blade points to keep your tape flat and level. Cost: $5–10.
-
Digital angle finder — skip this if your hub has stamped markings. No markings? Use the angle finder to measure blade angle and calculate pitch by hand. Cost: $15–30.
-
Marker and notepad — mark the widest blade edges before you measure. Write every number down right away. Memory is not a reliable backup.
Total cost for a full DIY kit: $45–115. That’s a one-time investment. Buy the right prop the first time and it pays for itself fast.
How to Measure Boat Propeller Diameter: Step-by-Step

Diameter is the easiest measurement you’ll take — and the one most people get wrong on the first try.
Before anything touches a tape measure, prep the prop. Pull it off the shaft, scrub off any barnacles or grime, and set it flat on a level surface. A tilted prop gives you tilted numbers. This part matters more than it sounds.
The standard method (works for any blade count):
-
Find the hub center — the central bore hole is your fixed starting point
-
Measure the radius — run your tape from that center point straight out to the outermost tip of one blade
-
Multiply by two — that’s your diameter. A 7-inch radius means a 14-inch prop.
-
Repeat on every blade — take three measurements minimum, then average them. Use the largest radius if your blades are uneven
Even-blade shortcut: Got a two- or four-blade prop? Measure straight across from one blade tip to the opposite tip. Pass through the center. That’s it — fast and accurate.
The mistake that gets everyone at least once: Two errors show up all the time. First, measuring blade tip-to-tip without passing through the hub center. Second, stopping at the hub edge instead of the center bore. Both give you a wrong number — and you won’t know it until something doesn’t fit.
Write down every measurement as you go. One number you trust beats three numbers you’re trying to remember.
How to Find and Read Propeller Size Markings
Most props stamp their specs right on the hub — no guesswork needed. You just need to know where to look and what you’re reading.
Where to look first:
-
The hub barrel (aft end, exterior surface)
-
Between the blades at the base
-
Blade roots
-
The spline area inside the hub
-
Under the prop nut or washer
Check all of these spots. Different manufacturers place stamps in different locations. Some props carry markings in two or three places at once.
Decoding what you find:
The first two numbers are always diameter × pitch, in inches. That’s your sizing info — everything else is descriptive.
|
Marking |
Diameter |
Pitch |
What the rest means |
|---|---|---|---|
|
|
14″ |
19″ |
Basic aluminum outboard prop |
|
|
14.5″ |
19″ |
Right-hand rotation, 3-blade, stainless steel, Apollo model |
|
|
14.6″ |
17″ |
“P” = progressive pitch variant |
After the size numbers, the suffixes break down like this:
-
RH / LH — right-hand (clockwise) or left-hand rotation
-
AL / SS — aluminum or stainless steel
-
3 Blade, 4 Blade — blade count
-
Model name — brand or style identifier
Stamp worn or unreadable? Skip the hub and measure by hand. Diameter is simple — take the distance from the hub center to the blade tip, then multiply by 2. Pitch is trickier. You’ll need a pitchometer for outboard props. Also, keep this in mind: a prop that has been repitched, cupped, or trimmed may no longer match its stamped numbers. The stamp reflects how the prop left the factory, not what it is now. Take the prop to a prop shop and get it verified before ordering a replacement based on old markings.
How to Measure Propeller Pitch Without Markings
No stamp, no problem — but you’ll need to do actual geometry.
The core principle is simple: measure how much the blade rises across a known arc. Then scale that rise to a full 360-degree rotation. The math sounds scary. It’s not.
The 75% radius rule
The marine industry measures pitch at 70–75% of the blade’s radius from the hub center. This is the standard. Don’t skip it.
Find that point first. Take your radius — say, 9 inches on an 18-inch diameter prop — and multiply by 0.75. That puts you at 6.75 inches from the hub center on each blade. Mark both the leading edge and trailing edge at that spot using a compass or template. Guessing the position adds 3–5% pitch error before you’ve even begun.
Taking the measurement
Set the prop flat on a stable surface. Use a plumb line or square to record the height of both marks above the surface:
-
Leading edge height: e.g., 33mm
-
Trailing edge height: e.g., 73mm
-
Height difference: 40mm
Now measure the swept angle between those two marks with a protractor. A typical result lands around 59–60 degrees.
The pitch calculation
Divide 360 by your swept angle to find how many segments fit in a full revolution:
360 ÷ 60° = 6 segments
Then multiply by your height difference:
40mm × 6 = 240mm = 9.45 inches
That’s your pitch.
Multi-blade check
Manufacturing tolerances mean individual blades can vary by 2–5%. Measure each blade at the 75% mark on its own, then average all the results. If your blades are symmetric, one measurement is enough.
Where error creeps in
|
Source |
Pitch Error |
Fix |
|---|---|---|
|
Position off by ±1% radius |
±3–5% |
Use compass for exact mark |
|
Angle gauge off by 0.5–1° |
±2% |
Calibrate before measuring |
|
Blade cupping or twist |
+5–10% |
Measure mid-chord, not the edge |
One note on cupping: a cupped blade adds pitch beyond what any calculation shows. Your prop has visible cupping? Log it as its own finding. That extra bite won’t appear in your numbers — but it will show up in your RPM.
Interpreting Propeller Numbers and Specifications
Every prop stamp uses the same format: diameter × pitch. Diameter comes first, pitch comes second. A marking like 14 × 19 means 14-inch diameter, 19-inch pitch. That’s it. Once you know that, the rest of the code makes sense.
What the Numbers After the Size Mean
Beyond the two main dimensions, the stamped string tells you how the prop was built:
-
Blade count — 3-blade props are the standard choice. They offer balanced speed and solid efficiency. 4-blade props give up a little top speed, but you get more thrust and a smoother ride in choppy water.
-
Material — Aluminum (AL) or stainless steel (SS). Stainless costs more. It also lasts longer and holds its shape under stress.
-
Rotation — RH (right-hand, clockwise) or LH (left-hand). Most single-engine boats run right-hand. Twin-engine setups run one of each.
-
Series or model name — Product lines like Viper™ TBX™ or Rebel TBX™ mark different performance tiers and blade geometry styles. These are real design differences, not just cosmetic ones.
Hub Specs Matter More Than Most People Realize
The hub connects your prop to the shaft. A mismatch here means the prop won’t fit — no matter how right the diameter and pitch are.
Two measurements decide hub compatibility:
-
Hub bore diameter — measure with calipers
-
Spline count — count the grooves inside the bore
These specs don’t cross over between engine families. Evinrude/Johnson V4 engines (45–75 HP) use a 13-spline hub. Their V6 versions use a different kit. Get the spline count wrong and the purchase is wasted.
The Spec That Doesn’t Appear in the Stamp
Blade rake is the backward angle of the blade relative to the hub. It won’t show up in the stamped code. But it directly affects how the prop handles at speed. High-rake designs cut down on ventilation and keep the prop tracking cleanly at high speed. You won’t find this number in the stamp, but manufacturer spec sheets list it. Check it before you place a replacement order.
Quick reference: Before you shop, write down diameter, pitch, blade count, hub bore, spline count, and material. That’s your full propeller ID — everything a seller needs to match you to the right prop on the first try.
Propeller Sizing and Performance Impact Basics
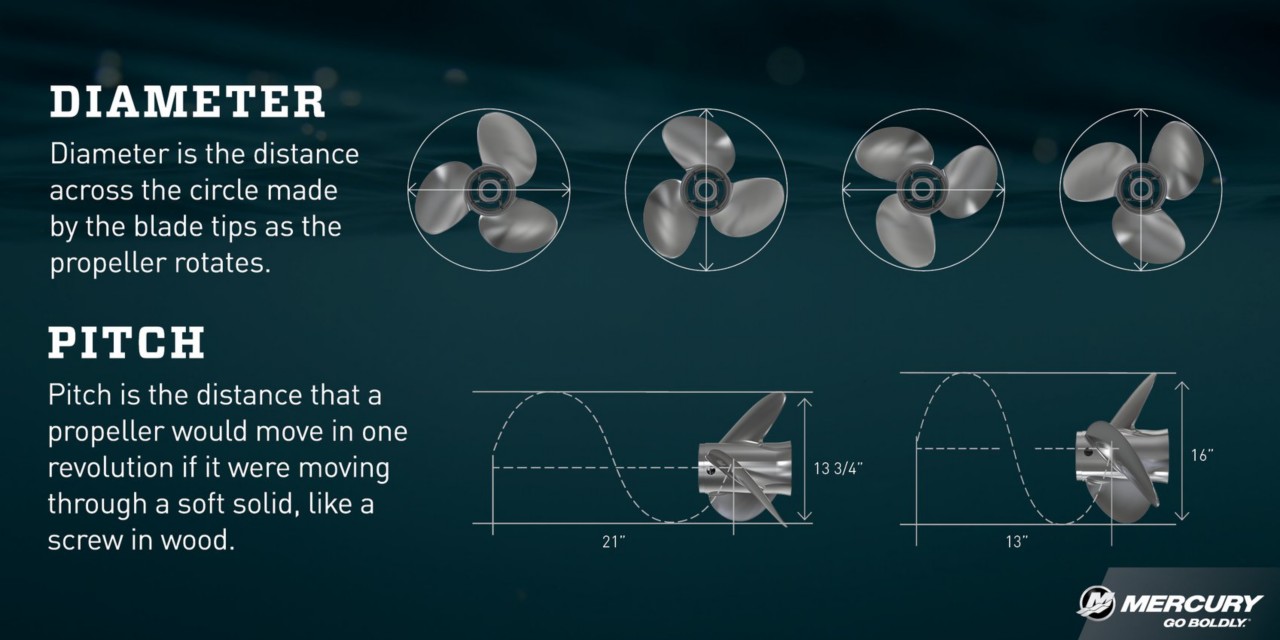
Size isn’t just a number on your hub — it’s a performance contract between your prop and your engine.
Get the sizing wrong and you’re leaving speed on the table. Or worse, you’re grinding your engine toward an early grave. Get it right and everything clicks: clean acceleration, efficient cruise, and an engine that stays in its happy RPM zone.
Diameter and pitch each do a specific job. Diameter controls how much water your prop can grab. More blade area means more thrust. That matters most when you’re pushing a heavy load. Pitch controls how hard the engine works per revolution. It sets your wide-open-throttle RPM.
Here’s the practical hierarchy:
-
Set diameter first. Larger diameter handles more power and generates more thrust. Respect your aperture clearance — your prop needs 15–20% of its diameter as clearance in the hull opening. A 24-inch aperture caps you at a 19-inch prop.
-
Tune pitch second. Every 1-inch change in pitch moves your WOT RPM by 150–200. Too high? Drop pitch. Too low? Add pitch. That’s how you dial into your engine’s recommended RPM range.
-
Blade count shifts RPM too. A 4-blade prop running the same pitch as a 3-blade will spin 50–100 RPM slower. More blades move more water per stroke — good for efficiency, but account for that difference during sizing.
Your engine manufacturer publishes a target WOT RPM range for a reason. Running outside that range shortens engine life. Propeller sizing is how you hit that target.
Common Propeller Measurement Mistakes to Avoid
Small errors compound fast. One wrong number throws off your entire prop selection. You won’t feel it until you’re on the water, engine straining outside its RPM range.
Confusing radius with diameter is the most common trap. Measure center-to-tip, forget to double it, and you’ve just reported a 9-inch prop instead of an 18-inch one. That 50% underestimation gives you a mismatched prop and a 7–15% efficiency loss. You won’t fix that at the dock.
Measuring tip-to-tip without passing through the hub center adds 1–2 inches of error. Blade twist and hub geometry cause this on their own. Always measure centerline-to-tip. Then multiply by two.
Trusting model codes as measurements is another reliable way to waste money. A casting number like “APC 10×7” looks like specs. It isn’t. Verify actual dimensions with calipers at the 75% blade station.
A few more worth flagging:
-
Unzeroed angle gauge — even a slight offset creates ±5–10° of pitch error before you’ve measured anything
-
Wrong measurement station — pitch varies across the blade. Measure outside the 75% radius point and you’re off by up to 15%
-
Ignoring blade tracking — no blade should deviate more than 1/16 inch (1.6mm) from the rotation plane. Past that, you’re not just measuring wrong. You’re running a prop that will vibrate and break down
Write the numbers down right away. Every single one.
Boat Propeller Size Reference Chart
Prop sizes follow predictable ranges. Find where your boat fits, and you skip the guesswork of hunting specs at every marina.
The format is diameter × pitch, diameter listed first. A 14 × 19 means 14 inches wide, with 19 inches of forward travel per revolution. That’s it — one format, used everywhere.
Here’s how common setups break down by boat type:
|
Boat Type |
Boat Length |
Prop Size |
Material |
Blades |
|---|---|---|---|---|
|
Small boats (low speed) |
15–20 ft |
9×7 RH |
— |
— |
|
Small boats |
15–18 ft |
10½×13 RH |
— |
— |
|
Inflatable (30–42 mph) |
— |
15×17 RH |
AL |
3 |
|
Inflatable (36–49 mph) |
19–22 ft |
14½×19 RH |
AL |
3 |
|
House/Cruiser (30–42 mph) |
21–26 ft |
15½×17 RH |
SS |
3 |
|
House/Cruiser (42–56 mph) |
17–20 ft |
14¾×21 RH |
— |
3 |
|
Pontoon |
12–27 ft |
15.3×14P RH |
SS |
3 |
Size limits to know: Outboards and Bravo One sterndrives top out at 16-inch diameter. Heavy sterndrives like the MerCruiser Bravo Two can handle up to 20 inches. Stay within your system’s limit — clearance is not optional.
Treat this chart as a starting point. Check it against your engine’s WOT RPM range before you order.
Measure vs. Replace Your Propeller
Not every prop problem means you need a new prop. Some problems mean you’ve been running the wrong size all along.
Know the difference. Measuring confirms what you have. Replacing fixes what’s broken or mismatched. Pick the wrong option and you lose time, money, or both.
Measure your propeller:
– Fuel efficiency drops more than 10–20% with no clear cause
– WOT RPM falls outside your engine’s target range
– You hit something — rocks, debris, a dock — and need to check for damage
– Acceleration feels sluggish or top speed has dropped
– A new season is starting and you haven’t checked in over a year
Replace right away:
– A blade is cracked, bent, or broken — efficiency loss exceeds 20% thrust
– Stainless steel shows any blade damage — stainless can’t be repaired the way aluminum can
– Vibration continues even after a shop balances the prop
Minor aluminum chips sit in the middle. A prop shop can sometimes balance and repair them at a fair cost. That’s worth trying. But if balance can’t be restored, replace it. A prop that stays out of balance will destroy your driveshaft long before it empties your wallet.
RPM tells you the real problem. Your engine targets 5,000–5,600 WOT, but you’re only hitting 4,800? That’s a pitch issue, not physical damage. Drop pitch by 1 inch and you gain 150–200 RPM. Measure first. Then decide.
Frequently Asked Questions About Measuring Boat Propellers
Real questions from real boat owners — answered straight, no filler.
Can I measure my propeller without removing it from the shaft?
Sort of. You can get a rough diameter by measuring blade tips with calipers while the prop is still mounted. But pitch? That’s close to impossible to measure on-boat with any precision. Expect ±1–2 inches of error from blade angle and limited access. Pull the prop. Fifteen minutes of work saves you from a bad purchase.
What if the stamped numbers are worn off?
Measure by hand. Take the diameter from hub center to blade tip, then double it. For pitch, use the 75% radius method outlined earlier in this guide. Cross-check at three different blade radii. You can also look up OEM specs using your motor’s model, year, and horsepower.
Does a 19″ pitch and a 21″ pitch prop spin at the same speed?
Same engine RPM, yes — but the 21″ pitch moves the boat farther per revolution. That translates to higher top speed. Larger diameter adds thrust, not speed. Those are two different levers.
How much blade variance is acceptable before I should worry about damage?
Tip-to-tip diameter variance over 0.25 inches signals a bent blade. Pitch deviation beyond 0.5 inches per inch of radius means the prop needs repair or replacement. Don’t just get a second opinion — act on it.
Do marine props use metric or imperial measurements?
Inches. Always. Mixing in metric creates rounding errors. Blade variance can exceed 0.1 inches on its own, and that gap grows fast. Stick to imperial for every single measurement.
Conclusion
Measuring your boat propeller is simple. Grab a tape measure and spend a Saturday afternoon on it. You’ll get real answers about your boat’s performance.
You now know how to read those stamped numbers. You can measure diameter and pitch the right way. You can also spot the common mistakes that send boaters back to the dock empty-handed. That knowledge stays useful. Bookmark this page, tuck these specs into your phone notes, and never walk into a propeller purchase blind again.
Here’s the truth: a boat that works and a boat that performs are not the same thing. The gap between them often comes down to two numbers — diameter and pitch. Get those right, and everything else falls into place.
Ready to put your measurements to work? Head to the VIF Propellers catalog with your propeller specs in hand. Find the upgrade your boat needs. The right prop is out there — and now you know how to find it.