
The wrong propeller turns your reliable Johnson outboard into a slow, fuel-wasting problem. Worse, it can damage your engine. Most boat owners pick a replacement prop based on guesswork or price at the marine shop. This leaves major performance gains and fuel savings behind.
Here’s what matters: Your propeller choice affects hole shot acceleration, top speed, fuel economy, and engine life.
Got cavitation issues? Can’t hit the right RPM range? Want better performance from your setup? Understanding prop pitch, blade design, and materials makes the difference.
This guide skips the technical talk. You’ll get a clear framework for matching the right propeller to your Johnson motor, boat setup, and water needs. Stop guessing. Start getting the performance you paid for.
Understanding Johnson Propeller Specifications
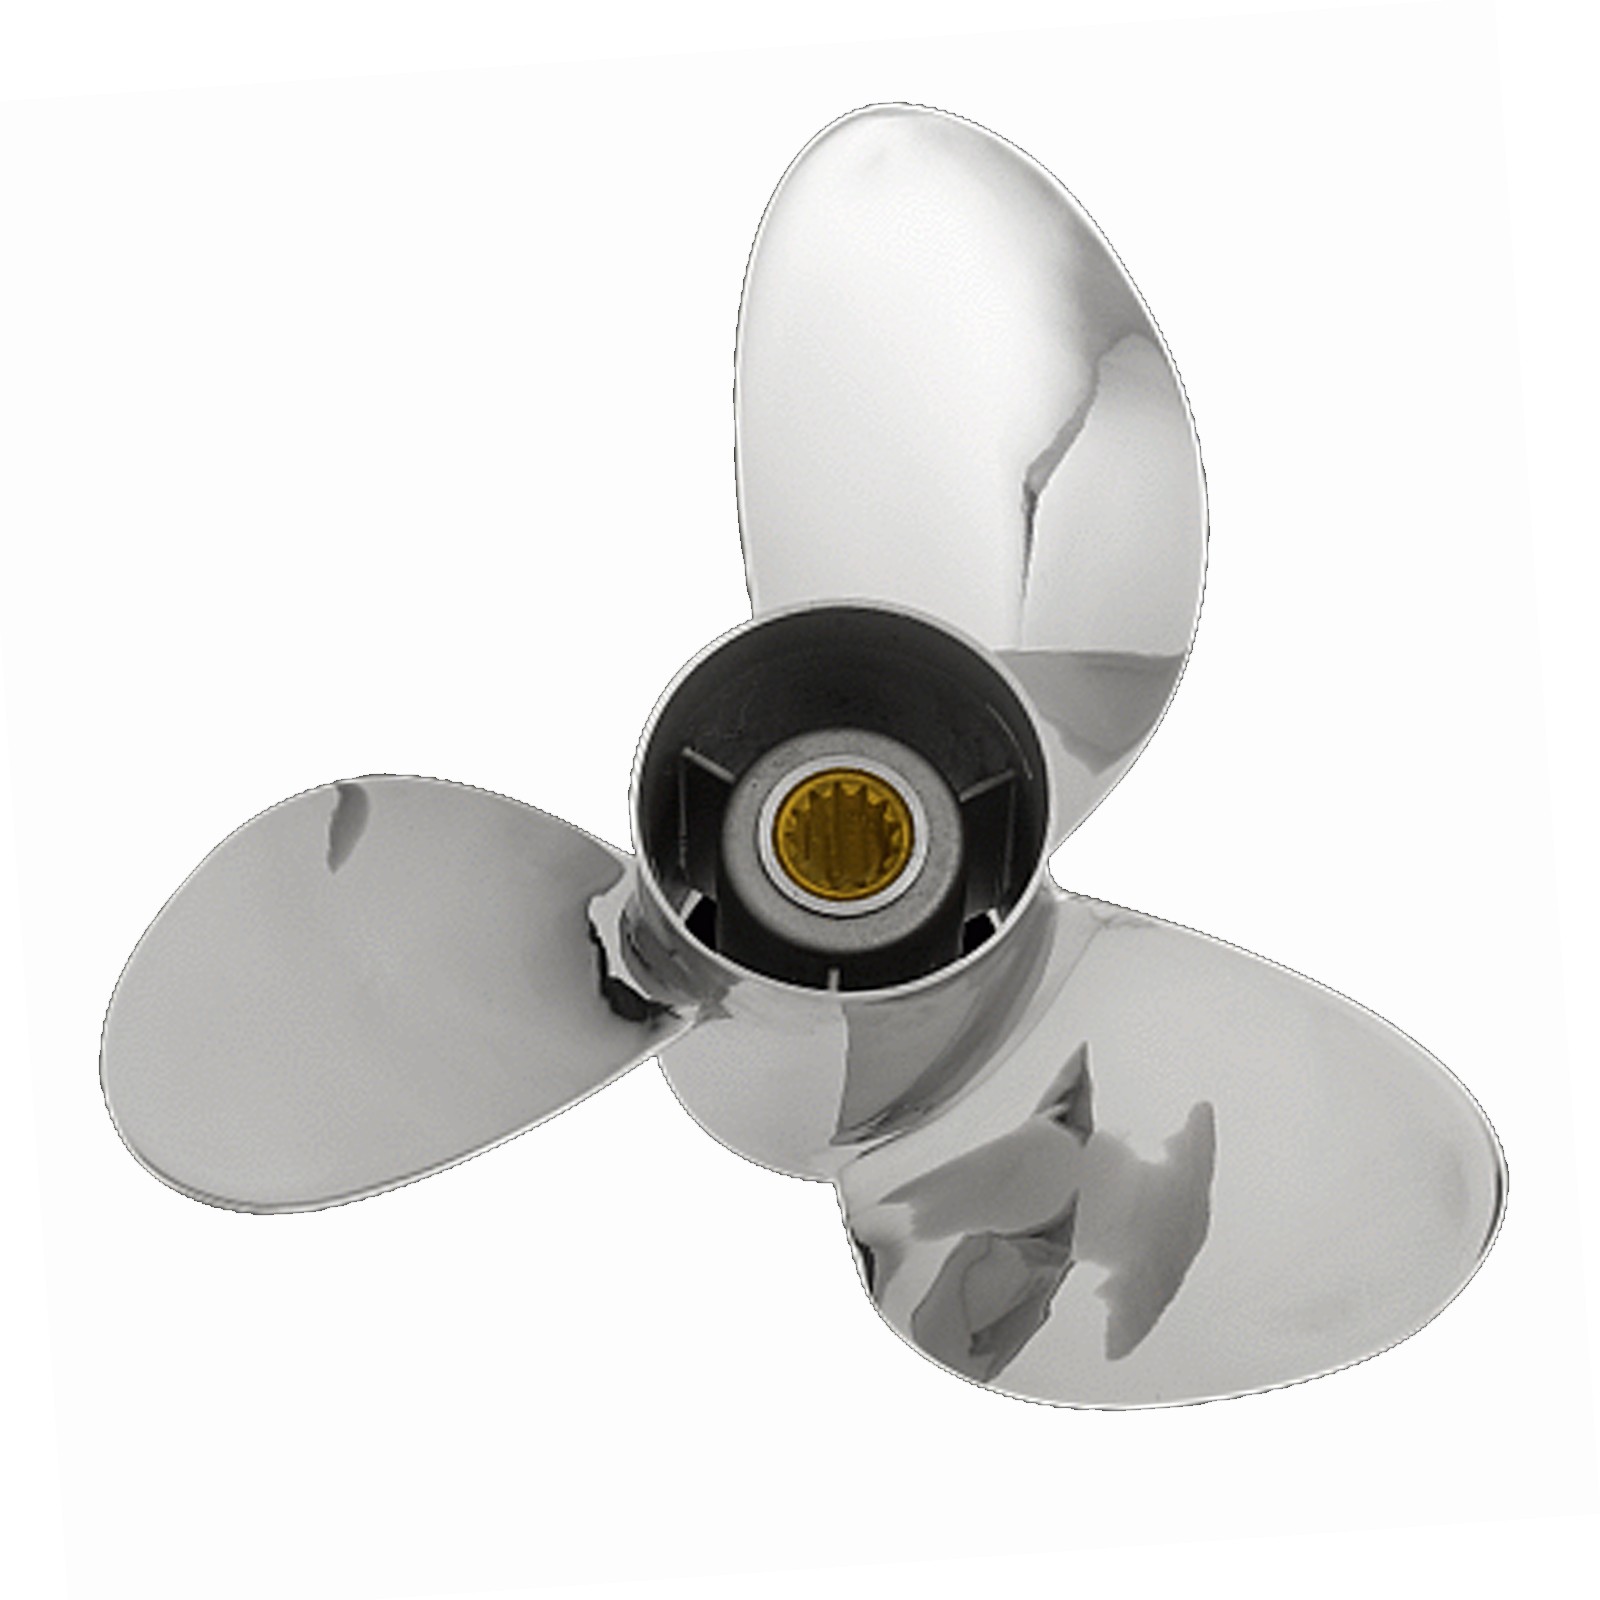
Every Johnson propeller stamp tells a story in numbers. That “14 x 19” marking isn’t random—it’s your performance blueprint. The first number is diameter in inches (how wide the propeller circle spins). The second is pitch (the distance the prop moves forward in one full rotation). Think of pitch like gears on a bicycle: higher numbers mean more speed but less acceleration.
Diameter sizing affects your engine’s grip on water. Johnson motors come with set diameter ranges based on horsepower. A 9.5-14 HP Johnson (1964-94 pin drive) runs a compact 9-inch diameter. This works great for 12-16 ft boats hitting 20-28 MPH. Jump to a 100-300 HP V6. You’re looking at 15½ to 16-inch diameters pushing heavier hulls (21-26 ft) to 30-42 MPH. Oversize the diameter? Your engine works harder. Undersize it? You lose thrust.
Propeller pitch selection controls your RPM sweet spot. Johnson outboards run within set RPM ranges at wide-open throttle (WOT). A 40-50 HP 4-stroke Johnson (13-tooth spline) pairs with a 14 x 13 RH extra cup prop for boats 19-22 ft. This delivers 17-26 MPH. Drop the pitch 2 inches, and RPMs climb 400-600—better hole shot, lower top speed. Add 2 inches, RPMs drop. Top speed increases, but you lose acceleration.
Blade count changes everything about handling. Standard 3-blade props dominate Johnson’s catalog. They’re the balanced choice for general boating. But special needs call for different setups. The 135-140 HP V4 models (1973-84) run 4-blade designs (P/N 8M0119543) for smoother rides on 22-29 ft boats. Four blades reduce vibration. They improve low-speed control. Plus, they help heavy boats plane faster.
Cupped propeller blades add a performance edge without changing pitch. That “extra cup” designation on the 14 x 13 RH means the blade trailing edge curves a bit. This creates better bite. Johnson’s RHC (Reverse Hook Cup) technology takes this further. You get up to 200% more reverse thrust for houseboats and workboats. A standard 16 x 10 RH becomes RHCJR210SP with RHC. This transforms docking and maneuvering.
Propeller shaft size and spline count decide compatibility. You can’t mix them. Johnson uses pin drives (older 9.5-14 HP models), 10-tooth splines (25-30 HP 4-stroke), 13-tooth splines (most mid-range motors), and 14-tooth setups. The 9.9-15 HP 2-stroke (1974-2000) takes a 13-tooth spline with 9 x 10 RH props. Installing the wrong spline count? The prop won’t even attach.
Aluminum vs stainless steel propeller choices split on usage patterns. Aluminum props cost $150-$250. They handle casual boating. They sacrifice themselves in impacts to protect your lower unit. Stainless steel runs $400-$650. It delivers 2-3 MPH more top speed through reduced flex. It survives rock strikes that would shred aluminum. For a 250-300 HP ETEC pushing performance boats, stainless (like the Thunderbolt QS5002X, 15½ x 17 RH, 3-blade SS) justifies the premium.
Propeller hub systems vary by Johnson gearcase design. The 110-300 HP V6 gearcase uses different hubs than 50-70 HP small gearcases. RHC props for 50-70 HP (like RHCJ52-10SP at 12¼ x 10) won’t fit 150-140 HP setups. These need RHCJJJJ10SP setups. Cross-reference your motor’s year, HP rating, and gearcase type before ordering.
Match Propeller Pitch to Your Johnson Motor RPM Range
Your tachometer doesn’t lie. Check that needle at wide-open throttle. It shows if your propeller pitch matches your Johnson’s specs. Or if you’re burning money and risking damage. Every Johnson outboard has a maker-specified WOT (wide-open throttle) RPM range. Hit below it? You’re lugging the engine. Exceed it? You’re over-revving. Both cut engine life short.
The RPM sweet spot sits at the midpoint of your range. A 50 HP Johnson (1975-2005) runs 4500-5500 RPM at WOT with a 2.42 gear ratio. Your target: 5000 RPM. Test your current setup. Floor the throttle in calm water with your normal load. Check the tach. Reading 4200 RPM? Your pitch is too high—drop 2 inches. Seeing 5800 RPM? Pitch is too low—add 2 inches. Each 1-inch pitch change moves RPM about 200-300 in the opposite direction.
Different Johnson models need different targets. Small motors run higher RPMs. A 6 HP 4-stroke (1997-2003) wants 5500-6500 RPM—aim for 6000. A 2 HP (all years) operates at 4000-5000 RPM with its 1.85 gear ratio. Targeting 4500 keeps it happy. Mid-range 4-strokes vary. The 40 HP 4-stroke (1999-2005) with 2.27 gearing targets 5500 RPM within its 5200-5800 range. The 50 HP 4-stroke version runs hotter: 5900-6500 RPM range, shoot for 6200.
Big V6 motors need precision. A 150 HP OceanPro (2003-2006) with 1.86 gearing operates at 4500-5500 RPM. That’s a tight 1000 RPM window. Missing the 5000 RPM midpoint by 500 RPM either direction creates problems. The 140 HP 4-stroke (2003-2005) runs 5600-6200 RPM at 2.38 gearing. Target 5900. These large motors cost more to repair if you run them wrong.
Test with real conditions. Load your boat with typical gear, fuel, and passengers. Run in the water you use most. Choppy conditions affect readings. The tach should hit midpoint RPM at three-quarter to full throttle with normal load. That’s how you know your prop choice works. Anything else means you’re leaving performance on the table.
Select Propeller Size Based on Boat Type and Usage
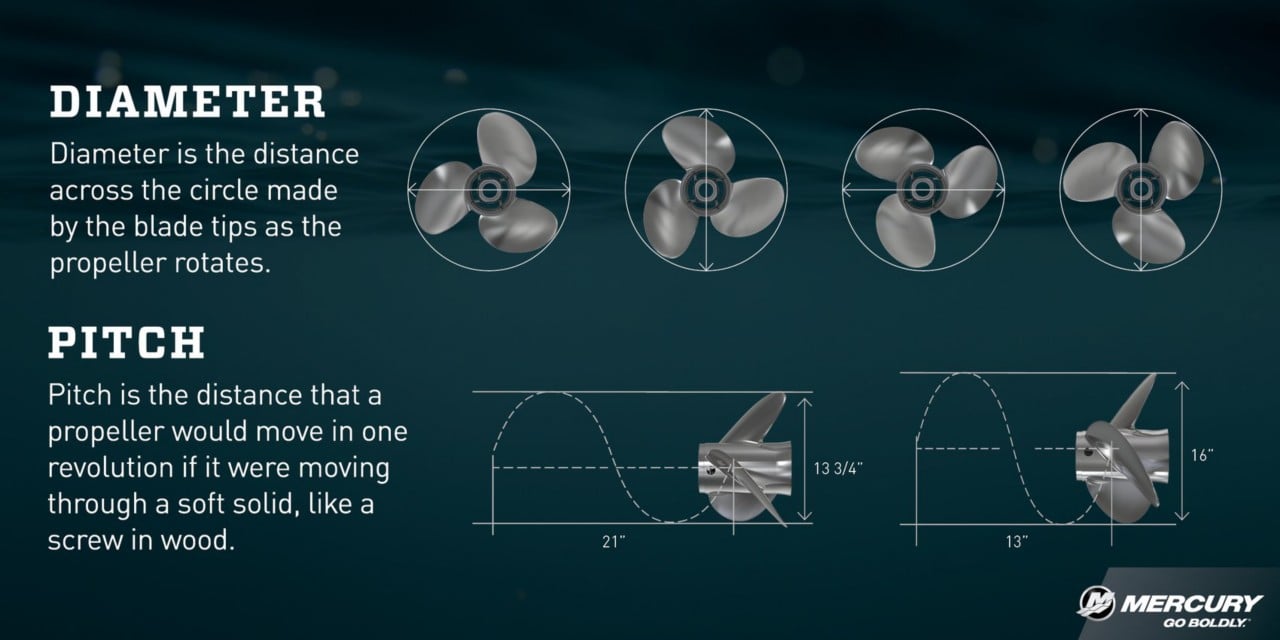
Your boat’s job determines the propeller it needs. A 24-ft pontoon loaded with fishing gear demands different thrust than a 19-ft bass boat built for speed. Propeller sizing uses three inputs: your boat’s weight (in pounds or tons), waterline length, and your Johnson motor’s horsepower. These numbers show you if you need a prop built for power or one designed for speed.
Diameter sizing follows boat weight and speed targets. Heavy hulls—think 26-ft cabin cruisers or loaded pontoons—need larger diameter props up to 20 inches. More blade area means more thrust to push weight through water. Light, fast boats (under 2,000 lbs) run best with smaller 13-16 inch diameters. Less diameter means less drag at top speed. The MerCruiser Bravo Two sterndrive uses oversized props for this reason. Johnson outboards work the same way. A 150 HP motor pushing a 3,500-lb walleye boat gets a 15½-inch diameter. That same motor on a 1,800-lb tournament bass boat drops to 14½ inches.
Pitch selection splits on your primary use. Maximum speed boats want small diameter with maximum pitch—say 14 x 21. You sacrifice hole shot for top end. Waterskiing or wakeboarding setups flip this: go with lower pitch like 13 x 15 for quick acceleration out of the hole. The gap between 19-inch and 21-inch pitch (same diameter) changes your boat’s feel. The 21-inch pitch delivers 2-3 MPH more at the top end with identical RPM. But you’ll wait longer to get on plane. Fishing boats pulling heavy loads? Pick large diameter over high pitch. A 15 x 17 moves weight better than a 14 x 19.
Pitch-to-diameter ratios reveal your boat’s mission. Tugboat-style work (heavy loads, slow speeds) runs ratios around 0.6. High-speed boats push ratios up to 2.0. Most Johnson-powered fishing and weekend boats sit between 1.2-1.5. Calculate yours: divide pitch by diameter. A 13 x 17 prop = 1.31 ratio. Perfect for all-around use. A race setup at 14 x 21 = 1.5 ratio. Built for speed.
Blade count matters for specific tasks. Stick with 3-blade props for pure speed and best hole shot on boats. Your Johnson’s standard 3-blade design does both well. Switch to 4-blade for heavy loads, smoother handling in rough water, or better fuel use at cruise speeds. The extra blade improves bite and reduces slip. Pontoons, houseboats, and fishing boats with LiveWells full of water run 4-blade props. Racing boats never do.
Adjust your prop choice using the 200-RPM rule. Test your current setup at WOT with normal load. Count the RPM gap from your target midpoint. Divide that gap by 200. The answer tells you how many pitch inches to change. Running 800 RPM below target? Drop 4 inches of pitch (800 ÷ 200 = 4). Reading 400 RPM high? Add 2 inches. This works because each pitch inch moves RPM about 200-300 in the opposite direction.
Verify clearance before you buy. Merchant vessel standards call for 20% of prop diameter between blade tips and hull (15% minimum). Your Johnson outboard keeps this clearance with factory-matched props. Custom or oversized props? Measure twice. Poor tip clearance creates vibration and cuts efficiency. Forward skeg clearance needs 30% of diameter. Ignore these margins and you’ll feel it in the helm.
Choose the Right Propeller Blade Design for Performance Goals

Blade design makes the difference between average and great performance. The curves, edges, and surface shapes on your Johnson propeller decide how it cuts through water. They also control how much power you waste fighting cavitation and drag.
Cupped blade edges create bite without pitch changes. That curved lip on the blade’s trailing edge (the cup) holds water better during acceleration. Johnson’s standard cup design adds about 1 inch of effective pitch. You avoid the downsides of going up a pitch size. You get stronger hole shot performance. Plus, better grip in turns. The boat planes faster with less bow rise. Expect to gain 200-300 RPM at WOT compared to flat-edge blades at the same pitch. You’re borderline on your RPM range? Cup gives you the grab you need. It keeps you above your motor’s optimal range.
Aggressive cup designs change specific uses. Johnson’s RHC (Reverse Hook Cup) technology pushes the curve further. These blades have pronounced trailing-edge hooks. They deliver up to 200% more reverse thrust. Picture a houseboat owner docking a 28-ft pontoon in crosswinds. The difference is instant. Standard blades slip and slide. RHC props bite hard in reverse. You get precise control. The trade-off? You sacrifice 1-2 MPH at top speed. The aggressive cup creates more drag. Worth it for workboats, pontoons, and boats that need low-speed handling over pure speed.
Blade rake angle affects how water flows off. Rake measures the blade angle relative to the propeller hub. Positive rake tilts the blade backward (toward the boat). Most Johnson props run 10-15 degrees of positive rake. Increase rake to 18-20 degrees. You lift the bow. You reduce ventilation in choppy water. Top speed improves by 1-2 MPH. But you’ll lose some acceleration. Boats that porpoise or run bow-high benefit from added rake. Bass boats running skinny water? Stick with standard rake for better hole shot.
Blade thickness ratio controls strength versus efficiency. Marine propeller research shows how thickness-to-chord ratios balance structure against drag. Thicker blades (8-10% ratio) survive rock strikes and heavy loading. Essential for aluminum props on fishing boats hitting stumps. Thin blades (4-6% ratio) slip through water with less resistance. This boosts efficiency 3-5% and adds 1 MPH top speed. Stainless steel allows thinner profiles. The material handles stress better than aluminum. That’s why stainless props outperform aluminum at the same dimensions.
Blade count changes your entire performance curve. Three blades excel at pure speed and quick planing. The reduced blade area (expanded area ratio of 0.45-0.55) creates less drag. Four-blade designs jump to 0.65-0.75 expanded area ratios. More surface area means better grip at low speeds. You get smoother operation. Fuel economy improves at cruise. Vibration drops. Real-world testing on container ship propellers shows that 4-5 blade setups with expanded area ratios of 0.740 maintain efficiency. They handle higher thrust loads too. Your 22-ft fishing boat loaded with gear and passengers? Four blades plane it faster. They run quieter than three blades at the same pitch.
Leading-edge design prevents cavitation damage. Sharp leading edges cut water clean but cavitate (form vapor bubbles) under high load. This creates noise and blade erosion. Rounded leading edges delay cavitation and handle rough water better. Johnson’s performance props use balanced leading-edge profiles. High-speed setups get sharper edges for reduced drag. Heavy-load setups get blunted edges for cavitation resistance. Check your blade faces yearly. Pitting or erosion near the leading edge means you’re cavitating. Drop one pitch size to reduce blade loading.
Surface finish impacts efficiency more than most think. A smooth, polished blade surface reduces drag. It can improve efficiency by 2-3% compared to rough finishes. Stainless steel holds a polish. Aluminum oxidizes and pits. Clean your prop each month in saltwater. Remove barnacles and growth right away. Even minor surface roughness kills top-end speed. Tournament anglers polish stainless props with 2000-grit wet sandpaper before events. The difference shows on GPS speed readings.
Match blade design to your main goal. Need maximum speed? Choose 3-blade stainless with moderate cup and high rake. Want better load handling and smooth cruising? Go 4-blade aluminum with aggressive cup and standard rake. Your blade design choice delivers the final 10-15% of performance gains. This comes after you’ve nailed diameter and pitch.
Test and Optimize Engine Mounting Height with Your Propeller
Engine height changes how your propeller performs. Most boat owners never touch this adjustment after the dealer sets it. That’s leaving 3-5 MPH and real fuel savings on the table.
Start with the cavitation plate. This flat horizontal surface sits just above your Johnson’s propeller. The factory rule puts it level with your boat’s keel or a bit above the water flow around the gearcase. That’s your baseline. But it’s not always optimal for your specific hull and prop setup.
Hull design sets your starting point. Deep-V hulls with 24-degree deadrise angles need the cavitation plate level with the keel. The sharp entry cuts water well at this height. Tunnel hulls (common on bass boats) run different geometry. Set the cavitation plate 2.5 inches above the extended keel line. The tunnel creates lift. You need height to get the most from it.
Work in half-inch steps. Raise your motor’s mounting holes one notch. Test it. Record five numbers: top speed, time to plane, RPM at wide-open throttle, fuel use at 25 MPH cruise, and water pressure at WOT. Change nothing else. Run the same course in similar conditions. Compare the data.
Here’s what testing shows. A February 2022 baseline test with standard mounting height and a 19-pitch 3-blade aluminum prop gave 42 MPH top speed, 5.8 seconds to plane, 3.2 MPG at cruise, and 18 PSI water pressure at WOT. One month later, raising the motor just 1 inch gave 44.5 MPH (+2.5), 5.2 seconds to plane (-0.6), 3.5 MPG (+0.3), and 16 PSI water pressure. Same boat. Same prop. Same engine. Just height.
Propeller type changes your optimal height. Standard aluminum props work best level or a bit above the hull bottom. Switch to cupped stainless steel? Add three-quarters of an inch higher than where aluminum worked. The aggressive cup design needs that extra height to stop ventilation in turns. Four-blade props need even more space. Raise them 1 full inch above where your 3-blade ran smooth.
The same boat pushed to 1.5 inches total height gain with a 19-pitch cupped stainless prop hit 47 MPH—a 5 MPH jump from baseline. Time to plane dropped to 4.8 seconds. Cruise economy climbed to 3.7 MPG. Water pressure fell to 14 PSI. WOT RPM settled at 5800—dead center of the optimal range. Bonus: the porpoising problem went away.
Watch your water pressure gauge. It tells you when you’ve gone too far. Pressure drops below 12 PSI? Your water pump intake sits too high. You’re risking overheating. Back down half an inch. Pressure stays above 20 PSI? You’re running too low. Drag from the submerged gearcase steals speed and burns extra fuel.
Multiple engines need precise matching. Twin or triple Johnson setups need mounting heights within one-quarter inch of each other. One test case showed an eighth-inch mismatch on the starboard engine caused constant ventilation in turns. Matching the heights fixed it right away. Test each engine alone at WOT. Then test them together. The combined thrust can show height issues that solo runs hide.
Document everything. Write down the date, height setting, prop specs, sea conditions, fuel load, and all five performance numbers. After four to six test sessions, the pattern becomes clear. You’ll see where your setup peaks. Most Johnson-powered boats find their sweet spot half an inch to one inch above the factory setting.
Higher mounting cuts underwater drag during cruise. That’s why economy improves. But push too high and you risk ventilation during hard acceleration or tight turns. The propeller sucks air instead of biting water. Find the edge. Then back off a quarter-inch for safety margin.
Verify Johnson Propeller Compatibility and Part Numbers
Part numbers matter more than you think. Order the wrong propeller for your Johnson motor and you’re stuck with a $300 paperweight that won’t even bolt on. The serial number stamped on your engine’s transom mounting bracket holds the key to compatibility. Find that metal tag. It sits on the swivel bracket or the transom clamp. Write down three things: the year, the model number, and the full serial number. You’ll need all three.
Johnson’s model number system uses letter codes. These letters tell you what features your engine has. A “C” after the horsepower rating means counter-rotation (left-hand propeller). An “S” marks saltwater-approved models. “DP” shows E-TEC technology with power trim and tilt. “J” means jet drive (no propeller at all). Miss these codes and you’ll order the wrong rotation or hub system. A right-hand prop on a counter-rotation engine spins backward. You go nowhere.
Shaft length decides which props fit. The letter after your model’s design codes shows shaft length. Short shaft motors (15 inches) take different props than long shaft (20 inches) or extra-long shaft (25 inches) versions. The propeller sits at different depths. Hub systems change. A 1973 85 HP V4 with short shaft uses different hardware than the same horsepower in long shaft setup.
Match your propeller specs to factory recommendations. A 140 HP V4 Johnson (1991-1995) takes a 14.6 x 23P RH stainless steel prop with Q4 hub. The part number is 48-8M0103531 or 48-8M0103533. But you can’t just install it. You need the correct Flo-Torq II hub kit. Models from 1991 and newer (non E-TEC G2) require kit 835265Q02. Engines from 1990 and older need 835267Q1. The 2014+ E-TEC G2 motors (200-300 HP) use hub kit 8M0107220 instead. Wrong hub kit? The prop won’t stay on the shaft.
Use digital prop selector tools to avoid mistakes. The Mercury Prop Selector works across brands—Mercury, Evinrude, Johnson, Volvo, Yamaha, Nissan, Honda, Suzuki, and Tohatsu. Enter your engine specs. It filters compatible options. The Solas Prop Finder tool searches two ways: by your original propeller model number or by engine make and model. Both tools stop you from ordering props with wrong spline counts, hub systems, or shaft diameters.
Cross-check swappable hub systems. Johnson props work with quick-swap systems like Solas Rubex, Flo-Torq, and Vortex. These systems let you change props in minutes without tools. But verify your engine’s hub type first. A Flo-Torq II system won’t work on motors built for older Flo-Torq I hubs. Check your owner’s manual. It lists compatible swap systems by year and model.
Your owner’s manual has key installation specs. You need exact torque values for the propeller shaft nut. Over-torque it and you damage threads. Under-torque it and the prop walks off the shaft at speed. Some setups need thrust washers, spacers, or tab washers in set positions. The manual shows the order. It also lists which engines need cotter pins versus locking tabs to hold the shaft nut. Skip these details and you risk losing a propeller mid-run.
Grease the propeller shaft before every install. This stops corrosion and galvanic seizure in saltwater. The taper on your thrust washer must mate with the shaft taper. Clean both surfaces. Use marine-grade waterproof grease. Slide the propeller on. Install spacers if needed. Torque the nut to spec. Bend the tab washer or insert the cotter pin. Check everything twice. A loose propeller destroys your lower unit in seconds.
Install Your New Johnson Propeller the Right Way
Grease saves your lower unit. Coat the entire propeller shaft with Triple-Guard marine grease first. This stops galvanic corrosion in saltwater. It also keeps the propeller from seizing on the shaft. Skip this step? You’ll need a propeller puller—or worse, a machine shop—to remove it next season.
Shift to neutral and kill the power. Turn your key switch off. Pull every spark plug lead. You don’t want the engine firing while your hand sits near spinning blades. One bump of the ignition can cost you fingers.
The thrust bushing goes on first. This key piece sits between your propeller and the gearcase. The shoulder faces aft (toward the back of the boat). The tapered end must match your propshaft taper. Slide it on until it seats flush. No thrust bushing? You’ll destroy both the propeller hub and your engine’s drive parts in one hard reverse.
Align the splines and push. Johnson motors use different spline counts. You’ll find 10-tooth, 13-tooth, or 14-tooth depending on your model. Line up the propeller’s internal splines with the shaft splines. Push until the propeller seats against the thrust bushing. It should slide on easy. Forcing it? That means misaligned splines or debris on the shaft.
Hardware order depends on your setup. Two types exist. Models with a cotter pin “keeper” use this order: thrust bushing → spacer → propeller nut → cotter pin → keeper. Models without the keeper run: thrust bushing → spacer → cotter pin → propeller nut. Check your parts bag or owner’s manual to see which system you have.
Torque matters more than you think. Wedge a wood block between a propeller blade and the anti-ventilation plate to stop rotation. Install the propeller nut hand-tight first. Then grab your torque wrench. Models with the keeper need 70-80 ft-lbs (95-109 N·m). Models without it need just 120-144 in-lbs (13.6-16.3 N·m)—that’s a huge difference. Over-torque the keeper-less setup? You’ll strip threads. Under-torque the keeper setup? The propeller walks off at speed.
The cotter pin holes must align on their own. For keeper-less systems, tighten the nut until the cotter pin holes in the shaft and nut line up. Never loosen the nut to get alignment. Holes don’t match? Keep tightening past hand-tight until they do. Then insert a new cotter pin—never reuse old ones—through both holes. Bend both ends over the nut to lock it.
Test the setup before launching. Spin the propeller by hand with the motor in neutral. It should rotate without binding. Watch for wobble. Good rotation means you installed it right. Wobbling means a bent shaft or a hub that didn’t seat right. Fix it now, not after you’re on the water.
Turning Point hub kits need an extra spacer. Running aftermarket systems like Flo-Torq II? Add prop nut spacer #12050 plus a flat washer before threading on the propeller nut. This keeps proper spacing. It also stops hub damage during use.
Diagnose Common Propeller Problems and Solutions
Your propeller sends signals when trouble hits. Watch for these clues: vibration through the steering wheel, grinding noise at startup, slower acceleration than last season, or RPMs that climb while speed stays flat. Each symptom points to specific damage. Spot it and fix it before engine repairs pile up.
Identify Physical Damage Through Touch and Sight
Run your hand along each blade edge. Feel for nicks and rough spots. Tiny dings smaller than a dime create turbulence. This kills top speed by 2-3 MPH. Check every inch of blade surface for cracks. They start small near the hub. Under load, they spread toward the tips. The FAA reports most prop failures happen at blade tips. This occurs within inches of the edge. Your Johnson prop follows this same pattern.
Measure blade tracking next. Park the boat. Put the motor in neutral. Mark one blade tip with tape. Spin the prop and measure the distance from blade tip to the lower unit at the same point for all blades. Variance beyond 0.010-0.015 inches means bent blades. You’ll feel vibration above 25 MPH with that much difference. Bent blades from hitting stumps or dock pilings don’t bend back true. Replacement beats repair.
Decode Vibration Patterns and Their Causes
Vibration that starts at 15 MPH and gets worse tells one story. Vibration at top speed tells another. Low-speed vibration (under 20 MPH) points to bent blades or loose hub parts. Check your propeller nut torque first. It loosens over time from constant rotation. Retorque to 70-80 ft-lbs with the keeper system. Without it, use 120-144 in-lbs.
High-speed vibration (above 35 MPH) means blade imbalance. Remove the prop and do a spin test. Balance it on a shaft through the center hole. The heavy side drops. Imbalance over 0.5 oz-inch creates shake you can feel. Professional prop shops fix this with precision grinding. Skip the DIY fixes with grinders. You’ll make it worse.
Vibration changes with trim angle? That’s cavitation. Your prop releases water vapor bubbles under the blades. Mounting height sits too low or pitch exceeds what your motor can handle at load. Raise the motor half an inch and test again. Still seeing cavitation? Drop one pitch size.
Spot Cavitation and Ventilation Damage
Cavitation leaves marks you can see. Flip your prop over. Examine the blade faces under bright light. Look for small pits or eroded spots near the leading edges. These crater-like marks show where vapor bubbles collapsed and ate metal. Aluminum props show this damage faster than stainless. Catch it by inspecting each month in heavy-use seasons.
Ventilation damage looks different. The blade edges show rounded wear patterns instead of sharp definition. Your prop sucks air during hard acceleration or tight turns. The blades spin without biting water. You hear RPMs spike but speed stays flat. Fix this by lowering your engine mounting. Or switch to a four-blade design with better grip.
Fix Common Performance Problems with Simple Changes
RPMs too high at wide-open throttle? You’re over-revved. The current pitch is too low for your motor and load. Add 2 inches of pitch. This brings RPMs down 400-600. A 15-pitch prop becomes a 17-pitch. Test and verify your tach reads mid-range at WOT.
RPMs too low? You’re lugging the engine. Drop 2 inches of pitch. Each inch change moves RPMs about 200-300 in the opposite direction. Keep adjusting until you hit your Johnson’s specified RPM range. Running outside that range damages bearings and seals over time.
Slow hole shot but good top speed? You need more blade area or aggressive cup. Switch from a three-blade to four-blade prop at the same pitch. Or add a cupped design. These changes improve water bite during acceleration. You keep the top end you already have.
Replace Props with Specific Damage Thresholds
Small nicks under 1/16 inch deep? File them smooth with a metal file and keep running. Dings deeper than 1/16 inch compromise blade strength. Replace the prop. Cracks anywhere mean immediate replacement. This includes hub, blade root, or tip. Cracks grow fast under load. They lead to failure at speed.
Bent blades beyond 0.010 inches need replacement too. Repair shops can straighten aluminum props within limits. But straightened blades never perform like new ones. They fatigue faster. The $180 you save on repair versus the $250 replacement costs you speed. Plus fuel efficiency and safety margin. Stainless steel props bent beyond 0.005 inches can’t be trusted after repair. The material work-hardens. It becomes brittle.
Hub cracks or spline wear show up as play. Wiggle the installed prop side-to-side. You shouldn’t feel movement at the hub. Any play means worn splines or a damaged hub system. Replace both the prop and hub kit together. Running with hub damage destroys your propshaft in hours.
Maximize Fuel Efficiency and Performance with Proper Propeller Selection
A mismatched propeller throws away 40% of your engine’s output. That’s not a typo. Half your horsepower fights inefficiency instead of moving your boat forward. The fix isn’t a new motor. Pick the right prop for your specific setup.
Advanced propeller designs prove the gains are real. Sharrow propellers deliver 10-30% fuel savings at 2,500-4,000 RPMs. They plane at 1,000 RPMs lower than standard props. A 57-foot motoryacht running CNC-machined stainless props saw 8-10% annual fuel reduction. Top speed increased 0.6 knots. Vibration at max RPM dropped 25%. These numbers come from switching props on identical boats. Same engines, different props.
CJR Class S CNC props reduce engine load up to 3% at the same RPM. Fuel burn drops up to 10%. Top speed climbs up to 2 knots. Vibration falls up to 50% compared to hand-finished Class 1 props. Precision manufacturing makes the difference. CNC tolerances stay within 0.001 inches. Hand-finished props vary by 0.010 inches or more.
Real-world testing shows clear patterns. A Gause Built 26-footer with Mercury V10 350/400 HP motors got faster acceleration with Sharrow X10 props. Range increased too. A Jupiter 43 SF running Sharrow MX props hit faster mid-range speeds. Plus added range and less slip. An Axopar 28 Cabin with Mercury 300 HP ran 8.3 MPH faster at 3,500 RPM. At slow and no-wake speeds, fuel use dropped 65%.
Optimized propellers peak around 0.8 efficiency. That means 80% of your engine power converts to thrust. Standard props run 0.5-0.6 efficiency. The gap represents wasted fuel and lost performance. Stainless steel delivers steady thrust. Aluminum flexes. One case study showed 8-10% fuel savings from the material switch alone. Same diameter, same pitch, just different metal.
Your goal determines which adjustment to make. Use this decision matrix:
|
Goal |
Current Problem |
Action |
|---|---|---|
|
Acceleration/towing |
Slow hole-shot |
Decrease pitch 1-2 inches |
|
Fuel economy (long runs) |
High RPMs at cruise |
Increase pitch 1 inch; test WOT |
|
Heavy loads |
Engine lugs, won’t plane |
Increase diameter or decrease pitch |
|
Top speed |
Low top end |
Increase pitch 1 inch |
|
Reduce vibration |
Rough at speed |
Inspect damage, balance prop |
Adjust pitch in 1-inch increments. Test your WOT RPM after each change. High pitch works for long offshore runs. Watch for lugging though. Mid pitch balances planing and cruise for mixed use. Low pitch improves hole-shot. Better for towing or quick acceleration. Each inch of pitch change moves RPM about 200-300 in the opposite direction.
Damage kills efficiency fast. Bent tips and chewed edges increase drag. Vibration goes up. Fuel burn rises. Prop reconditioning restores economy. Vibration disappears. MIT and Hymar tests on Autoprop designs showed best efficiency at high advance coefficients. Midrange performance led in Hymar trials. The lesson: match your prop design to your typical operating speeds.
Conclusion
Getting the right Johnson boat motor propeller isn’t about guessing. You need to understand how pitch, diameter, blade design, and material work together. This unlocks your boat’s true potential. Chasing top speed? Want better fuel economy? Need faster acceleration for watersports? The specs you pick affect every moment on the water.
Start by testing your current setup’s RPM performance. Then adjust one variable at a time. Here’s what matters: a stainless steel propeller with the correct pitch beats an aluminum prop every time. That extra investment pays off in durability and efficiency. Propeller hub systems and mounting height might seem like small details. But they make the difference between adequate performance and an optimized rig.
Ready to upgrade? Cross-reference your Johnson Evinrude propeller compatibility requirements. Verify your shaft size. Choose based on your primary boating activity. The perfect propeller transforms your entire boating experience. You get smoother acceleration. You get better fuel economy. Plus, you get the confidence that comes from knowing your motor runs as engineered. Your Johnson deserves nothing less.