
Every RC boat fan hits this wall: your boat looks fast and sounds strong, but the speed doesn’t match. Here’s what most people learn too late—your propeller cuts your boat’s power by 15-30%.
I’ve tested hundreds of high-speed RC boat propellers over the years. The gap between a basic prop and a tuned one? Huge.
The good news? You don’t need engineering skills or tons of money for testing.
Chasing lap records? Tired of other boats passing you? This guide shows you the exact propeller tuning methods pro racers use. You’ll learn to pick the right pitch-to-diameter ratio for your motor. You’ll discover blade changes that stop cavitation.
You’ll find out what’s really slowing your boat down. (Hint: it’s not what you think.) You’ll get a clear plan to unlock those extra mph your rig can deliver.
RC Boat Propeller Speed – The Basics
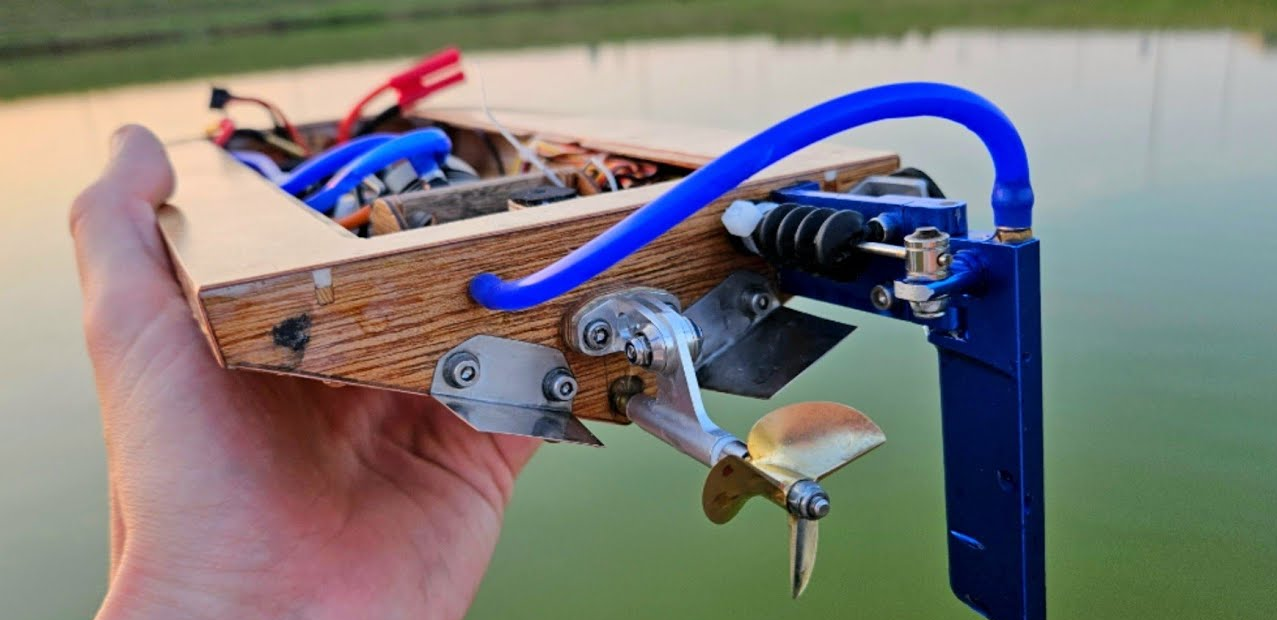
Speed depends on three numbers: diameter, pitch, and RPM. Get these right, and you control how fast your boat can go.
The speed formula is simple:
Speed (mph) = (RPM × Pitch) ÷ 1056
A 40-inch pitch prop spinning at 6,000 RPM? That’s 227 mph on paper. Your real speed? Maybe 180 mph if you’re lucky. That gap is prop slip—the difference between theory and reality.
The Slip Reality Check
Calculate your slip percentage:
Slip = 1 – (Actual Speed ÷ Theoretical Speed)
Why does this matter? High-performance props run 10-15% slip. Bad prop matches hit 30-40%. That’s wasted motor power. Your motor spins water instead of moving your hull.
RPM: Your Starting Point
Your motor’s KV rating sets base RPM. Take KV times voltage—use 3.9V per cell under load, not the battery’s full voltage. Got a 1000KV motor on 6S (22.2V nominal)? You’re looking at about 8,580 RPM at the prop shaft.
Blade count changes exit speed big time:
– 2-blade props: 1.4× efficiency factor
– 3-blade props: 1.6× efficiency factor
– 4-blade props: 1.7× efficiency factor
More blades give better thrust at lower speeds. Fewer blades win at top speed. Speed boats run 2-blade setups for this exact reason.
Find Out What’s Limiting Your Propeller
Your propeller shows you what’s wrong—if you measure the right things. Skip the guesswork. Run these three tests and you’ll know where your speed’s bleeding away.
The Static Thrust Test
Mount your boat so it won’t move. Run your motor from idle to full throttle in 10% steps. Log thrust readings at each step. You need real numbers, not feelings.
What you’re hunting for:
Thrust should climb as RPM rises. See a plateau or drop before max RPM? That’s your prop hitting its limit. The thrust coefficient (C_T) usually starts around 0.15 at 5,500 RPM. It climbs to 0.18 near 16,000 RPM for small props. Your numbers falling short? Wrong pitch or diameter for your motor’s power band.
A simple load cell gets you there. A 100 kg capacity S-type strain gauge works for most RC boats. Mount it inline with your prop shaft. Record thrust every 1,000 RPM. Plot the curve. The sweet spot lives where thrust peaks before efficiency drops.
The Speed-RPM Gap Test
This one’s honest. Run your boat at full throttle on calm water. Record real speed with GPS. Count RPM with a tachometer (motor pulse reading works fine—just divide by pole pairs).
Calculate theoretical speed: (RPM × Pitch) ÷ 1056
Now the truth: Subtract real from theoretical. That gap? That’s propeller slip. High-performance setups run 10-15% slip. You’re seeing 30%+? Your prop’s churning water instead of grabbing it. Could be cavitation. Could be pitch mismatch. Could be blade design failing at speed.
The Advance Ratio Reality Check
This metric separates fast props from fake speed. Advance ratio (J) equals V divided by (n × D). V is boat speed in feet per second. n is propeller rotation in revolutions per second. D is diameter in feet.
Low J values (under 0.4) mean your prop’s working hard but moving slow. Think tugboat mode. High J values (above 1.2) signal your blades can’t grab enough water at speed. Sweet spot for racing? 0.6 to 0.9. This depends on your hull and motor combo.
Test at different speeds: launch, cruise, and sprint. Watch how J shifts. Props built for one speed range fail at others. That’s why one-size-fits-all props never win races.
Propeller Pitch Optimization for Maximum Speed
Pitch decides whether your motor screams or drives your hull forward. Think of pitch as the distance your prop would travel through a solid medium in one complete rotation. Like a screw threading through wood. In water, you never get that theoretical distance. But the relationship between pitch and your actual speed? That’s where races get won.
The RPM-Pitch Balancing Act
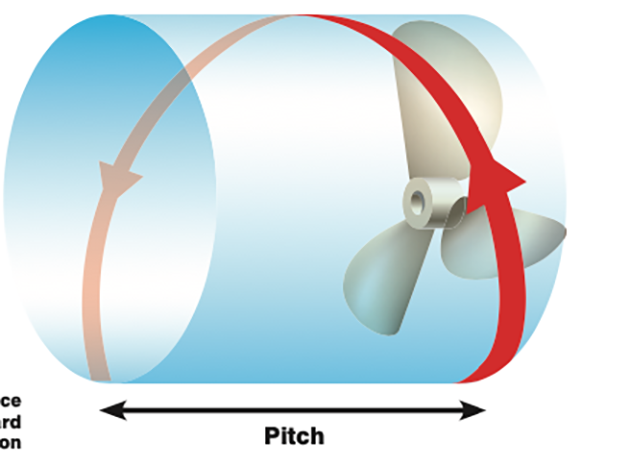
Your motor has a sweet spot—maximum RPM at wide-open throttle (WOT). Hit that number, and you’re extracting every bit of power your motor can deliver. Lower pitch props let your motor reach max RPM. They spin faster, accelerate harder off the line. Higher pitch props slow down your RPM but push more distance per revolution once you’re at speed.
Here’s the target: select a propeller pitch that allows your motor to hit its rated maximum RPM at full throttle. Check your motor’s spec sheet. See 25,000 RPM listed? Your prop should let you reach 24,500-25,000 at WOT on flat water. Running 22,000? Your pitch is too aggressive—you’re lugging the motor. Hitting 28,000? You’ve undersized the load. Your motor’s spinning air.
The 1:1 Pitch-to-Diameter Rule
For high-speed RC boats, aim for a pitch-to-diameter ratio near 1:1. A 40mm diameter prop? Start testing with 40mm pitch. This ratio gives you efficient thrust at speed. Lower ratios (0.8:1) favor acceleration and rough water. Higher ratios (1.2:1) work if your motor has power to spare and your hull cuts clean.
Speed boats running dual props on sterndrives target 12% slip at top RPM. Single prop setups? Expect 15-18% due to hull drag and turbulence. Calculate your slip percentage after every change. Drop from 18% to 14% slip? You get speed gains—same motor, same power draw, more forward motion.
Pitch Changes: Start Small
Pitch adjustments work in tight increments. Jumping from 1.4-inch pitch to 1.7-inch? Too big. You’ll miss the optimal point. Move in 0.1-inch steps for precision props. Test each change under the same conditions. Same battery charge state. Same water. Same weight distribution.
Watch your motor temperature. Oversized pitch loads your motor beyond design limits. Sustained overload? You’re buying new windings. Undersized pitch lets your motor over-rev without resistance. Bearings wear faster. Efficiency drops. The right pitch runs your motor at rated RPM without thermal stress.
The efficiency equation backs this up: η = (T × V_a) ÷ (Q × ω). Thrust times axial speed divided by torque times angular velocity. Maximize that ratio, and you maximize speed for your available power. Every pitch change shifts where peak efficiency lives on your RPM curve.
Propeller Diameter Selection Strategy

Diameter controls how much water your propeller grabs per revolution. The physics is simple: larger diameter means more blade area sweeping through water. This gives you more thrust potential. But there’s a limit—go too big and you’ll overload your motor. Your battery drains in minutes. Your hull digs instead of planing.
Diameter and RPM have an inverse relationship. Add a quarter-inch to your prop diameter? You lose 150 RPM, give or take 50. That RPM drop matters. Your motor needs to spin fast enough to stay efficient. A 3-inch prop at 28,000 RPM might hit the same speed as a 4-inch prop at 21,000 RPM—but the actual performance? Totally different. The larger prop moves more water with less slip. The smaller prop cavitates sooner. It wastes energy.
Match Diameter to Your Motor’s KV
Low KV motors (under 1500) need large diameter props. These motors make high torque at low RPM. They turn big blades without bogging down. Think 40mm+ diameters paired with moderate pitch. High KV motors (3000+) need smaller diameters—28mm to 35mm range. They lack the torque to swing large props well. Force a high KV motor to turn a 50mm prop and you get heat, not speed.
Start with this baseline: prop diameter should use about 80-90% of your motor’s available torque at target RPM. Any less? You’re leaving thrust on the table. Any more? Your motor lugs. Temperatures spike. You risk permanent magnet damage.
Hull Clearance Sets Your Upper Limit
Your boat’s hull and running gear define maximum usable diameter. Measure from prop shaft centerline to hull bottom. You need at least 3-4mm clearance at full compression if you’re running struts. Rudders, trim tabs, pickle forks—they all eat into available space. A 45mm prop that fits great at rest might strike the hull at speed. It can also hit during wakes.
For speed-specific hull selection: narrow, deep-V hulls handle smaller diameters better (32-38mm). Wide, flat hulls with more displacement? They work best with 40-48mm diameters. These generate thrust across a broader blade area. The hull’s running attitude changes what diameter works. A boat that runs nose-high needs different diameter specs than one running flat.
Test diameter changes in 2mm increments. The gap between 38mm and 40mm can shift your thrust-to-weight ratio. It can move you into or out of optimal range.
Blade Count and Design Considerations
Two blades or three? This choice affects your prop’s entire performance. Your blade count decides one thing: explosive acceleration or maximum speed. You can’t have both with one prop.
Blade loading versus efficiency—that’s the core trade-off. Two-blade props move less water per spin. Each blade handles more load. This means less drag at high RPM. Your motor spins faster. You hit higher speeds. Three-blade props spread thrust over more area. Each blade does less work. You get smoother power and better grip in rough water. But you lose 3-5% of top speed.
The Efficiency Math Behind Blade Count
Blade efficiency follows a simple pattern. Two-blade setups run at 1.4× efficiency in clean water. Three-blade props hit 1.6× efficiency. Four-blade designs reach 1.7×. But that extra blade adds weight and drag. Speed dies in RC boats.
For pure speed runs: use two blades. Less surface touches the water. Form drag drops. Races get won here. Test data proves it. Two-blade props hold thrust values near 0.18 at 16,000 RPM. Three-blade props max out around 0.16 at the same speed. That 11% gap shows up as mph on your GPS.
For acceleration and handling: three blades win. The extra blade gives 40% more surface grabbing water during punch-outs. Your boat planes faster. It corners harder. The prop won’t break loose. Competition hydro drivers pick three-blade props for technical courses. They need instant thrust response. The last 4 mph of straight speed? They don’t need it.
Check your blade thickness too. Thin blades (2-3mm) slice through water with less drag. They flex under load though. Thick blades (4-5mm) fight flex and cavitation. But they make turbulence. Speed drops above 50 mph.
Material Upgrade for High-RPM Performance
Plastic props fail above 25,000 RPM. The centrifugal forces tear blade tips apart. You’ll see cracks forming at the hub where stress builds up. Push hard enough? Your prop explodes mid-run.
Carbon fiber changes everything at high RPM. The material handles 30,000+ RPM without flexing. Blade tips stay rigid under load. You get consistent pitch angles across the entire RPM range. Plastic props twist 2-3 degrees at peak speed. That’s wasted thrust turning into heat and vibration.
Metal props (stainless steel, aluminum) sit between plastic and carbon. Stainless works for 18,000-22,000 RPM uses. But the weight kills acceleration. A 40mm stainless prop weighs 28 grams. The same size in carbon? 12 grams. That difference in spinning mass means slower spool-up times.
The RPM-Material Matrix
Under 15,000 RPM: High-grade nylon props work fine. They’re cheap ($8-15). Easy to replace after impacts.
15,000-25,000 RPM: Go with reinforced composite or basic carbon fiber. You need the stiffness. Blade flex at this speed costs 5-8% efficiency.
Above 25,000 RPM: Full carbon fiber construction is a must. The centrifugal forces demand it. Racing-grade carbon props run $45-120 depending on size and layup quality.
Test data from high-RPM milling spindles backs this up. Aluminum cutting at 18,336 RPM versus plastics at 27,504 RPM. The material sets your safe operating speed. Your prop faces the same physics. Match material strength to your motor’s RPM ceiling. Go lower? You’re risking equipment damage and lost performance.
Balancing Pitch and Diameter for Your Setup
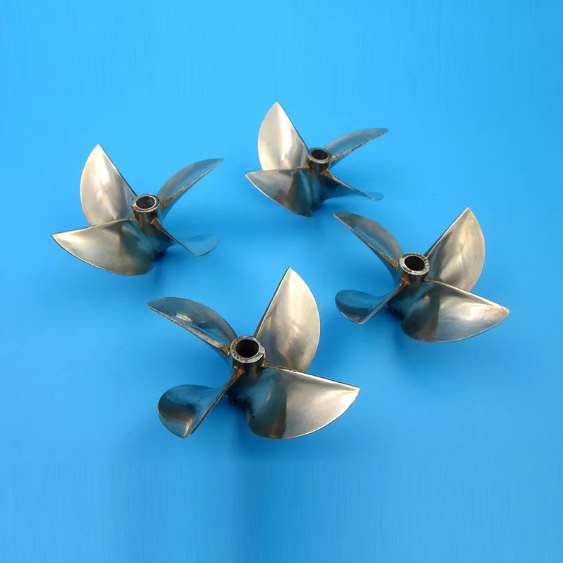
Your prop’s pitch and diameter work together like gears in a transmission. Change one without adjusting the other? You break the balance. Your motor either screams without load or bogs down under stress.
The load distribution principle applies to propellers. A 40mm diameter prop with 50mm pitch creates uneven stress on your motor. The pitch demands more torque than the diameter can deliver. Result? Your motor heats up. Efficiency drops 20-25%. You’re fighting physics instead of using it.
Start With Your Motor’s Torque Curve
Pull your motor’s spec sheet. Find the RPM where it makes peak torque. That’s your target operating range. Now pick diameter first—match it to your motor’s KV and hull clearance limits. A 1800KV motor on 6S needs 38-42mm diameter range. Higher KV motors (2800+) work best with 32-36mm.
Once diameter is locked, pitch follows a formula: Your motor should hit 95-98% of its max rated RPM at full throttle. Test with a baseline 1:1 pitch-to-diameter ratio. Motor not reaching max RPM? Drop pitch by 2mm increments. Motor over-revving past specs? Add 2mm pitch.
Tolerance matters here like thread manufacturing—precision in 0.5mm steps prevents bad mismatches. Jump from 1.4 to 1.8 pitch ratio in one move? You’ll waste three test sessions finding the sweet spot you skipped over.
Hull drag and weight shift this balance too. Heavy boats need more diameter, less pitch. Light hulls want aggressive pitch with moderate diameter. Test. Log your data. Consistent measurement shows you the right combination. Guessing won’t.
Step-by-Step Propeller Optimization Process
Grab a notebook. You’re about to test your way to faster speeds with a system that removes guesswork.
Step 1: Baseline Your Current Setup
Mount your boat on a test stand. Run your motor through its full RPM range. Log three numbers: actual RPM, thrust output, and motor temperature. Use a load cell connected to your prop shaft—a 100 kg S-type strain gauge handles most RC boats. Record readings every 1,000 RPM from idle to wide-open throttle.
Calculate your theoretical speed using this formula: (RPM × Pitch) ÷ 1056. Now run your boat on calm water with GPS tracking. The gap between theoretical and actual speed is your slip percentage. Top props run 10-15% slip. Seeing 25% or more? That’s where your speed’s hiding.
Step 2: Test Pitch in 2mm Increments
Start with your current diameter. Change pitch only—move up or down by 2mm. Test each variation under the same conditions. Use the same battery charge state. Use the same water. Keep boat weight the same. Your target: find the pitch that lets your motor hit 95-98% of its rated max RPM at full throttle.
Motor spinning too fast past specs? Add pitch. Motor slowing down below rated RPM? Drop pitch. Track your slip percentage after each change. A drop from 18% to 14% slip means real speed gains without touching your motor or battery.
Step 3: Adjust Diameter for Load Balance
Once pitch is locked, test diameter changes. Move in 2mm steps here too. Larger diameter boosts thrust but drops RPM. Smaller diameter lets your motor spin faster but cuts grip.
Watch your motor’s torque curve. You want your prop diameter using 80-90% of available torque at target RPM. Check motor temperature during long runs. Temps jumping above specs? Your diameter’s too big. Motor running cool with power left over? You can go larger.
Advanced Propeller Modifications
Blade sweep angles separate fun props from racing props. The shape changes how water flows off each blade. A 45-degree swept blade cuts through cavitation zones. These zones destroy straight-blade performance above 40 mph.
Sweep Angle Performance Data
Testing shows swept blades deliver 3% efficiency gains at moderate speeds (35-45 mph, equal to Mach 0.6-0.7 in aircraft testing). Push into the 50+ mph range? That gain jumps to 4% over straight blades. Aircraft propeller research transfers to RC boat use. Swept leading edges delay flow separation. Your blade keeps smooth flow longer. Less turbulence means more thrust per watt.
You need precision machining. You can’t hand-file a proper sweep angle. CNC-cut blades or cast carbon fiber molds give you the consistency needed. Most racing props run 40-50 degree sweeps. This is measured from the radial centerline. Anything less than 35 degrees? You won’t see real gains. Above 55 degrees? The blade root loses strength.
Blade Count Strategy for Speed Classes
Eight blades versus ten? The data settles this debate. Ten-bladed props beat eight-bladed designs by 0.75-1% in the 35-45 mph speed range. Both setups need matched power numbers and advance ratios for fair testing. That percentage seems small until you’re racing. It’s the difference between first and third place.
But ten blades hit a wall above 50 mph. Flow choking between blade passages kills the advantage. You lose 0.5% efficiency compared to eight blades at top speed. Hull class matters here. Nitro hydros running 60+ mph? Stick with six or eight blades. Electric sport cats topping out at 45 mph? Ten blades give you better hole shots and smoother power delivery.
Thickness Taper Specs
Blade thickness controls flex and cavitation resistance. Start thick at the hub—15% thickness-to-chord ratio. This gives strength where spin forces peak. Taper fast toward the tip. Racing props run 2% thickness-to-chord at blade tips. The thin tips slice through water with minimal drag. They shed water spirals clean.
Cheap props run constant 8-10% thickness root to tip. They’re easier to make. They also waste 12-15% of your available thrust at speed. Tapered blades pay back in lap times.
Common Mistakes and How to Avoid Them
Most prop tuning fails happen before you touch the hardware. RC boat racers make the same errors. They chase diameter changes when pitch is the issue. They test without logging data. They copy someone else’s setup without checking if the motor matches.
Testing Without Baseline Numbers
You swap a 38mm prop for a 42mm. Feels faster. But did you measure? Without GPS speed logs and RPM readings from your original setup, you’re guessing. Write down three numbers before any change: top speed, motor RPM at WOT, and slip percentage. Test your new prop under the same conditions. Use the same battery charge level, same water, same weight distribution. Compare the data. A prop that “feels” faster might run 2% slower with 5% more slip.
Ignoring Motor Temperature Limits
Your motor runs hot after a prop change. That’s your hardware telling you the load is wrong. Too much pitch or diameter forces your motor beyond its heat limits. Overheating harms magnets for good. Check motor temps after every 3-minute run. Temps above maker specs mean your prop combo is too much. Drop pitch by 2mm or cut diameter. Speed means nothing if you replace motors every month.
VIF Propellers Product Recommendations

VIF builds props for real-world power ranges. No fantasy spec sheets here. Their lineup covers 4-300HP outboards with sizing that matches what your motor can swing. You want to know the fit? Measure from shaft hole center to blade tip. Double it. That’s your diameter.
Mercury 25-70HP Stainless Steel Series
The 10.25″ x 15″ three-blade stainless ($215-$309.99) handles 40-60HP motors at moderate speeds. You get black finish, 13-spline hub, right-hand rotation. This pitch gives you thrust without stressing smaller blocks. Your motor bogs at WOT with the 15-pitch? Drop to the 10.25″ x 14″ version ($309.99).
The 10 1/2″ x 13″ stainless ($215) fits 25-75HP with thru-hub exhaust. Great for fast acceleration setups. Broader HP range means better adaptation to modified motors. The 10 3/8″ x 14″ (part 48-855860A46, $215) sits in the middle. It fits 25-70HP. Mid-range pitch gives you balanced performance.
Budget Aluminum Options
VIF’s aluminum props use 6061-T6 alloy (Fe≤0.7%, Cu≤0.15%). The 10 5/8″ x 12″ and 10 1/2″ x 13″ models (part 48-73134A45, 48-816704A45) both cost $75. Same 25-70HP fit. Different pitch angles. Start with 13-pitch for speed. Got a heavy hull? You need hole shot power. Switch to 12-pitch.
Yamaha 40-60HP Performance Tier
The 10.25″ x 14/15/16-G stainless (part 663-45978-00-00, $309.99) gives you polished YBS finish. Three pitch options included. Test 14-pitch first. Your motor has RPM headroom? Move up. The 13 1/4″ x 17″ stainless jumps to 2-225HP capacity. You get right and left-hand rotation choices.
VIF’s 17-4PH stainless steel (S/P≤0.03%) beats standard alloys at resisting cavitation damage. Racing hulls running 17-4PH props? They report 180-day blade life. Cheaper stainless only lasts 90 days.
Warranty covers 180 days. Blade fractures get free replacement. Bush slipping gets free replacement. Normal wear doesn’t count. Hit a log? That’s on you.
Troubleshooting Performance Issues
Your prop spins. Your motor runs. But something’s killing your speed, and you can’t pin it down. Here’s how to diagnose what’s broken instead of swapping parts at random.
Track These Three Metrics First
Error patterns matter more than single failures. Log every run for two weeks minimum. Record motor temperature, battery voltage drop, and GPS speed. You need baseline data before you can spot problems. One slow run means nothing. Five runs showing the same 8 mph speed loss at the 30-second mark? That’s a pattern.
Set your alert limits tight: motor temps above 160°F, voltage sag beyond 0.4V per cell under load, speed drops exceeding 12% from baseline. These numbers catch problems before your ESC shuts down mid-run.
The Link Between Symptoms and Root Causes
High motor temperature plus voltage sag means your prop’s overloading the system. CPU usage translates to motor current draw in RC terms. Check your ESC data logs. See current spikes matching your speed drops? Your prop pitch is too aggressive for available torque.
Low speed with normal temps and voltage points elsewhere. Cavitation chews up 15-20% of your thrust without heat symptoms. Pull your prop after each session. Pitting on blade faces near the leading edge confirms it. Blade damage at tips? You’re hitting cavitation speed.
Test One Variable at a Time
Copy the problem in controlled conditions. Same water. Same battery charge state. Same boat weight. Change prop pitch by 2mm. Run three tests back-to-back. Log the results. Speed improved but temps spiked? You found your bottleneck—it’s motor heat limits, not prop design.
The “spray and pray” method wastes money. Buying four different props hoping one works costs $180-240. Testing with measurements costs you nothing but time.
Realistic Performance Expectations
Numbers on a spec sheet tell one story. Real water tells another.
Prop manufacturers claim 25% speed gains from a single upgrade. You’ve seen YouTube videos showing boats hitting 70 mph with “simple modifications.” Here’s what they don’t show: the twelve props that failed before finding the right one. The motor that overheated after three runs. The hull that porpoised so hard it became unflyable.
Set your targets based on physics, not marketing. A good propeller upgrade delivers 8-15% speed improvement over a random stock prop. That’s real. That’s what you can repeat. Want to push beyond 15%? You need to change multiple systems at once. Motor, battery, prop, and hull work together. Single-component swaps won’t get you there.
The Speed Gain Reality Table
Start here before you spend a dollar:
-
Stock prop, no tuning: Baseline (0% gain)
-
Optimized pitch: 5-8% speed increase
-
Pitch + diameter match: 10-12% speed increase
-
Material upgrade (carbon fiber): Additional 3-5% at high RPM
-
Full system optimization: 15-18% total improvement
These percentages assume your motor isn’t maxed out. Got a 2000KV motor on 4S pushing a 42mm prop? You might see 2-3% gains. You’re already close to optimal. Running a 1500KV motor with a generic plastic prop? The 15% target is reachable.
Slip Percentage Targets by Boat Class
Sport boats (30-45 mph): Target 15-18% slip. You’re fighting hull drag and rough water. Anything below 15% means your prop’s too small. Or your pitch is too conservative.
Speed boats (45-60 mph): Aim for 12-15% slip. The hull planes cleaner. Water flow smooths out. Your prop can work better.
Racing boats (60+ mph): World-class setups hit 10-12% slip. You need carbon fiber props. Shafts must align just right. Hulls need designs for minimum wetted surface. This is where the last 2% costs as much as the first 10%.
Never expect single-digit slip in RC boats. Aircraft props running in air hit 5-7% slip. Water is 800 times denser. The physics won’t let you break 10%. Not without exotic materials and precision machining that costs more than most complete boat setups.
Time Investment vs. Gains
Finding your optimal prop takes testing. Budget these time blocks:
Week 1: Baseline testing and data collection (3-4 runs, 20 minutes each)
Week 2-3: Pitch testing in 2mm increments (2 runs per variation, 5-6 props total)
Week 4: Diameter confirmation testing (3-4 variations, 2 runs each)
Week 5: Fine-tuning and validation runs
That’s a month of dedicated testing to nail your setup. Skip steps? You’ll waste money buying the wrong props. Rush the process? You’ll miss the 2mm pitch difference that unlocks the speed you’re chasing.
Your first “perfect” prop won’t be perfect. Water temperature changes performance. Battery age shifts voltage curves. Even small weight changes from new electronics move your optimal point. Race hard? Plan to revisit your prop selection twice a year.
Essential Tools and Equipment
Prop testing requires the right measurement tools. Without them, you’re just guessing—swapping props on hunches instead of real data.
Digital Tachometer ($25-45)
Your motor’s RPM controls everything. A contact or optical tachometer reads your motor’s actual spin rate under load. Cheap units work fine for RC boats. Mount it near your motor. Log RPM at different throttle positions. These numbers help you calculate theoretical speed. They also help match props to your motor’s power band.
GPS Speed Logger ($80-150)
Phone GPS apps don’t work well at high speed. A dedicated GPS unit samples at 10Hz minimum. It captures your actual boat speed within 0.2 mph accuracy. Record every test run. Compare GPS speed against theoretical speed from your RPM readings. That gap shows your prop’s slip percentage. This metric tells you if you’re wasting power or using it well.
Load Cell and Mounting Stand ($45-120)
Static thrust testing requires a 100kg S-type strain gauge. Connect it inline with your prop shaft. Mount your boat secure so it won’t move. Run throttle tests from idle to WOT in 10% steps. The load cell shows thrust output at each RPM point. Plot this data. You’ll see where your current prop stops delivering gains.
Precision Calipers ($15-30)
Measure prop diameter and pitch yourself. Don’t trust manufacturer specs—they’re often 1-2mm off. Digital calipers give you 0.01mm resolution. Check blade thickness at root and tip. Check pitch angle consistency across all blades. These measurements matter during multi-prop testing to find the best one.
Conclusion
Your RC boat’s top speed isn’t set in stone. You can unlock it through smart propeller optimization. Chasing that extra 5 mph in weekend races? Or maybe you just want smoother, more efficient runs. The techniques we’ve covered give you a clear roadmap: match your high speed rc boat propeller to your motor’s power band. Fine-tune pitch for your hull design. Don’t overlook the basics like proper balancing and shaft alignment.
Start with the diagnostic steps. Identify your current bottleneck. Then tackle the easiest wins first. Often a simple diameter or pitch adjustment delivers immediate results. Even professional racers treat propeller pitch optimization as an ongoing process. It’s not a one-time fix.
Ready to see real gains? Browse VIF Propellers‘ performance lineup to find the right match for your setup. You can also reach out to our technical team with your boat specs. We’ll give you personalized recommendations. Your faster RC boat is just one propeller swap away—make it count.