
You’ve just pulled your boat out of the water and noticed your propeller looks worn. Or worse, you’re shopping for a replacement and have no clue what size you need. Here’s the frustrating part: order the wrong prop, and you’re looking at poor fuel economy, sluggish acceleration, or even engine damage.
The good news? Measuring a boat propeller isn’t rocket science. You don’t need a marine mechanic to do it for you.
Maybe you’re decoding those cryptic stamped numbers on your prop hub. Or calculating pitch with a homemade gauge. Or just trying to match your outboard propeller specs for an upgrade. This guide breaks down every measurement technique you need.
We’ll walk you through the exact tools, step-by-step processes, and insider tips. You’ll identify your propeller dimensions with ease. This saves you time, money, and the headache of ordering the wrong part twice.
Understanding Boat Propeller Size: Diameter and Pitch Basics
Every boat propeller has two critical numbers stamped on it. These numbers control your boat’s acceleration, top speed, and engine protection. The standard format looks like this: 14 x 19. That’s a 14-inch diameter and a 19-inch pitch.
What Diameter Means
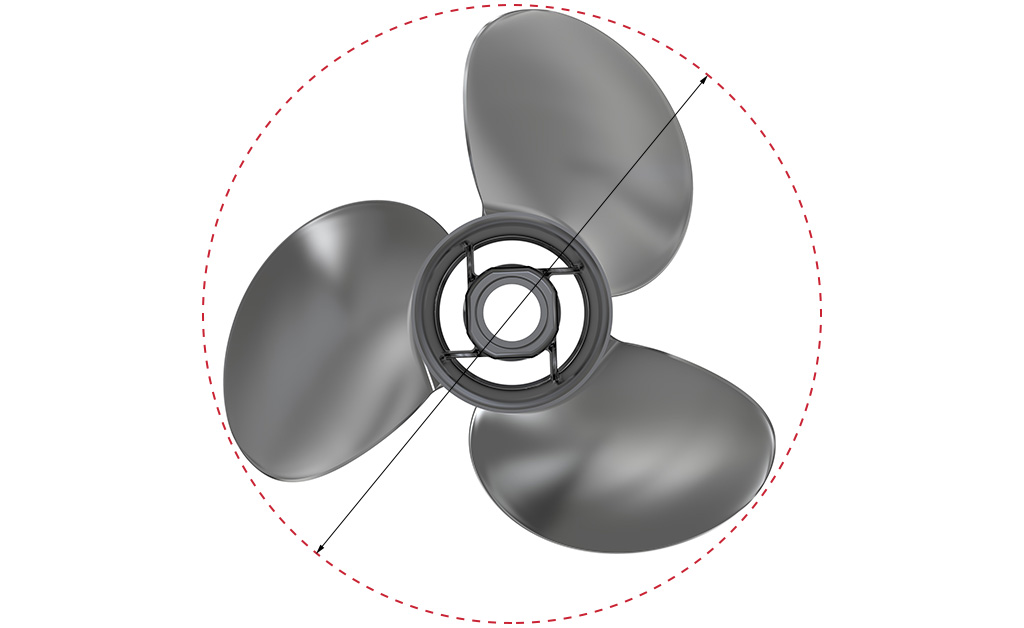
Diameter measures the width of the circle your propeller blades create while spinning. Picture drawing a circle from one blade tip to the opposite blade tip.
Here’s the quick math: Measure from the hub center to the outer blade tip. Double that number. A 7-inch measurement gives you a 14-inch diameter.
Diameter controls how much water your prop grabs with each spin:
-
Larger diameter props have more blade surface area. They handle heavy loads. They create stronger thrust. Perfect for bigger boats, pontoons, or vessels carrying heavy cargo.
-
Smaller diameter props create less drag. They work best for lighter, faster boats. Water resistance matters more than raw power on these boats.
How Pitch Controls Your Performance
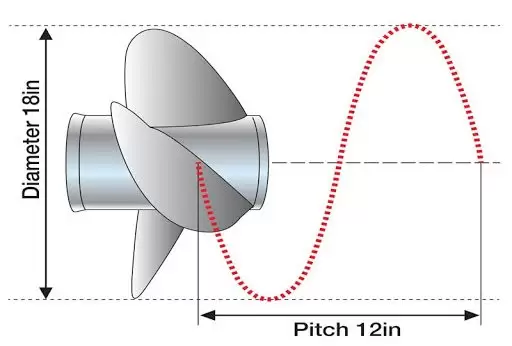
Pitch tells you how far forward your propeller moves through one complete spin—if water were solid like a screw threading through wood. A 19-pitch prop advances 19 inches per rotation in perfect conditions.
This number changes your boat’s behavior:
Higher pitch (21″ vs. 19″) pushes your boat farther forward per engine turn. You gain top speed. But you lose acceleration and hole shot power. Your engine works harder. WOT RPM drops by about 200 RPM per inch of added pitch.
Lower pitch (17″ vs. 19″) trades top-end speed for quicker acceleration and better hole shot. Your engine spins faster. About 200 RPM higher per inch you drop.
The Trade-Off You Need to Know
You can’t max out both diameter and pitch at the same time. Here are real examples:
-
Mercury Spitfire X7: 13 x 17 (smaller diameter for speed)
-
Mercury Trophy Plus: 13.75 x 17 (same pitch, larger diameter for thrust)
-
ePropulsion Navy 6.0 Evo: 12.6″ x 10.8″ (compact composite design)
The golden rule: Match your prop to hit your engine maker’s recommended WOT RPM range. Too much pitch strains the engine. RPM drops too low. Too little pitch over-revs the engine. Top speed suffers.
Tools You Need to Measure a Boat Propeller
You own half these tools already. A measuring tape with dual inch/millimeter markings handles diameter measurements. You need 1/16-inch precision minimum. Measure from hub center to blade tip. Then double it.
Digital calipers ($20-50) measure hub bore diameter with 0.01-inch accuracy. Your shaft fit depends on this number. Common bores run 1″, 1-1/8″, or 1-1/4″. Use calipers to count splines too. This matters for matching your engine shaft.
A straightedge keeps your tape aligned across the widest blade points. Diagonal measurements throw off your diameter by half an inch or more. The straightedge prevents this.
Props without stamped pitch numbers? Grab a digital angle finder ($15-30). It measures blade angle. Use the angle-to-diameter ratio to calculate pitch.
Round out your kit with a marker and a notepad. The marker flags the widest blade edges. The notepad records measurements. Always take three readings and average them. Blade lengths vary a bit from manufacturing.
Total investment: $45-115 for a complete measuring kit. This beats ordering the wrong propeller twice. Return shipping alone costs more.
Pro tip: Check your tape measure for stretching. A worn tape creates 1/32-inch errors on 14-19 inch diameters. This causes clearance problems with your hull or trailer. Keep at least 5/8-inch blade-to-hull clearance. 3/4-inch works better.
How to Measure Boat Propeller Diameter: Step-by-Step
Measuring propeller diameter is simple. Find the center, measure to the blade tip, then double it. Skip the prep or rush, and you’ll order a 13-inch prop instead of 14-inch. That half-inch mistake creates clearance problems and drops performance.
Preparation: Set Yourself Up for Accurate Readings
Clean your propeller first. Barnacles, fishing line, and old grease can throw off measurements by 1/16 inch or more. Scrub the blades and hub with a stiff brush. Rinse it well.
Remove the prop from your boat if you can. Use a prop puller tool to avoid damaging the shaft threads. Place it on a flat, level workbench. An uneven surface tilts the hub. On larger props, this creates errors up to 1/8 inch.
Check your measuring tape before you start. Lay it against a ruler or new tape measure. Look for stretching at the 12-14 inch marks. Replace worn tapes right away.
The Center-to-Tip Method (Works for All Props)
Step 1: Lay the propeller flat with the hub centered on your work surface. The blade tips should extend outward in a balanced way.
Step 2: Find the exact center of the hub bore. This is the circular opening where the prop shaft goes through. Mark it with a pencil if needed.
Step 3: Extend your measuring tape from the hub center to the outermost tip of one blade. Pull the tape tight. Make sure it runs straight—not curved along the blade surface. Record this number. This is your radius.
Example: Your tape reads 7 inches from center to tip.
Step 4: Double the radius to get diameter. 7 inches × 2 = 14-inch diameter.
Step 5: Repeat on 2-3 different blades. Manufacturing can create small differences. Use the largest radius measurement or average all three readings.
Got a 3-blade prop showing 7″, 6.97″, and 7.02″ radii? Your diameter is 14.04 inches (using the max). Round to 14 inches for standard sizing.
Alternative Method for Even-Blade Props
Props with 2, 4, or 6 blades let you measure straight across. Find two blades positioned opposite each other. Measure from the tip of one blade, through the hub center, to the tip of the opposite blade.
This gives you diameter straight away. No doubling needed.
Warning: This works only when blades align just right. A 3-blade or 5-blade prop has no true opposite blade. Use the center-to-tip method for odd-numbered props.
Verification: Triple-Check Your Numbers
Take at least three measurements per blade. Write down each reading:
– Blade 1: 7.01″, 6.99″, 7.00″
– Blade 2: 7.02″, 7.01″, 7.03″
– Blade 3: 6.98″, 7.00″, 6.99″
Average these nine readings: 7.004 inches radius = 14.008 inches diameter. Round to 14 inches.
Cross-check all blades. A radius difference over 0.1 inch signals blade damage or bending. Check that blade well before ordering a replacement.
Common Mistakes That Ruin Accuracy
Measuring radius once and forgetting to double it: You’d order a 7-inch prop instead of 14-inch. Double it every time.
Measuring blade tip-to-tip on 3-blade props: The tips don’t align through center. You’ll measure at an angle. This shortchanges diameter by half an inch or more.
Measuring from the hub outer edge instead of center bore: This adds 1-2 inches you don’t have. Start from the shaft bore center.
Letting the tape curve along the blade surface: This adds extra length. Keep the tape straight—use a straightedge if needed.
Ignoring blade wear: A worn blade tip shortens your measurement. Compare all blades. Use the longest intact blade for your final number.
One final check: Compare your measurement to any stamped numbers on the hub. A marking like “14 x 19” confirms your 14-inch diameter reading. Numbers don’t match? Measure again with care. The stamped size is correct if your technique checks out.
How to Find and Read Propeller Size Markings
Most propellers have their size stamped on the hub. These numbers tell you everything you need. No measuring tools required. The catch? You need to know where to look and how to decode what you find.
Where to Look for Stamped Numbers
Check the hub barrel first—the cylindrical outer surface facing the back of your boat. Manufacturers stamp numbers here most often. Rotate the prop and inspect the entire barrel surface.
Can’t find anything? Try these spots next:
-
Between blade roots where they connect to the hub
-
Under the prop nut or washer (remove these with care)
-
Inside the hub spline area where the shaft teeth engage
-
Around the hub’s aft end near the exhaust outlet
Flip through all these locations. Some props hide markings in unexpected places. Aluminum props show clearer stamps than stainless steel. Corrosion and paint can cover numbers.
Decoding the Number Format
The standard format puts diameter first, then pitch. Both measure in inches. Here’s what you’ll see:
14-1/2 × 19 = 14.5-inch diameter, 19-inch pitch
13.3 × 17 = 13.3-inch diameter, 17-inch pitch
That’s your core sizing. Everything else adds detail:
-
RH = Right-hand rotation (clockwise from behind)
-
LH = Left-hand rotation (counterclockwise)
-
3 Blade or 4 Blade = Number of blades
-
SS = Stainless steel
-
AL = Aluminum
-
Model names = Brand-specific identifiers like “Apollo,” “Trophy,” or “Spitfire”
A full stamp reads: 14-1/2 × 19 RH 3 Blade SS Apollo. Here’s what that means: 14.5″ diameter, 19″ pitch, right-hand, 3-blade, stainless steel, Apollo model.
When Stamps Don’t Tell the Truth
Worn stamps fade to nothing on old props. Salt corrosion eats away aluminum markings in 5-10 seasons. You’ll see partial numbers like “1_ × 1_” or complete blanks.
Reworked props create bigger problems. Prop shops re-pitch blades or add cupping. Your stamped “19” pitch might measure 21″ after modifications. The hub still shows the original number.
What to do: Measure diameter yourself using the center-to-tip method from the previous section. For pitch, you need a pitchometer tool ($50-150) or a prop shop with digital scanning equipment. Faded or modified prop stamps? Don’t trust them for ordering replacements.
Quick Reference: Size vs. Model Codes
Size numbers always come first: 14 × 19 (diameter × pitch)
Model codes follow after: RH 3 Blade SS (rotation, blades, material)
Keep the two separate in your head. Size determines fit and performance. Model codes tell you style and construction. You need both for ordering, but size matters most for compatibility.
Can’t find any markings at all? Remove the prop and bring it to a marine dealer. They’ll measure it with calibrated tools. This beats guessing and ordering wrong.
How to Measure Propeller Pitch Without Markings
You need geometry for pitch calculation, not guesswork. Measure the blade angle at a set radius point. Then convert that angle into forward travel distance. The industry uses the 75% radius spot as standard. This spot shows average blade behavior across the full rotation.
Finding Your 75% Measurement Point
Start with your propeller radius. Got a 9-inch radius (18-inch diameter prop)? Do this math: 9 inches × 0.75 = 6.75 inches from hub center. Use 6.75 inches for precise work. Or use 6 inches (about 2/3 radius) for quick field checks.
Mark this distance on both sides of each blade—the leading edge (LE) and trailing edge (TE). Use a compass to scribe a light arc at 6.75 inches from the hub bore center. This arc crosses each blade at your measurement zone.
Place the propeller flat on a large sheet of paper. Use a plumb line or carpenter’s square to transfer the blade height at these marked points onto the paper. The leading edge might sit 33mm above the surface. The trailing edge sits 73mm up. The height difference is 40mm (73mm – 33mm).
The Swept Angle Method
Draw a straight line connecting your two marked points on the paper. Grab a protractor. Measure the angle this line makes against a flat reference line from the hub center. A typical 19-pitch prop shows about 59-60 degrees.
Now calculate pitch using this formula:
Pitch = height difference × (360 ÷ swept angle)
Using our example: 40mm × (360 ÷ 60) = 40mm × 6 = 240mm
Convert to inches: 240mm ÷ 25.4 = 9.45 inches. Round to 9.5-inch pitch. Or check if it’s a 10-pitch prop. Account for measurement variance.
Here’s why the math works: You’re calculating how many times that blade segment would complete a full circle. 360° ÷ 60° = 6 segments. Each segment moves forward by the height difference you measured.
Using a Digital Angle Gauge
Digital angle finders ($15-30) speed up the process. Zero the gauge on a flat reference surface—your workbench or the hub face works. Place the gauge flat against the blade surface at your 75% radius mark.
Record the angle at the leading edge, then the trailing edge. Calculate pitch using: Pitch = tan(angle) × (π × radius × 2)
A 60-degree reading on a 9-inch radius gives: tan(60°) × (3.14159 × 18) ≈ 19 inches pitch
Average All Blades for Accuracy
Factory tolerances create 2-5% variation between blades on the same prop. Measure each blade one by one at the 75% radius point. Record all values. Average them for your final pitch number.
Three-blade prop readings of 19.2″, 18.8″, and 19.1″ average to 19.03 inches—call it a 19-pitch prop.
Precision Factors That Matter
Position errors mess up your numbers fast. Miss the 75% radius mark by just 1%? This throws pitch calculations off by 3-5%. Use a compass or radius template to nail that 6.75-inch mark on target.
Blade cupping adds effective pitch. But it doesn’t change the measured angle. A cupped blade acts like it has 5-10% more pitch than your calculation shows. Note any visible cup depth on the trailing edge—it looks like a small scoop or curve.
Angle gauge accuracy matters too. A ±0.5-degree error gives you about ±2% pitch variation. Calibrate your digital gauge before measuring. Work on a stable surface with no vibration.
Keep these tools ready: protractor, millimeter ruler, plumb line, carpenter’s square, and digital angle gauge (0.1-degree resolution minimum). Total cost runs $35-60. This beats paying a prop shop $75-150 for the same measurement.
Reading Propeller Numbers and Specs
All propeller makers use the same marking format. You’ll see diameter × pitch in that exact order. A 14 × 19 marking means 14-inch diameter and 19-inch pitch. Always.
The Basic Format Explained
Diameter comes first. This measures the full circle your blades make while spinning. Start at the hub center. Measure to one blade tip. Double it. That’s your diameter. Most outboards use 8¼ inches to 15¼ inches based on engine size.
Pitch comes second. This tells you how far forward the prop moves in one full turn. Picture a screw going through wood—your prop does the same through water. Standard pitch runs 7 inches to 23 inches. Bigger engines need bigger pitch numbers.
Material and Blade Codes
Makers stamp the material type on the hub. Here’s what you’ll find:
-
Aluminum (AL) – Costs less, weighs less
-
Stainless Steel (SS) – Stronger, performs better, costs more
-
SSP – Standard Series Propeller mark
Blade count affects how your boat handles:
3-blade props give you a good mix of speed and fuel savings. Most outboards come with these.
4-blade props push harder and run smoother in rough water. You get better grip during hole shot. Top speed drops a bit compared to 3-blade props.
Performance Model Codes
Race-grade props use special model names. Here are some examples:
-
TBX™ series – Better blade shapes for speed
-
Viper™ TBX™ – 14¾” diameter, 16″ to 20″ pitch choices, 3-blade stainless
-
Rebel TBX™ – 15¼”-15⅛” diameter, 19″-21″ pitch range, 3-blade build
-
15H.O. High Thrust – Built for jobs that need max power at low speeds
Hub Specs That Matter
Hub size must match your shaft. Check two key measures:
Hub bore diameter – Use calipers on the center hole. Common sizes: 1″, 1-1/8″, 1-1/4″.
Spline count – Count the grooves inside. Evinrude/Johnson V4s take 13-spline hubs (P/N 765195). V6s take different counts (P/N 765190). Get this wrong and your prop won’t fit.
Spin Direction Marks
Props turn clockwise or counterclockwise, viewed from behind:
-
RH (Right-Hand) – Spins clockwise, standard for single engines
-
LH (Left-Hand) – Spins counterclockwise, goes on port engines in twins
Twin-engine boats need one RH and one LH prop. This balances torque. Use the wrong spin direction and you’ll lose power plus get bad vibration.
Propeller Sizing and Performance Impact Basics
Your engine runs at a specific RPM range for peak performance and longevity. The propeller you choose either keeps it there or pushes it into dangerous territory. Pick the wrong prop? You’ll shorten engine life by thousands of hours. Or you’ll leave performance on the table.
The WOT RPM Rule That Protects Your Engine
Wide Open Throttle (WOT) RPM is your non-negotiable target. Every outboard or inboard engine has a maker-specified WOT RPM range. Check your owner’s manual. Yanmar, Mercury, Yamaha—they all publish these numbers for a reason.
Your propeller must let the engine hit maximum rated RPM at full throttle. Not 200 RPM below. Not 300 RPM above. Right in the sweet spot.
Example: Your Yamaha F150 calls for 5000-6000 WOT RPM. Install a prop with too much pitch. Your engine strains at 4700 RPM under load. Install too little pitch. It screams at 6400 RPM. Both scenarios cut engine life and waste fuel.
The Pitch-RPM Adjustment Formula
Need to fine-tune your WOT RPM? Here’s the industry-standard rule:
Every 1 inch of pitch change moves RPM by 150-200
-
Add 1 inch pitch → RPM drops 150-200
-
Subtract 1 inch pitch → RPM rises 150-200
Running 200 RPM low with a 19-pitch prop? Drop to an 18-pitch prop. You’ll gain 150-200 RPM and land right in spec. Running 300 RPM high? Add 2 inches of pitch (from 17″ to 19″). Your RPM drops 300-400. You’re back in range.
Why Blade Count Changes Your RPM
Same pitch, different blade count—your RPM changes. 4-blade props run 50-100 RPM lower than 3-blade props at identical pitch and diameter.
The reason? More blade area creates more drag. Your engine works harder to spin the same pitch through water. That extra resistance costs 50-100 RPM at WOT.
Practical impact: Switching from a 3-blade 19-pitch to a 4-blade 19-pitch? Expect to lose 75 RPM on average. Already running at the low end of your WOT range? This drops you below spec. Compensate by reducing pitch to 18 inches on the 4-blade prop.
Diameter First, Pitch Second
Sizing a new prop? Follow this order:
Step 1: Choose the largest diameter your hull allows. Check aperture clearance. You need 15-20% buffer space around the spinning blades. A 24-inch vertical aperture fits a 19-19.2 inch diameter prop (24″ × 0.80 = 19.2″ max).
Larger diameter means more blade surface area. More area grabs more water per revolution. You get stronger thrust and better load-handling. This matters for pontoons, heavy fishing boats, or towing.
Step 2: Adjust pitch to hit your target WOT RPM. Start with maker recommendations for your boat weight and engine horsepower. Test at WOT. Fine-tune using the 150-200 RPM-per-inch rule above.
Calculating Usable Horsepower
Your engine’s nameplate horsepower isn’t what reaches the prop. Gearbox friction and transmission losses eat 10-15% of your power before it hits the water.
Real example: A 48.28 hp engine loses 2.14 hp through the gearbox. You’ve got 46.14 hp available at 2907 RPM for propulsion. Design for continuous rating (80-95% of max power). Don’t design for the 5% peak rating you’ll rarely use. This engine delivers 42.54 hp continuously. That’s your design target for everyday running.
Overload beyond this continuous rating? The engine works harder. WOT RPM drops. Fuel use climbs. Engine temperatures rise. Your prop sizing must respect this usable horsepower ceiling.
Get diameter and pitch right. Your engine runs in its happy zone every time you throttle up. Ignore these rules? You’re gambling with a $5,000-15,000 powerhead.
Common Propeller Measurement Mistakes to Avoid
One wrong measurement turns your upgrade into a costly return. Boat owners repeat the same five errors. Each one wastes your time, money, and performance. Here’s what ruins accuracy and how to fix it before ordering.
Measuring Radius Instead of Diameter
The center-to-tip measurement gives you radius, not diameter. Your tape shows 9 inches from hub center to blade tip. You write down 9 inches as your prop size? You just cut the real size in half. That’s an 18-inch prop, not 9 inches.
This error kills efficiency. Installing a 14-inch prop on a boat that needs 18 inches cuts efficiency by 7.5-15%. Your engine works harder. You burn more fuel. Top speed drops.
The fix: Double your center-to-tip reading every time. Measure 7 inches radius? Your diameter is 14 inches. No exceptions.
Trusting Tip-to-Tip Measurements
Measuring straight across from blade tip to opposite blade tip sounds right. It’s off by 1-2 inches on most props. Blade twist and hub shape mess up this method. The blade tips don’t line up through true center.
This method works on 2-blade, 4-blade, or 6-blade props where blades sit opposite each other. Got a 3-blade or 5-blade prop? The tips won’t line up through the hub centerline.
The fix: Use the centerline-to-blade-tip method each time. Find hub bore center. Measure to one tip. Double it. This works on every prop type.
Confusing Model Numbers with Actual Dimensions
Those stamped numbers on your hub? Not all show size. Model codes like “APC 10×7” or casting numbers (765195) get confused with diameter and pitch specs all the time.
You order based on model codes alone? You might get a different size. A “10×7” model name doesn’t mean 10-inch diameter and 7-inch pitch. Manufacturers use these codes for tracking parts.
The fix: Check size with calipers at the 75% blade station (three-quarters out from hub center to tip). This spot gives you real pitch data. Compare it against actual stamped diameter and pitch numbers. These are different from model codes.
Missing the 75% Radius Point for Pitch
Pitch changes across the blade length. Measure angle at the wrong spot? You’re off by 15% or more. The blade root has different pitch than mid-blade or tip areas.
The 75% radius station is the standard for all pitch measurements. This point shows average blade action. Testing labs measure at this exact spot for performance data. Measure at 70% or 80% instead? Your numbers won’t match what the manufacturer lists or what replacement props deliver.
The fix: Calculate 75% of your radius. Got a 9-inch radius? Your measurement point is 6.75 inches from hub center (9 × 0.75 = 6.75). Mark this spot with a compass arc on each blade. Take blade angle measurements here.
Skipping Blade Tracking Checks
Blades need to spin in the same rotation plane. Any blade more than 1/16 inch (1.6mm) above or below the others causes vibration. This wrecks seals, bearings, and prop shafts over time.
Most boat owners skip tracking checks. They measure diameter and pitch. Then they ignore whether all blades line up. Hit a submerged log? One blade bends a bit. Now you have tracking problems.
The fix: Put the prop on a flat surface. Spin it. Watch each blade tip. They should pass the same height point within 1/16 inch. Use a fixed pointer or caliper depth gauge to check the gap. See variation beyond 1/16 inch? That blade is bent. Don’t use it.
Boat Propeller Size Reference Chart
Check the prop hub. Manufacturers stamp diameter × pitch on every one. A 13×17 marking means 13-inch diameter and 17-inch pitch. 14.5×19 reads as 14.5 inches diameter, 19 inches pitch. The first number shows diameter. The second shows pitch. Both measure in inches.
Size Ranges by Boat Type
Small inflatables under 16 feet run 9×7 RH to 10.1×15 RH props. Boats from 14-17 feet use 9 1/4×9 RH or 10.3×13 RH sizes. Mid-size boats (13-36 feet) need larger props. Options include 12.7×17 RH, 13×17, 14×23 RH, 14 1/2×19 RH, 15×17 RH, or 15 1/4×19 RH.
Heavy sterndrives like MerCruiser Bravo Two can handle up to 20-inch diameter props. Most outboards and Bravo One units max out at 16-inch diameter.
Quick Reference by Application
Inflatable boats (4-15 HP): Use 15×17 RH aluminum 3-blade (P/N Black Diamond QA1912X). Speeds 30-42 MPH need the same size. Faster inflatables (50-64 MPH, 15-19 feet) need 14×23 RH aluminum (P/N Black Diamond QA1920X).
Pontoon boats (12-27 feet): Go with 15.3×14P RH stainless steel 3-blade (P/N Q3 48-8M0103518). Larger pontoons or cruisers (17-30 feet) need 14.6×21P RH with 8-tooth spline.
House/cruiser boats: Pick 15 1/2×17 RH stainless 3-blade (P/N Thunderbolt QS5004X) for 21-26 foot boats at 30-42 MPH. Drop to 14 3/4×21 RH 3-blade (P/N Q3 48-8M0103517) for 17-20 foot boats running 42-56 MPH.
Small boats (15-20 feet): Low speeds (15-18 MPH) use 9×7 RH. Mid speeds (26-30 MPH) need 10 1/2×13 RH. Higher speeds (23-27 feet boats) take 10 5/8×12 RH aluminum (P/N Black Diamond QA2074X).
Match your boat length, engine HP, and target speed to these ranges. Then check the prop fits your shaft spline count and hub bore diameter.
Measure or Replace Your Propeller?
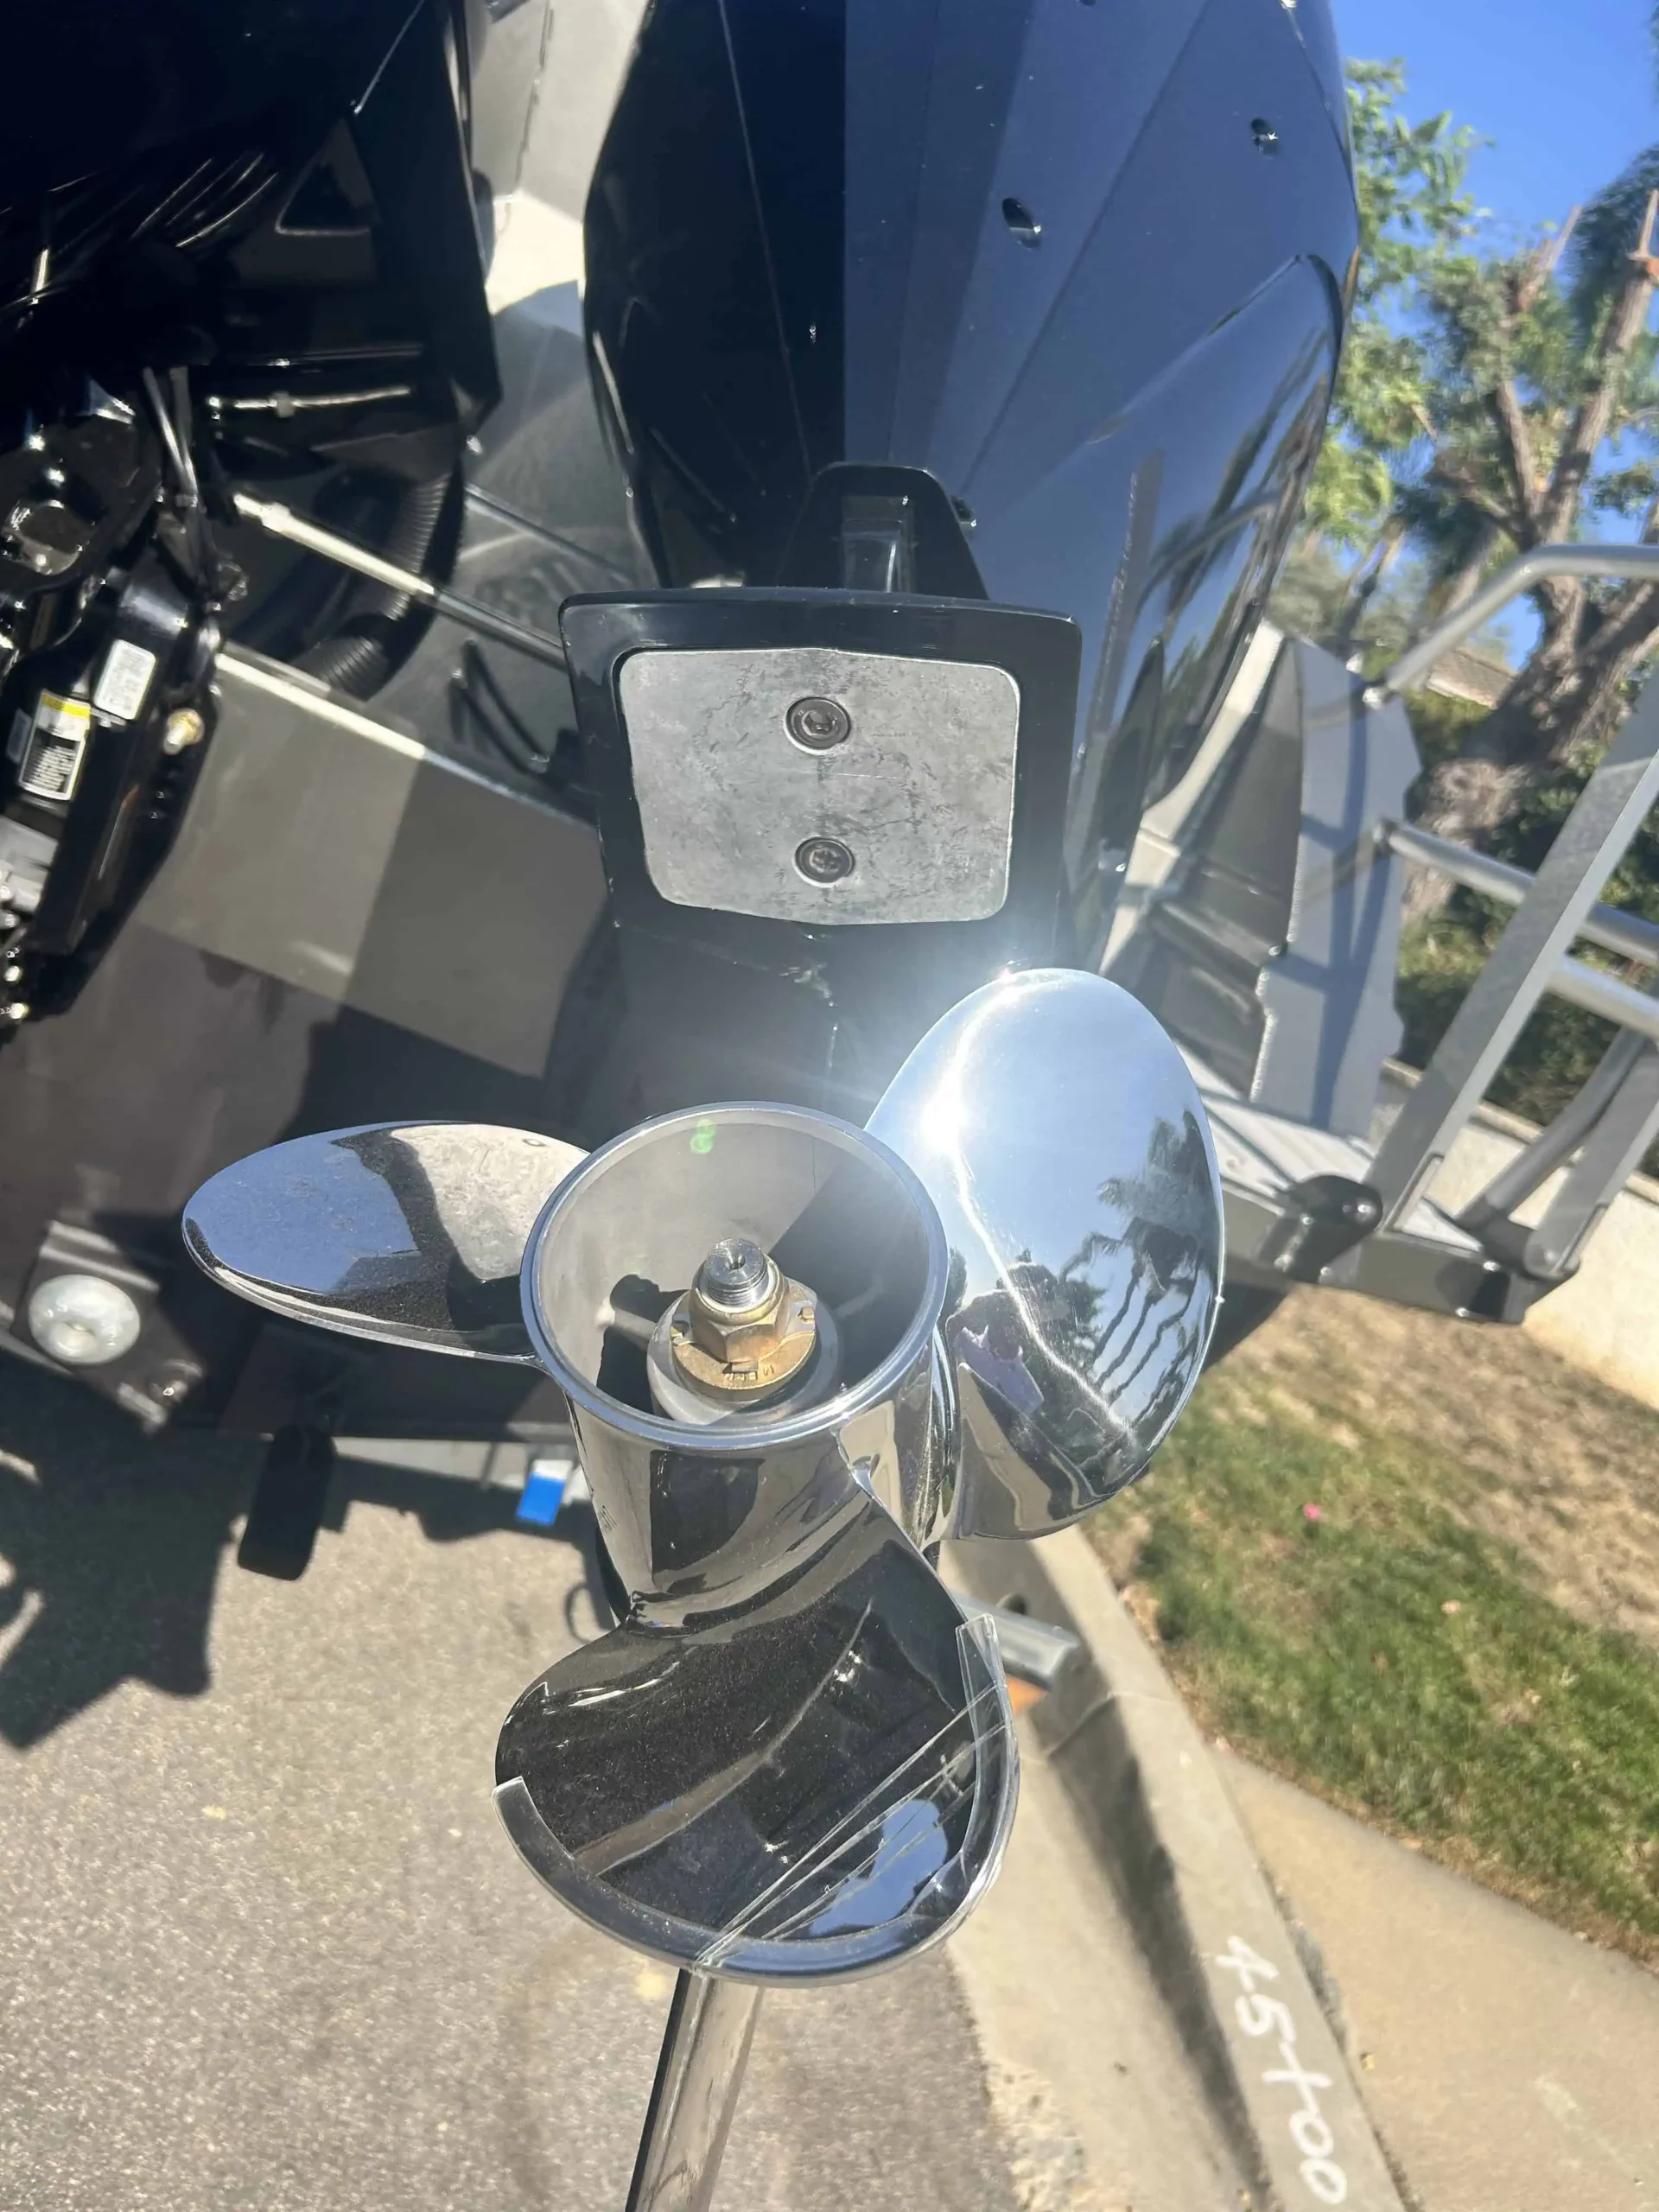
Prop damage doesn’t always mean replacement. You need measurements to make the right call. Measure first. Then decide whether to repair, upgrade, or replace.
Check These Situations
Pull out your measuring tools in these cases:
Seasonal maintenance checks – Inspect before each season or long trip. Look for chips, cracks, or blade warping. Check diameter if you see uneven wear. Compare blade lengths. Blades with 0.1-inch difference or more? That signals trouble.
RPM runs outside your engine’s WOT range – Your Yamaha F150 targets 5000-6000 RPM at wide-open throttle. You’re hitting 4800 RPM. Measure your current pitch. Use the 150-200 RPM per inch rule to calculate the adjustment. Running 800 RPM low? Divide 800 by 200. You need 4 inches less pitch. Drop from a 21-pitch to a 17-pitch prop.
Fuel efficiency drops 10-20% without visible damage – Check blade tracking first. Set the prop on a flat surface. Spin it. Watch each blade tip pass a fixed point. Blades out of alignment by more than 1/16 inch create drag. This kills fuel economy even when blades look fine.
Post-impact check – Hit a submerged log or dock piling? Measure diameter across all blades. Check pitch at the 75% radius point. Bent blades change these numbers by 3-5%. Minor aluminum chips under 1/8 inch deep can be filed smooth and balanced. Measure again after filing. This verifies blade tracking.
Replace Right Away
Skip the measurements and order a new prop here:
Cracks anywhere on the blade – Aluminum or stainless, cracks spread under stress. They cut thrust by 20% or more. No repair holds long-term. Replace it.
Bends or breaks – Bent blades create bad vibrations. You’ll damage seals, bearings, and the prop shaft. Repair costs more than replacement on stainless steel props. Aluminum props bent over 5 degrees from true? Not worth fixing either.
Chunks missing from blade edges – Lost material throws off balance for good. A pro shop can’t restore what’s gone. A 1/4-inch chunk on one blade means you need 1/4 inch removed from all other blades to rebalance. Now you’ve got a smaller, weaker prop.
Cavitation burn marks – Deep pitting from cavitation means the prop is wrong for your setup. Measure to confirm diameter and pitch specs. Then replace with the correct size. Burned props don’t perform even after grinding smooth.
Wrong size for your boat – Measure your current prop. Check your engine manual’s specs. Got a 15-inch diameter but specs call for 13.5 inches? Your engine struggles. Pitch off by 3+ inches from spec? You’re either over-revving or lugging the engine. Get the size your manufacturer recommends.
The Repair Decision Matrix
|
Damage Type |
Measure & Repair |
Replace Now |
|---|---|---|
|
Minor aluminum chips (< 1/8″ deep) |
Yes, if a pro balances it |
No |
|
Any cracks or fractures |
No |
Yes |
|
Bent blades (> 5° deflection) |
No |
Yes |
|
Cavitation pitting (> 1/16″ deep) |
No |
Yes |
|
RPM 800+ outside range |
Measure, then replace with different pitch |
Yes |
|
Blade tracking off > 1/16″ |
Try balance, measure result |
Yes if balance fails |
Minor aluminum damage gets one chance. Have a prop shop measure, repair, and balance it. Cost runs $75-150. Test it after. Still getting vibration or RPM problems? Replace it. Bad balance after repair causes more damage than the first problem.
Stainless steel props? Replace on any blade damage. Stainless is too hard to reshape right. Grinding and welding change blade strength. Performance drops even when the prop looks fixed.
Measure before you order a replacement. Get those numbers first. The wrong replacement prop wastes another $200-800 on returns and shipping.
Common Questions About Measuring Boat Propellers
Even veteran boat owners get confused by propeller measurement. Here are the top questions we get, with direct answers from real-world testing and prop shop work.
Can I measure my prop without removing it from the boat?
Yes, but you’ll lose accuracy. Measure diameter with calipers at the blade tips. Extend the calipers from tip to opposite tip on 2-blade, 4-blade, or 6-blade props. For 3-blade or 5-blade props, measure from hub center to one tip, then double it.
Pitch measurement while on-boat? You’ll get ±1-2 inch error. You can’t reach the proper 75% radius measurement point. Hull angle and water load shift blade position. Take the prop off for accurate pitch readings.
Check your hull clearance while measuring. You need 5/8 inch minimum from blade tip to hull bottom. 3/4 inch works better for v-drive wakesurf boats. Less clearance means gel-burn damage to your hull.
What if the stamped numbers are worn or gone?
You’ll have to measure by hand. Use the center-to-tip method for diameter. Measure at three spots on each blade—near the hub, at mid-blade, and near the tip. Write down all readings.
Compare your diameter measurement to your motor’s specs. Look up your engine model, year, and horsepower rating. Makers list recommended prop sizes. A 150 HP Yamaha usually takes 14-14.5 inch diameter props. Your measurement should match.
For pitch, grab a pitch gauge or pitchometer tool ($50-150). Or visit a prop shop with digital scanning gear. They’ll measure pitch at the standard 75% radius point. You get accurate numbers for ordering replacements.
Does a 19-inch pitch prop always perform the same as another 19-inch pitch?
No. Pitch alone doesn’t control performance. Blade count makes a huge difference. A 4-blade 19-pitch prop gives more thrust and better acceleration than a 3-blade 19-pitch. But the 4-blade loses 2-3 MPH at top speed.
Diameter counts too. A 13 x 19 prop (13-inch diameter) acts different than a 14.5 x 19 prop. The bigger diameter grabs more water per turn. You get stronger thrust for heavy loads. Top speed stays close at the same RPM, but hole shot gets better.
|
Configuration |
Hole Shot |
Top Speed |
Best For |
|---|---|---|---|
|
13 x 19, 3-blade |
Good |
Higher |
Light boats, speed focus |
|
14.5 x 19, 3-blade |
Better |
Similar |
Heavy loads, balanced use |
|
14.5 x 19, 4-blade |
Best |
2-3 MPH lower |
Max thrust, rough water |
Same pitch number means different results. Match your prop to your boat weight, engine specs, and how you use it.
How do I know if my prop measurement is good enough?
Take three measurements per blade and average them. Blade making differences run ±0.1 inch on diameter. Your readings should fall in this range.
For diameter, use digital calipers accurate to ±0.01 inch. Manual tape measures stretch over time. Test your tape against a new one before measuring. A worn tape gives 1/32 inch errors on 14-19 inch diameters.
Check blade tracking to test measurement quality. Set the prop on a flat surface. Spin it. Watch each blade tip pass a fixed pointer. Tips should line up within 1/16 inch. Variance over 0.25 inch tip-to-tip means bent blades. Your measurements won’t show the prop’s true specs.
For pitch, measure at the exact 75% radius point. Calculate this: take your radius times 0.75. A 7-inch radius (14-inch diameter) means measuring at 5.25 inches from hub center (7 x 0.75 = 5.25). Off by just 1% at this measurement point? Your pitch calculation shifts by 3-5%—that’s a full inch of error on a 19-pitch prop.
Conclusion
You don’t need professional skills to measure your boat propeller. You just need the right tools, a clear process, and what you’ve learned from this guide. Read the stamped numbers on your prop hub. Calculate propeller pitch with a ruler. Check blade dimensions before buying a replacement. You can handle all of this on your own now.
Accurate propeller diameter and pitch measurements are the base of great boat performance. The right prop size gives you better fuel efficiency. You get improved acceleration. Plus, your engine runs in the correct RPM range. Measure with care. Check your numbers against what the manufacturer says. Write down these measurements for later use.
Ready to use what you’ve learned? Your measurements show it’s time for an upgrade or replacement? Check out our complete propeller selection guide to find the right match for your boat. Still not sure about what you found? Our expert team can verify your measurements. We’ll help you pick the best propeller for your boating needs.
Your boat’s peak performance is just one accurate measurement away.