
That persistent vibration humming through your hull. The RPMs climbing while your speed stays flat. Pitting eating into your Propeller blades like rust on a forgotten anchor.
Spent time troubleshooting outboard motor Propeller cavitation? You know how fast it turns from a minor annoyance into a real performance and cost problem. Pinning down the fix is another story — it’s one of the more frustrating repairs a boat owner faces.
The cupped propeller has been solving this problem for serious boaters for decades. Yet most boat owners never understand why it works, when it’s the right choice, or which cup geometry fits their specific setup.
That’s what we’re breaking down here:
-
The physics behind how a cupped propeller works
-
The performance tradeoffs you need to know
-
Real-world applications where it makes sense
-
The key decisions that separate a smart upgrade from an expensive mistake
What Makes a Cupped Propeller Work
The fix is simpler than most engineers want to admit.
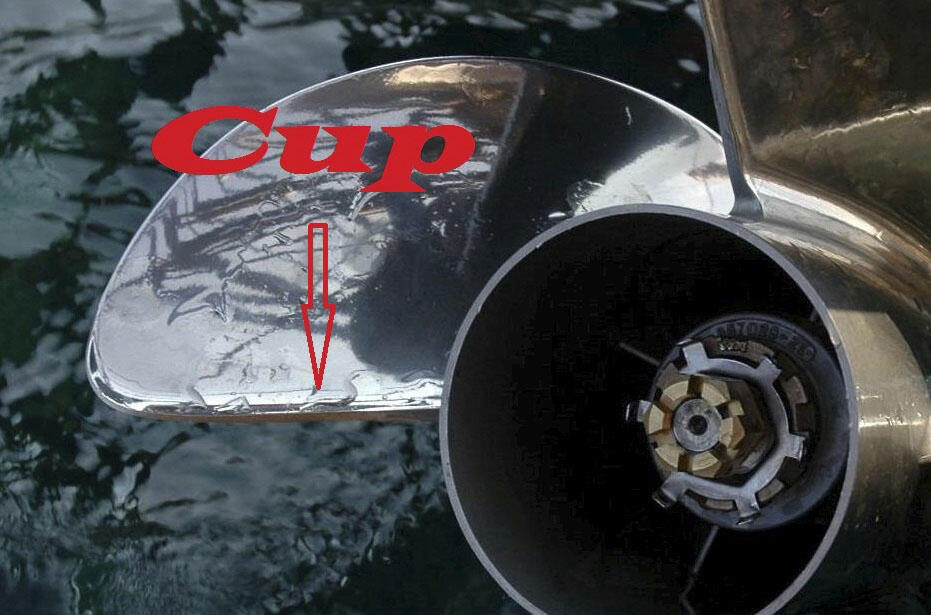
A cupped propeller comes down to one small geometric change. The trailing edge of each blade bends toward the pressure face — the aft-facing surface — forming a tight radius curve. That curve adds camber to the blade profile. More camber means higher effective pitch. Higher effective pitch means the blade holds a cleaner grip on the water before the pressure differential breaks down into a bubble.
That’s the whole mechanism. One bend at the trailing edge, and cavitation damage to the propeller drops by a clear, measurable amount.
Run your finger from the leading edge to the trailing edge of a cupped blade. You’ll feel the curl. The size of that curl — the cup amount — varies by design, and it matters more than most buyers expect.
Expert Opinion:
“In my years of propeller hydrodynamics research, I’ve seen countless boat owners treat cavitation as an unavoidable cost of doing business — they replace blades, absorb the fuel penalty, and move on. That’s the wrong frame entirely. Cavitation is a design problem with a design solution. The cupped trailing edge works precisely because it addresses the root cause: pressure field breakdown at the blade surface. What I find most compelling about the cupped geometry isn’t just the cavitation reduction itself — it’s the efficiency of the fix. One deliberate geometric change at the trailing edge redistributes the suction pressure zone, keeps flow attached longer through each stroke, and breaks the cavitation chain before bubble collapse can do structural damage. When CFD modeling shows vapor fraction dropping measurably at real operating advance coefficients, that’s not incremental improvement. That’s a fundamentally better blade-water interaction. The critical variable most owners overlook, however, is pitch compensation. Adding cup without reducing nominal pitch by 1–2 inches doesn’t solve your problem — it trades cavitation risk for engine overload risk. Always verify your WOT RPM sits inside the manufacturer’s target band after any cupped upgrade. The physics only work in your favor when the full system is tuned together.“
————Dr. R. Mitchell, Marine Propulsion Engineer & Hydrodynamics Researcher, Society of Naval Architects and Marine Engineers (SNAME)
The Performance Numbers Worth Knowing
These benefits are real and proven. Above 30 knots, cupped propellers beat standard designs in three ways you can measure:
-
Cavitation and ventilation reduction — the blade holds pressure longer through each stroke
-
Fuel efficiency improvement — especially on planing hulls running at higher throttle ranges
-
Speed and stability gains — the blade holds its angle of attack without slipping
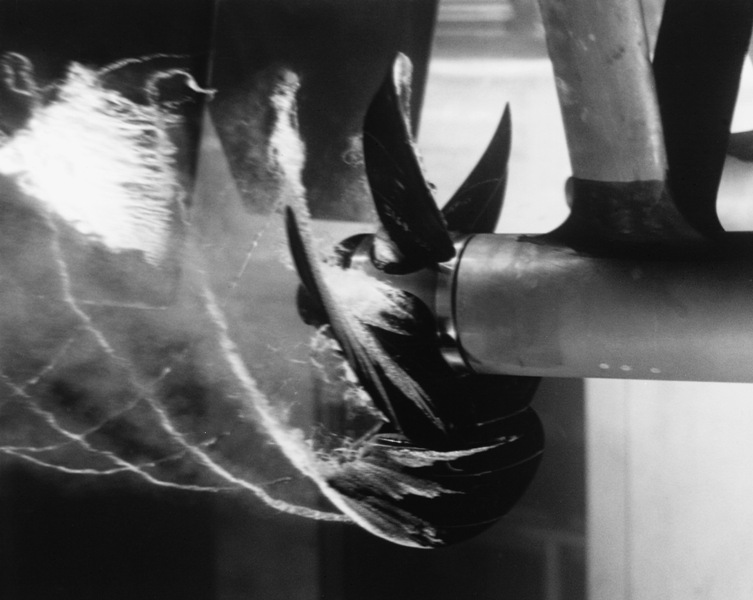
Research backs this up. Samsul (2021) ran detailed computational modeling comparing cupped and non-cupped propeller designs head-to-head. The cupped geometry showed clear, quantifiable cavitation reduction — not a small gain, but a structural difference in how the blade moves through water under load.
The One Mistake That Kills the Upgrade
Here’s where boat owners get burned.
Cupping raises effective pitch. So installing a cupped propeller on your current setup — without changing the design pitch — puts more load on your engine. Your max RPM at wide-open throttle drops. Your engine may already run close to its minimum RPM ceiling. At that point, it’s not a tuning issue. That’s a real overload risk.
The fix is simple: drop your design pitch by 1–2 inches compared to your old non-cupped propeller. This keeps your engine in its intended RPM range and offsets the extra effective pitch the cup adds.
The good news — most Prop repair facilities can add cupping to your existing propeller. No new tooling. No pattern changes. It’s a modification, not a full replacement.
How the Cupped Blade Design Attacks Cavitation at the Physics Level
Cavitation doesn’t announce itself with a warning. It finds the weak point in your blade’s pressure field and exploits it — over and over — until the metal shows the damage in pits and craters.
To understand why a cupped blade stops that process, look at what happens at the trailing edge during each rotation.
The Pressure Field Problem
Every propeller blade creates a pressure imbalance as it moves through water. The suction side — the forward-facing surface — generates lift by pulling local pressure down. Drop that pressure below the water’s vapor pressure, and the physics turn against you. Liquid becomes gas. Bubbles form. They collapse against the blade surface and release localized shock waves strong enough to erode hardened metal.
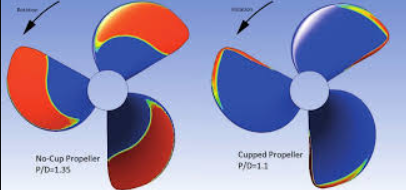
The damage pattern on a standard non-cupped blade is consistent and easy to read: uniform pitting from 0.5R to the tip, spread across a large portion of the blade surface. That’s sheet cavitation doing what sheet cavitation does.
The cupped blade cuts this off at the source.
Deflecting the trailing edge toward the pressure face — a ¼ to ½ inch curve — redistributes the low-pressure zone that sheet cavitation feeds on. Instead of a broad suction field across the mid-blade, the pressure burden shifts and concentrates. The dangerous cavitation zone doesn’t vanish, but it moves: from a wide band across 0.5R to the tip, down to isolated activity at the trailing edge and tip only — less than 20% of the blade surface under load.
That’s not a small gain. That’s a structural change in how the blade interacts with water.
The Camber Mechanism
Cupping also adds camber along the blade chord. More camber keeps the flow attached to the blade surface longer through each stroke. Better flow attachment keeps the pressure differential above the vaporization threshold. No vaporization means no bubble formation, no collapse shock — the entire cavitation chain breaks before it starts.
CFD modeling at advance coefficients of J=0.82 and J=0.87 confirms this. At those operating points, cupped geometry produces a clear, measurable reduction in vapor fraction. The cavitation coefficient drops. Tip vortex risk stays balanced through more even load distribution across the blade.
The efficiency cost? Less than 2% propulsive efficiency loss with a well-tuned pitch-to-diameter ratio — and that small cost disappears fast against the thrust recovery gains.
Angle of Attack and the Tuning Link
Here’s the part most buyers miss, and it matters.
The cup raises effective pitch without changing the physical geometry of the blade. The formula used in lifting surface design gives a practical starting point: PEFF = PGEO + 21(XCUP). In real terms, cupping adds the equivalent of 1 to 2 inches of pitch and drops operating RPM by 200 to 400.
To compensate, a cupped blade runs at a lower angle of attack — matched to the cup level — which unloads the mid-blade sections where pressure breakdown tends to begin. At moderate cup levels, this restores thrust across a broad RPM range, 60% to 90% of maximum, with no real penalty to efficiency.
The blade erosion pattern confirms the math is working. On a well-tuned cupped propeller, erosion concentrates at the trailing edge and tip — predictable, manageable, and confined. On an unmodified standard blade running the same conditions, the pitting spreads from mid-blade outward, and thrust loss from sheet cavitation can reach 10 to 15%. Cupped and optimized, that same figure drops below 5%.
One bent trailing edge. One deliberate camber addition. The physics of cavitation don’t change — but the blade stops giving them a place to work.
Cupped vs. Non-Cupped Propellers: Performance Data You Need Before Deciding
The numbers don’t lie — but they do require context.
Side-by-side performance data tells a clear story. You just need to know how to read it. Raw figures without application context push boat owners toward the wrong call. Here’s what the data shows, and what it means for your specific setup.
The RPM Reality Check
Swap in a cupped propeller at the same nominal pitch as your current non-cupped blade. Your wide-open throttle RPM will drop. That’s not a problem — the cup adds the equivalent of 1 to 2 inches of effective pitch without touching the physical blade geometry.
The drop lands between 100 and 400 RPM depending on cup intensity. That range matters. Too much drop means your engine is underloaded at the top end. Get the match right, and you gain efficiency in the mid-range — where most boats spend the bulk of their running time.
The standard fix: drop your design pitch by 1–2 inches on a cupped blade. This keeps your engine inside the manufacturer’s intended RPM band. The cup does its job without working against your setup.
What Changes — And What Doesn’t
|
Metric |
Cupped Propeller |
Non-Cupped Propeller |
|---|---|---|
|
Thrust Efficiency |
Improved at low speed |
Moderate |
|
Cavitation Resistance |
Reduced |
Moderate to high |
|
Noise & Vibration |
Lower (when tuned) |
Higher at speed |
|
Fuel Efficiency |
Better under load and cruising |
Variable |
|
RPM at WOT |
100–400 lower |
Higher, more slip |
|
Acceleration & Grip |
Enhanced — better water hold |
Steady, less aggressive |
|
Maintenance Burden |
Lower — less cavitation damage |
Higher erosion risk |
Non-cupped props aren’t bad designs. On low-horsepower engines and easy cruising conditions, they do the job fine. Push past 30 knots, add load, or run in shallow water where propeller ventilation bleeds off pressure — the performance gap opens up fast.
Where Cupping Earns Its Keep
Acceleration is where you feel the difference first. The cup grips the water harder at takeoff and through tight turns. It cuts the slip that bleeds speed from a standard blade during direction changes and hard throttle inputs.
Fuel economy at cruise is where the long-term math adds up. Lower mid-range RPM under load burns less fuel across every hour on the water. The gain isn’t dramatic in any single moment — but it builds over time.
Blade erosion and maintenance are the hidden costs most buyers miss. A non-cupped blade in cavitation-prone conditions builds up pitting damage on a steady basis. A well-matched cupped blade keeps any leftover erosion at the trailing edge and tip — contained, predictable, and far less damaging to the blade overall.
How to Use This Before You Buy
Four practical steps before committing to a cupped upgrade:
-
Check your current WOT RPM against your engine’s recommended range. Already at the low end? The extra pitch from cupping needs a compensating pitch reduction.
-
Identify your primary running conditions — high-speed performance, shallow water, frequent acceleration, or steady cruising. Cupping delivers the strongest return in the first three.
-
Match cup intensity to need. Moderate cup handles most performance and cavitation problems without issue. Heavy cup is a specialist tool — it sharpens grip but raises overload risk without the right pitch adjustment alongside it.
-
Stick with non-cupped where conditions don’t call for it. General low-horsepower cruising on calm water doesn’t need the added complexity. The upgrade pays off most where pressure differentials run highest.
The data backs cupped propeller performance across cavitation control, fuel economy, and blade longevity. That support comes with conditions — correct pitch matching, the right cup level, and a clear read on how and where your boat runs.
How to Select the Right Cup Type for Your Boat and Engine Setup
Cup amount isn’t a preference. It’s a specification — and getting it wrong costs you either performance or engine life.
Three cup levels exist for a reason. Each one is built around a specific combination of hull type, engine height, load, and speed range. Get the match right and the blade works with your setup. Miss it and you’ve paid for a problem.
The Three Cup Levels and What They’re Built For
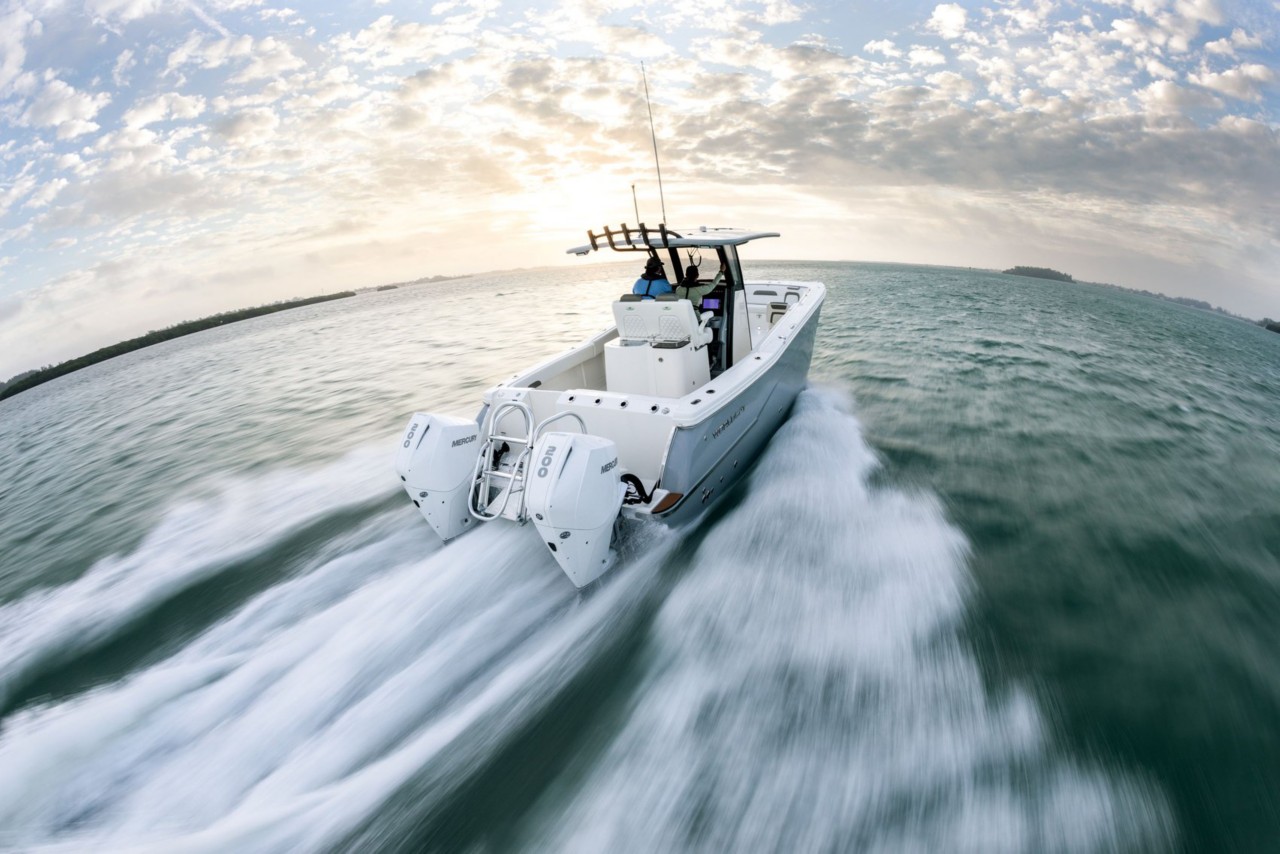
Light cup (around 0–8°) belongs on high-speed planing hulls running above 30 mph at wide-open throttle. Think short, light boats — under 16 feet, 30 to 50 horsepower. The anti-ventilation plate sits at or just above the waterline. These setups already generate strong pressure across the blade. A light cup handles the cavitation risk without piling on extra pitch load.
Medium cup (8–12°) covers the middle ground. You’re looking at cruise speeds between 20 and 30 mph. Standard engine height with the plate near the waterline. Mid-size boats from 16 to 20 feet, running 50 to 150 horsepower. This is the widest-use bracket. It balances acceleration against top speed without needing aggressive pitch correction.
Heavy cup (15–25°) is a specialist pick. Large boats over 20 feet, 150 horsepower and up. Engine plates sit 1 to 2 inches below the waterline. Displacement hulls cruise below 20 mph. Towing loads, heavy payload, shallow launches — these are conditions where the blade needs maximum grip from the first stroke.
The Pitch Compensation You Cannot Skip
Add 10 degrees of cup and you need to drop nominal pitch by 1 to 2 inches. That keeps your engine inside its target RPM band. This isn’t optional math.
Here’s a real example. A 150 hp engine on a 20-foot planing hull runs a 21×15 flat propeller and hits 5,800 RPM at wide-open throttle. Swap to a 15-degree cup without changing the pitch and that RPM falls outside the safe operating window. Drop to a 19-inch pitch alongside the cup and the engine settles back into its 5,500–6,000 RPM target range. The cup delivers its performance gain. The engine stays protected.
Slip Targets That Tell You the Tuning Is Right
Two numbers confirm your selection is working:
-
Cruise (70–80% throttle): 8–12% slip. At a theoretical speed of 35 mph, your GPS should read 31 to 32 mph.
-
Wide-open throttle: 8–15% slip, with 10–12% as the ideal target.
Use this formula to find slip: (RPM × pitch × gear ratio) / 1056 = theoretical speed. Compare that number against your GPS reading. Slip above 15% means your pitch is too low or the cup is too aggressive for the load. Slip below 8% means the blade is over-pitched and your engine is working harder than it should.
Adjust pitch one inch at a time. Retest after each change. Check that RPM lands inside the manufacturer’s band before you call the tuning done.
FAQ: Real Questions from Boat Owners About Cupped Propellers and Cavitation
Boat owners ask the same questions — just in different orders, depending on how much it’s already cost them.
“How do I know if my propeller has a cavitation problem?”
Four things tell you before the blade shows damage:
-
Speed drops without explanation — the engine is working, the numbers aren’t moving
-
Vibration travels up through the hull in a way it didn’t before
-
The throttle responds, but the boat doesn’t — there’s lag where there used to be pull
-
Physical pitting on the blade surface: mid-chord pitting points to bubble cavitation. Erosion spread across the full blade face means sheet cavitation has taken hold
See two or more of those together? Cavitation is the cause.
“What’s the difference between cavitation and ventilation? I keep seeing both terms.”
They feel similar from the helm — sudden RPM surge, thrust drops off, the boat loses momentum. The cause is different.
Cavitation is a pressure problem. Water vaporizes at the blade surface. Bubbles form, collapse, and hammer the metal. The damage builds over time: pitting, erosion, blade wear that gets worse with every run.
Ventilation is an air problem. Surface air or exhaust gas reaches the blades and breaks up flow. Less erosion damage, but the thrust loss is just as sharp.
Ventilation often needs a geometry or trim fix. Cavitation needs more — correct pitch, proper blade shape, or a cupped trailing edge that holds water through the pressure drop.
“Can I add cupping to my existing propeller, or do I need to buy a new one?”
A Prop shop can add cupping to your current blade. It’s a modification, not a rebuild — lower cost than a full replacement, and it works. One common case: a mechanic pulls the props, adds cupping at the trailing edge, and low-speed response comes back right away.
The limit is condition. A blade with existing chips or structural defects needs inspection first. Too much cupping on a damaged blade doesn’t fix cavitation — it causes it.
“Will a cupped propeller reduce my fuel consumption?”
At low speeds, the cup improves handling and low-end torque. Heavy boats notice this the most — better reverse thrust, faster throttle response. At higher speeds, less cavitation means the engine stops fighting itself. That translates to real efficiency gains.
The exact percentage depends on your hull, load, and running speed. There’s no single number that fits every boat. What holds true across the board: less cavitation means less wasted engine output. You’ll see that in fuel burn over time.
“Is a cupped propeller the right call for my boat?”
Running above 30 knots? Dealing with cavitation damage? Operating at aggressive trim angles? Yes, a cupped prop makes sense. Cruising at moderate speeds on calm water with a modest engine? The extra complexity isn’t worth it. A standard prop handles that job fine.
One check matters before you order anything: pull your WOT RPM. The engine already running near the bottom of its recommended range means you need a pitch reduction alongside any cupped upgrade. Skip that step and you’ve traded a cavitation problem for an overload problem.
Conclusion
Cavitation isn’t a mystery. It’s a physics problem — and cupped propeller blade design is one of the most proven engineering solutions to it. Your boat is losing speed, burning extra fuel, or chewing through blades too fast? The cup isn’t just a small detail. It’s the gap between a propeller that fights the water and one that works with it.
The right cup type makes a real difference. Match it to your engine, hull, and running conditions, and it tightens blade grip at the trailing edge. It cuts propeller slip. It keeps harmful vapor collapse away from the blade surface. That’s not a sales pitch — that’s fluid dynamics at work.
So stop guessing and start matching. Browse VIF’s cupped propeller lineup built for your specific make and engine setup, or reach out to us for help. The right propeller is out there — and now you know what to look for.