
After 25 years of engineering and manufacturing marine propulsion components, we at VIF Propeller have analyzed thousands of failed impellers and water pump housings. The truth we’ve learned isn’t found in a sales brochure—it’s written in heat-scorched rubber and scored aluminum. When you build the parts that keep engines alive for a living, you quickly realize that 90% of cooling failures come down to simple, preventable installation errors. We’re not here to pitch you a magic fix. This guide is built purely on the raw mechanics and real-world teardown experience our engineers trust. Here is exactly how to do the job right the first time.
How Do You Know Your Outboard Impeller Needs Replacing?
Listen, an impeller rarely fails without leaving a trail of clues. Based on decades of marine maintenance data, ignoring these early warning signs is the exact difference between a $40 preventative parts kit and a $2,500 cylinder head rebuild. Your cooling system operates on strict mechanical tolerances—when they slip, the engine tells you.

Diagnostic Warning Signs (Before Teardown)
-
Pressure Drop Signaling Poor Health: A functioning engine should create a steady stream of pressure within the first 10 to 15 seconds of operation; if it begins to weaken or spurt erratically after this time span, it should be shut off at once.
RPM-Dependent Engine Temperature Increases: This condition can be considered the textbook symptom of engine malfunctioning: when there are significant increases in temperature while idling (between 600 to 800 RPM), which then level out during flight, it indicates inefficient impeller performance due to wear-and-tear of the rubber.
Vapor Exhaust and Overheat Signals: If steam is coming out of the exhaust rather than water, the cooling liquid is boiling. An overheat signal should not even be ignored, since this means definite damage to the engine (warped heads or broken gaskets).
Physical Failure Modes (During Inspection)
Once the housing is off, physical inspection leaves no room for guessing. Professional technicians don’t just “eyeball” an impeller—they look for specific, measurable failure modes:
-
Root Stress Cracking: Even a 1mm micro-fracture at the base of a single vane dictates a full replacement. That blade will eventually snap and completely block a downstream cooling jacket.
-
Compression Set: Vanes that are permanently bent flat and fail to spring back have lost their elastic memory. In engineering terms, the pump has lost its internal sealing pressure.
-
Thermal Glazing: Blade edges hardened, brittle, or with a glossy finish are clear indicators of dry running. Thirty to sixty seconds of blade movement without water cooling will result in permanent damage to the blade’s rubber nitrile compound.
Replacement Based on Reliable Data: Relying on visible indicators alone is insufficient. The rigid industry standard for preventive maintenance calls for replacement either after every 100 hours of operation or within a year, whichever occurs first. Running in an environment that is highly abrasive, such as high silt estuaries or sandbars, results in rapid wear. Experienced operators will reduce the replacement interval to 50-70 hours.
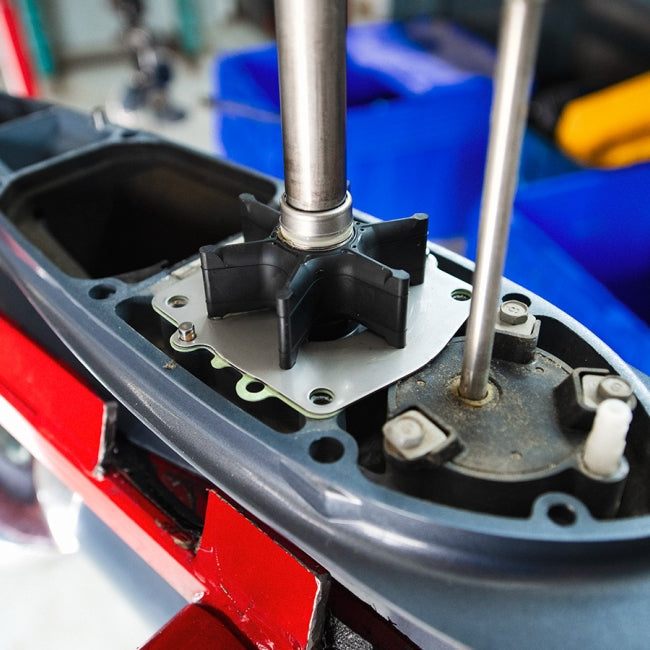
Tools & Parts You’ll Need Before You Start
Gather everything before you pull a single bolt. Stop mid-job to hunt for a wrench, and your gearcase sits open on the dock. That kills a clean repair fast.
Tools
-
Socket set (metric 8–14 mm, imperial 3/8″–1/2″) — use a 1/4″ and 3/8″ drive ratchet. Add 3″ and 6″ extensions. You’ll need them to reach pump housing bolts in tight spots.
-
Screwdrivers — Phillips #1/#2/#3 and flathead 3/16″–5/16″. Magnetic tips stop small screws from dropping into the bilge.
-
Needle-nose pliers — pull old impeller fragments, grip the driveshaft key, and remove O-rings. A good pair lets you work the seal groove without tearing it.
-
Rubber mallet — aluminum housings dent easily. A steel hammer will crack one fast.
-
Pick/hook set — 4–6 piece with straight and 90° hooks. Use these to lift out old O-rings and gasket remnants without leaving debris behind.
-
Torque wrench (5–60 N·m range) — housing bolts need exact torque. Guessing causes leaks.
Parts
Buy a complete impeller kit — not just the impeller. A full kit includes the impeller, Woodruff key, wear plate, pump cup, gaskets, and O-rings. Leave a grooved wear plate behind, and cooling flow drops by up to 20%. Buying a full kit also costs 10–25% less than picking up each part on its own.
One exception: You’re on a frequent maintenance schedule and your pump cup and wear plate show zero scoring? A single impeller swap is fine.
Lubricants
-
Marine grease (Mercury 2-4-C or equivalent) — thin coat on impeller vanes and splines. That’s it. Don’t pack the housing.
-
Soapy water — a solid lubricant for assembly if you prefer nothing near rubber components.
Put anti-seize compound on every stainless bolt threading into aluminum. Skip it once, and your next removal turns into a broken-bolt extraction job.
Summary: The Outboard Impeller Replacement Cheat Sheet
You know, looking back at the whole process, changing your outboard impeller isn’t exactly rocket science. It mostly just demands a bit of patience. Honestly, the first time you prep to drop that heavy gearcase, it feels like a massive leap of faith. Fifty-plus pounds of aluminum ready to drop the second a bolt clears? Yeah, that catches your attention.
However, after doing all of these six steps, you will see that the whole process is very easy. Additionally, you have not only saved $200 but also have found out how the cooling system operates inside your engine. It was not such a bad way to spend a weekend morning, was it?
If you want to find this procedure even easier the next time you perform the maintenance, here are a few tips I recommend to you. Just keep the following points in mind, and you will avoid the biggest mistakes.
|
Phase |
Crucial Actions to Nail |
The “Don’t Do This” Warning ⚠️ |
|---|---|---|
|
1. Lower Unit Removal |
Always shift into forward gear first. Find the hidden trim tab bolt and support the weight before the last thread clears. |
Never pry the aluminum housing with metal tools. Forgetting to disconnect the shift rod will bend it fast. |
|
2 & 3. Disassembly & Inspection |
Lift the pump housing evenly. Catch that tiny Woodruff key the second the impeller comes off. Inspect everything, not just the rubber. |
Losing the key in the bilge, or ignoring fingernail-deep wear grooves on the metal wear plate. |
|
4 & 5. Prep & Impeller Install |
Clean mating surfaces completely. Lightly grease the keyway. Fold vanes in the direction of rotation using soapy water. |
Installing the wear plate backward, spraying petroleum lubricants, or dry-fitting the new rubber impeller. |
|
6. Final Button-Up |
Rotate the driveshaft smoothly while applying light downward pressure on the housing. Torque the bolts diagonally. |
Pressing the housing straight down without turning the shaft (this crushes and ruins the new vanes instantly). |
Stick to this game plan, don’t rush the stubborn bolts, and your outboard is going to pump a strong, steady stream of water all season long.
Common Mistakes That Can Ruin a New Impeller
Here’s the hard truth: most impeller failures after a fresh install aren’t product defects. They’re installation errors. The rubber is fine. The technique wasn’t. To save you the headache of destroying a brand-new part within the first hour of running, I’ve broken down the mistakes that kill new impellers into a quick reference table.
|
Installation Mistake |
The Consequence |
How to Prevent It (The Fix) |
|---|---|---|
|
Losing or misseating the key |
Cooling flow drops to zero if missing. If half-seated, it shears under torque and chews through the housing. |
Drop it in a magnetic tray instantly. Once installed, manually rotate the driveshaft 360° to ensure the impeller grips and turns with no lag. |
|
Folding blades backward |
Root stress spikes by 30–50%. Snapped blades will travel downstream and severely block cooling passages. |
Spin the driveshaft by hand to check its rotation. Fold the vanes into that exact same direction as you press the housing down. |
|
Scoring the sealing surface |
An air leak ruins the pump’s self-priming ability, killing 20–40% of standard cooling flow. |
Only use plastic pry tools or a thin scraper. If you feel any ridge over 0.1 mm with your fingernail, the housing needs replacing. |
|
Forcing a hidden fastener |
Prying against a stuck bolt permanently warps the housing face. It pushes the impeller off-center, ruining the rubber fast. |
Walk your fingers around the entire perimeter first. If the cover lifts unevenly, stop immediately and find the hidden bolt. |
|
Skipping lubrication |
Dry rubber on aluminum generates intense heat within seconds, hardening and cracking the new vanes instantly. |
Before assembly, generously coat the vanes and housing interior with glycerin or a 5–10% dish soap and water solution. |
Quick Pre-Install Checklist (Before buttoning everything up):
-
✔ Parts check: New impeller, correct gaskets/O-rings, and Woodruff key are all accounted for.
-
✔ Surface check: Mating faces are fully cleaned, smooth, and free of old debris.
-
✔ Alignment check: The key is firmly seated into both the shaft groove and impeller keyway.
-
✔ Direction check: Blades are pre-folded matching the actual rotation direction.
-
✔ Lube check: Vanes and housing interior are properly lubricated to prevent dry-start damage.

What shortens impeller life the most?
Three things top the list: dry starts, abrasive water, and storage.
A few seconds of dry running spikes blade surface temperatures enough to crack brand-new rubber. Sandy, silty, or muddy water grinds through vanes far faster than hours on the clock — boats used often in those conditions may need a mid-season replacement. A Boat sitting a full season with the impeller locked in one position develops compression set. The vanes stay bent and lose their spring for good. Boat sat all winter? Inspect the impeller before the first run of the year, regardless of hours logged.
Conclusion
Your outboard motor keeps you moving — and now you have everything you need to keep it cool.
Replacing an impeller isn’t glamorous work. It’s greasy, sometimes stubborn, and takes patience. But it’s also one of the highest-value maintenance tasks a Boat owner can do. A $20–$40 rubber part sits between your engine and a catastrophic overheating failure that could cost thousands. Install it right, and that cheap little piece earns its keep every single season.
You’ve worked through the full process:
-
Lower unit removal
-
Water pump housing disassembly
-
Proper vane alignment
-
Post-replacement flush test
You know what failure looks like before it happens. You know how to fix it yourself. That’s a real edge most boat owners don’t have.
So here’s your next move: check your engine hours. Past the 100-hour mark? Haven’t touched your outboard cooling system in two seasons? Don’t wait for the warning signs. By the time the temperature gauge climbs, the damage is already done.
Grab a quality rubber impeller kit, block out a Saturday morning, and get it done. Future-you, somewhere out on the water with a cool-running engine, will be glad you did.