
Dropping an outboard motor on the garage floor hurts. Watching it tip off a flimsy sawhorse is even worse. Either way, it’s a mistake you don’t want to make twice.
A proper outboard motor storage stand keeps your engine upright, stable, and ready for maintenance. You don’t need to spend $150 at the marine supply store to get one.
Build it yourself in an afternoon for under $40 in lumber and hardware. It’ll hold anything from a lightweight 6-horse kicker to a heavy 150-pound four-stroke — no problem.
This guide covers every cut, joint, and bolt. You get:
-
Exact outboard stand dimensions
-
A full materials list
-
Weight capacity checks
By the end, you’ll have a stand you can trust to hold a motor worth more than your truck payment.
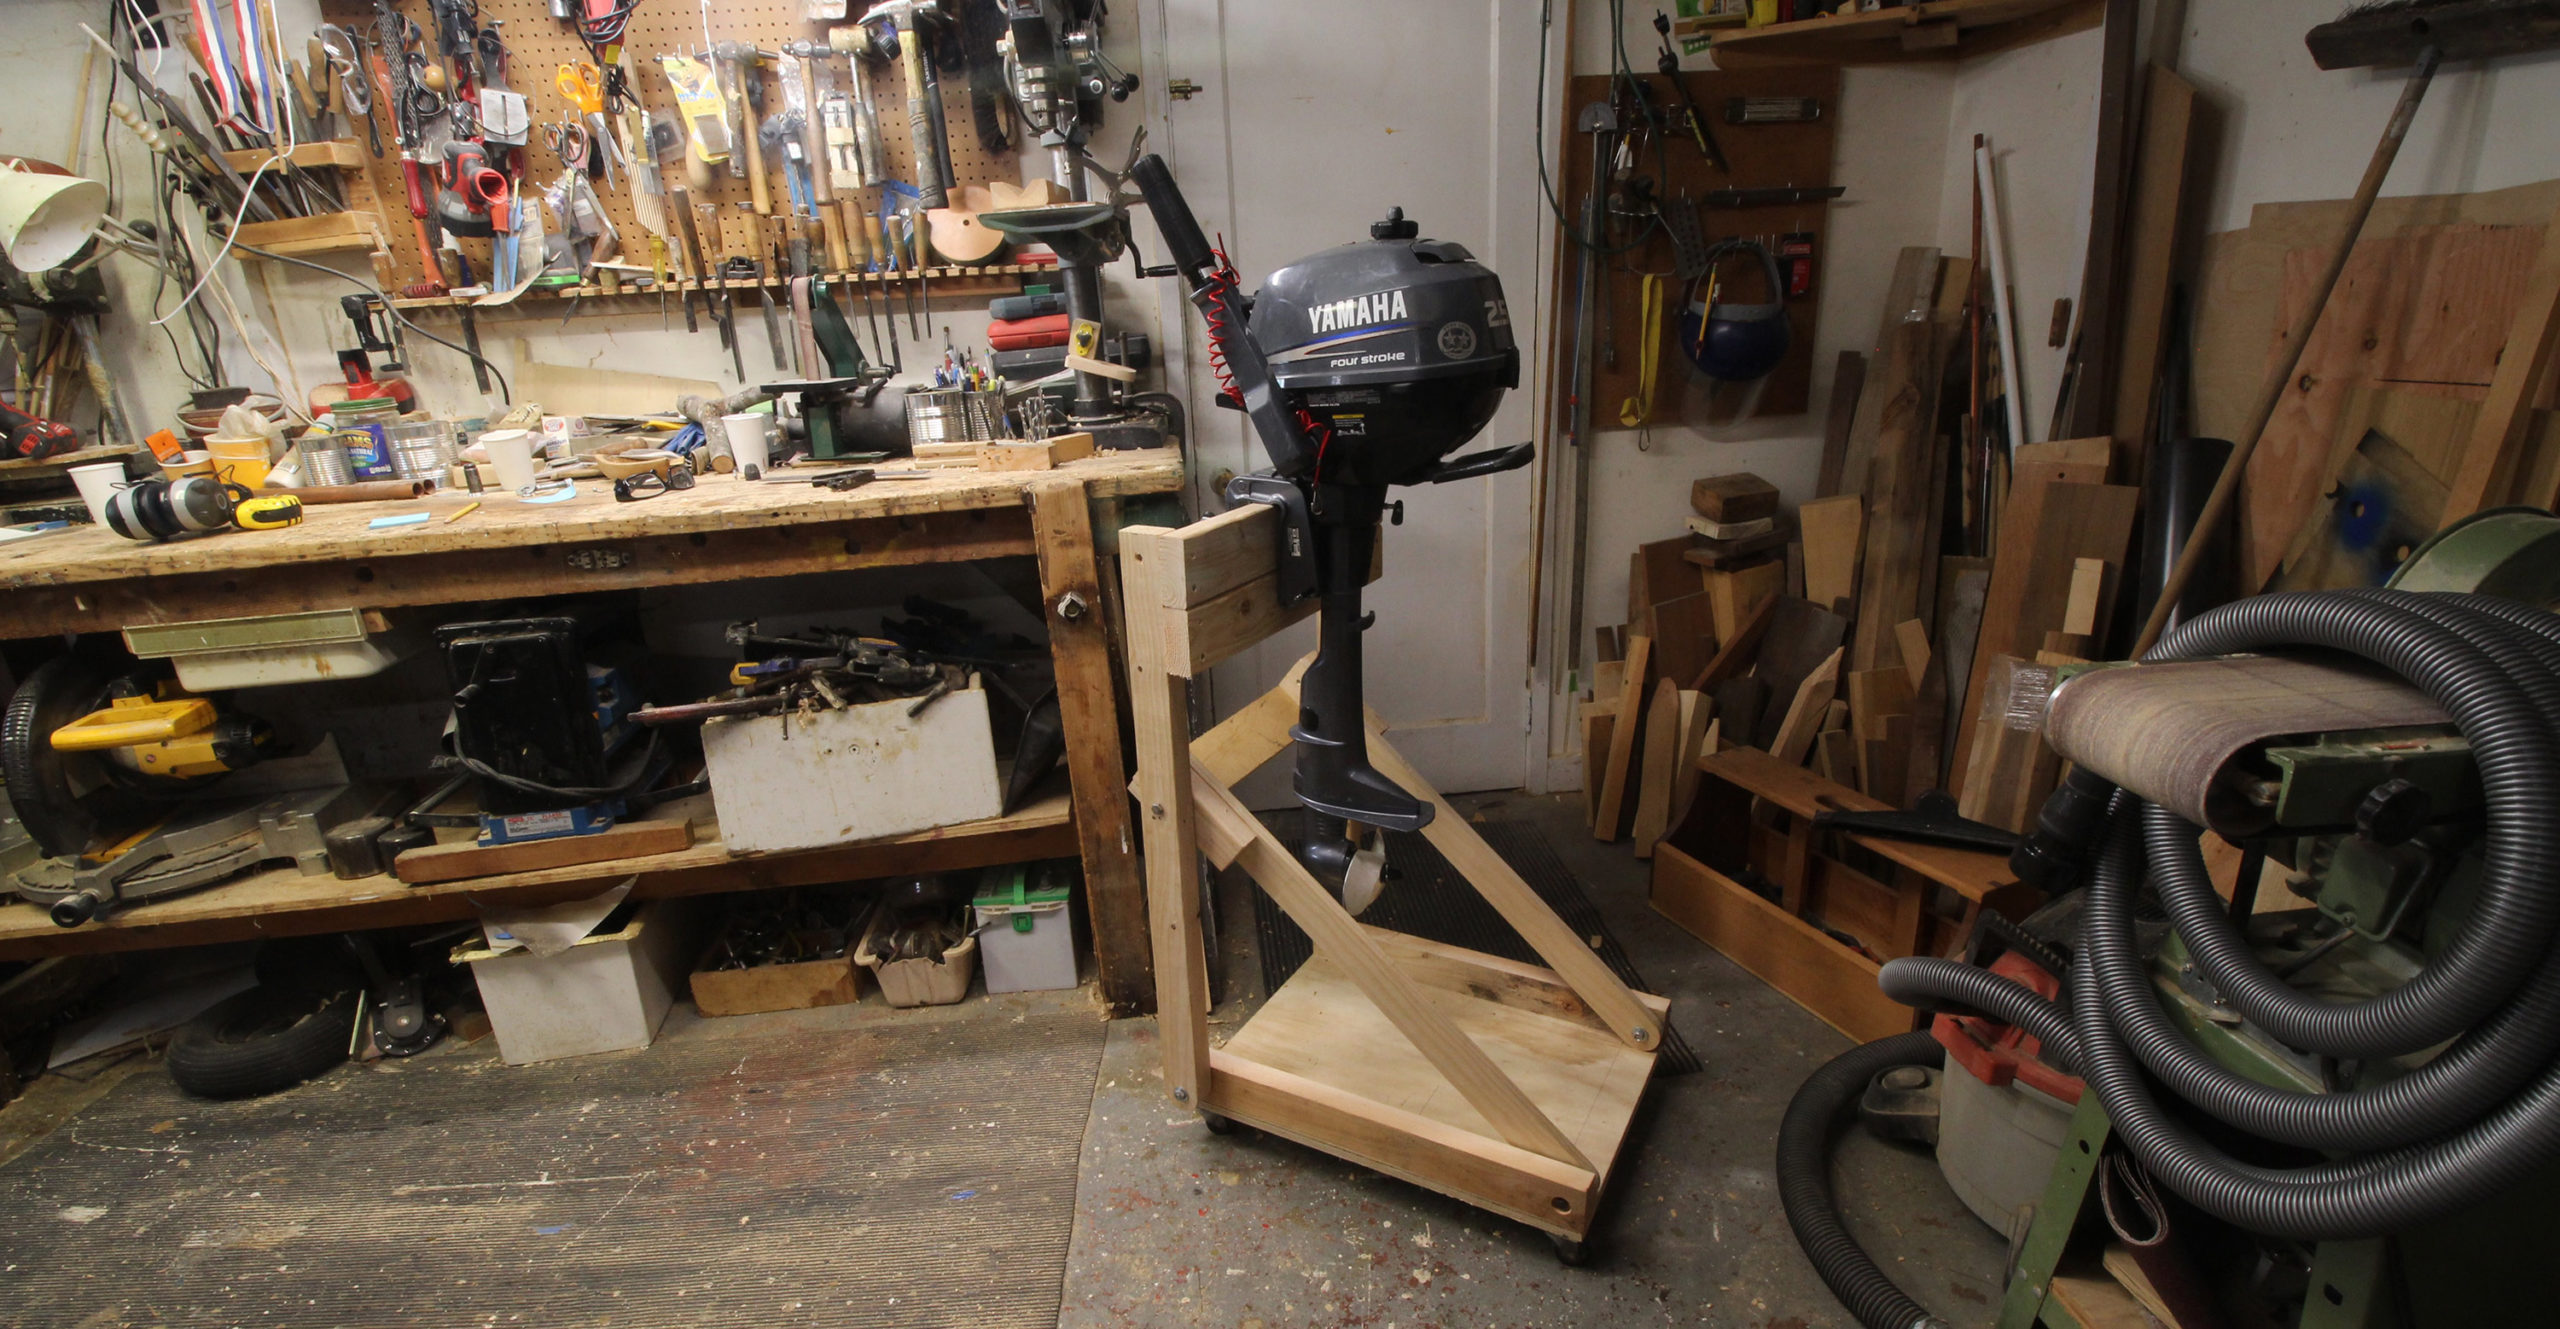
Materials and Tools You’ll Need for a DIY Outboard Motor Stand
Stage everything on this list before you make a single cut. One trip to the hardware store, not three.
The lumber list below fits engines in the 9.9–15 hp range — about 75–110 lb (35–50 kg) — with a 2x safety factor or better. Your motor falls in that class? This spec holds it with no problem.
Lumber List
|
Piece |
Size |
Qty |
Cut To |
|---|---|---|---|
|
Main uprights |
2×4 × 8 ft |
2 |
36″ (front) + 30″ (rear) per board |
|
Top crossbeam + base ties |
2×4 × 6 ft |
1 |
24″ top beam + two 12″ base connectors |
|
Base rails |
2×4 × 8 ft |
1 |
Two 28″ longitudinal runners |
|
Diagonal braces |
2×4 × 8 ft |
1 |
Four 20–22″ diagonal pieces |
|
Engine clamp board |
2×8 × 3–4 ft |
1 |
One 18–20″ panel, 1.5–1.75″ thick |
That clamp board matters more than most people realize. It stands in for your Boat’s transom — the surface your motor grips directly. Use SPF or hardwood at 38–45 mm thick. Your lumber yard carries thinner stock? Laminate two 18–22 mm boards with wood glue. Don’t skip this step.
Total lumber cost: ~$25–35 at Home Depot or Lowe’s (2025 pricing).
Hardware
-
Structural screws — #8 to #10, 3–3.5″ long for primary joints; 2–2.5″ for braces. SPAX or GRK brand gives you 20–40% higher shear resistance than standard wood screws. A box of 50–75 runs $8–12.
-
Carriage bolts + washers + lock nuts — 5/16″ to 3/8″ diameter, 4.5–5″ long. Use these at the clamp board connection and any hinge points. Put a flat washer on each side, then add a nylon lock nut to stop loosening. A kit of 10–20 sets: $10–20.
-
Swivel casters (optional but worth it) — 4 total, rated ≥ 88–110 lb each (400–500 kg combined). Get 3″ to 4″ diameter wheels. Pick two with brakes. Mount them to your base rails with 6 mm bolts. Budget $20–40 based on load rating.
Tools
You need these:
– Tape measure (16–25 ft)
– Combination square — non-negotiable for 90° cuts
– Drill/driver + 1/8″ pilot bit + 3/8″ spade bit for bolt holes
– Impact driver for 3″ screws (a standard drill will strip them)
– Circular saw or miter saw
No power saw? A hand saw works fine. Mark cut lines on all four faces of the board with your square, clamp the piece solid, and cut slow. It takes longer, but the joints come out clean.
No clamps? Add 30–50% to your build time. Use temporary screws to hold pieces in place while you drill. It gets the job done — just not the fastest way.
Optional Upgrades Worth Adding
-
Wood glue (PVA or polyurethane) — Put it on every T-joint alongside your screws. It adds 30–60% to connection strength. This matters a lot if the stand moves on a regular basis. Cost: $4–8 for a small bottle.
-
Outdoor sealant or marine varnish — Two to three coats push wood life out by 2–3x. This is a smart move in humid or saltwater environments. A quart runs $12–20.
-
Bolt-and-knob hardware for a folding design — Swap the fixed joints at the clamp board and base for carriage bolts with wing nuts. The stand folds flat for storage and cuts its footprint by 50–70%. A solid upgrade if your garage is already tight on space.
Full materials budget for a standard build: $45–75, casters included. Add $20–40 for any tools you need to buy new. Either way, you stay well under the $120–200 a commercial stand costs — and this one fits your exact motor’s specs.
4-Step Assembly Summary: How to Build Your Outboard Stand
Building a rock-solid outboard motor stand really comes down to precise cuts, a perfectly square base, and maintaining a critical 12° angle on the uprights to safely shift the engine’s center of gravity backward. The assembly follows a straightforward but strict sequence: making exact cuts on your 2×4 and 2×8 lumber, building a square base frame (always pre-drilling to prevent wood from splitting), securely mounting the 12° angled uprights, and finally bolting down the top motor board with those crucial angled support blocks for added compression strength. Honestly, if you tackle it methodically and double-check your level before driving the final screws, you’ll end up with a professional-grade structure that won’t wobble one bit under a heavy four-stroke engine.
|
Step |
Build Phase |
Core Actions |
Critical Detail To Check |
|---|---|---|---|
|
1 |
Cut Lumber |
Cut all 2×4 frame pieces and 2×8 mount board to dimension. |
Ensure a perfect 12° bevel on uprights. Mark the 16″-18″ motor height now. |
|
2 |
Base Frame |
Assemble the 24″ x 36″ foundation footprint. |
Measure corner-to-corner diagonals to confirm it’s 100% square. |
|
3 |
Uprights |
Install vertical supports and diagonal cross braces. |
Verify the 12° backward lean. Use at least three 3″ structural screws per joint. |
|
4 |
Motor Board |
Mount the top panel alongside 12° support blocks. |
Check for level (max 1/8″ deviation) and do a final push-shake test. |
Outboard Stand Weight Capacity and Safety Checks
Here’s the number that matters most before you hang any motor on this stand: 2×. Your structure needs to hold twice the engine’s weight with no visible deflection. That gives you a solid safety margin for everyday use.
That multiplier isn’t arbitrary. It covers dynamic loads — throttle bursts, gear shifts, the stand rolling over a concrete seam. Static weight is the easy part. Sudden inputs are what expose weak joints.

Know Your Motor’s Weight Class
Match your engine to the right capacity bracket before you build:
|
Engine Size |
Typical Weight |
Build Recommendation |
|---|---|---|
|
9.9–20 HP four-stroke |
44–55 kg |
Standard 2×4 wood build |
|
40–60 HP four-stroke |
95–110 kg |
Reinforced wood with full diagonal bracing |
|
90–115 HP four-stroke |
160–180 kg |
Transition to steel-primary structure |
|
150 HP four-stroke |
205–220 kg |
Steel frame required |
The wood build in this guide handles the ≤110–130 kg range — about 60–70 HP four-stroke and below — with solid margin. Past that point, wood starts to creep and shear over time. Those aren’t theoretical risks. They become real structural failures.
Five Warning Signs Your Stand Is Overloaded
Don’t wait for a motor to hit the floor. Pull it off the stand the moment you spot any of these:
-
Motor board deflects more than 2–3 mm under load — measure with a straightedge
-
Clamp hardware sinks after mounting — height changes you can see with the naked eye
-
Radiating cracks around bolt holes on the uprights or base rails
-
One or more casters lift off the floor with the motor mounted
-
Audible creaking at joint connections during a barrel test throttle input
One item on that list is enough. Pull the motor and reinforce before you go any further.

FAQ: Outboard Engine Stand Plans — Common Questions Answered
These questions come up every time someone builds their first stand. Here are the real answers.
Q: Why do most plans call for a 12°–15° angle instead of a straight 90° board?
Outboard clamps were designed for a tilted transom, not a vertical wall. Mount on a flat 90° board and the engine’s center of gravity shifts forward — you’ve just built a tipping machine. Tilt the board back 12°–14° and the crankshaft sits close to vertical. Weight drops over the base centerline. The clamp makes full-face contact instead of digging into one edge. For most DIY builds, 12°–14° is the sweet spot. Going bigger than 150 HP or 200 lb? Go with 15°–18° and a longer base footprint.
Q: Should upright placement be marked at 16″ or 18″ from the front?
It depends on your motor’s weight:
-
≤ 90 lb (40 kg) — mark at 18″
-
90–130 lb (40–60 kg) — mark at 16″
-
Over 130 lb (60 kg) — 14″–16″, plus add diagonal bracing
A heavier motor means higher tip risk. Moving the uprights forward keeps the center of gravity back over the base.
Q: How do I stop the stand from wobbling?
Pre-drill every connection — no exceptions. Assemble with one screw per joint first. Square the whole frame. Then drive the rest. Key reinforcements to add:
-
Saddle blocks cut to 12°, seated under each upright base — they increase contact area and kill lateral rock
-
45° diagonal braces on each side
-
Casters with brakes — two minimum, four preferred
Q: How big of a motor can this stand hold?
|
Engine Class |
Weight |
Build Required |
|---|---|---|
|
Up to 6 HP |
≤ 60 lb (27 kg) |
Basic 2×4 frame |
|
6–15 HP |
60–120 lb (55 kg) |
Add diagonal bracing + saddle blocks |
|
15–40 HP |
120–200 lb (90 kg) |
4″×2″ lumber, full bolt connections |
|
Over 40 HP |
200+ lb (90+ kg) |
Steel frame |
Conclusion
You just saved yourself $150 and built something that will outlast anything off the shelf.
That’s the real win — not just the money, but the confidence of knowing what’s holding your engine. You chose the lumber. You set the dimensions. You torqued every bolt. Your outboard motor maintenance stand holds steady during a Prop swap or an oil change. That’s your engineering doing the job.
Keep your outboard stand blueprints somewhere accessible. Conditions change. Maybe you’re upgrading to a heavier motor next season. Maybe a buddy needs one too. The plans you followed today scale up faster than you’d expect.
Next step: get that engine on the stand and use it. Check the Propeller too — a well-maintained Prop on a well-supported engine is the whole game.
Build smart. Maintain it often. Go farther.
The wood build in this guide covers the middle two classes. Past 200 lb, weld something or buy steel.
Honestly, once you’ve got your motor resting securely on your new DIY stand, it’s the perfect excuse to do a quick maintenance check. Take a close look at your propeller while it’s at eye level. Notice any rough edges, bent blades, or a worn-out hub? If it’s time for an upgrade or you just want a reliable spare onboard, you should really check out VIF Propellers.
They make some seriously durable replacement props—both aluminum and stainless steel—that fit pretty much every major outboard brand out there. The best part? You’re getting OEM-level performance without that painful dealership markup. A solid stand keeps your motor safe in the garage, but a fresh VIF prop is what’s going to maximize your performance out on the water.