
Let’s be honest—few things ruin a great day on the water faster than realizing your bilge pump is working overtime. Often, the hidden culprit is your Propeller shaft seal (also known as a stern tube seal or marine shaft seal). It has a deceptively simple, yet critical job: letting your shaft spin at high speeds while keeping the ocean firmly outside your hull. Ignoring a wearing seal can quickly lead to expensive bearing damage, compromised lubrication, and real safety risks. Whether you’ve noticed a suspicious drip or you’re just planning your seasonal maintenance, here is a straightforward, no-nonsense guide to understanding, choosing, and cleanly replacing your marine shaft seal before a minor weep turns into a major headache.
At VIF Propellers, we don’t just make props. We’ve spent over 25 years diagnosing shaft seal failures, shipping replacements to 700+ engine applications, and walking Boat owners through the exact steps that separate a lasting fix from a repeat leak. We’ve seen firsthand how a failing seal can quietly destroy a shaft and strand a boat. That’s why we built this guide.
What Is a Propeller Shaft Seal and Why It Matters for Your Boat
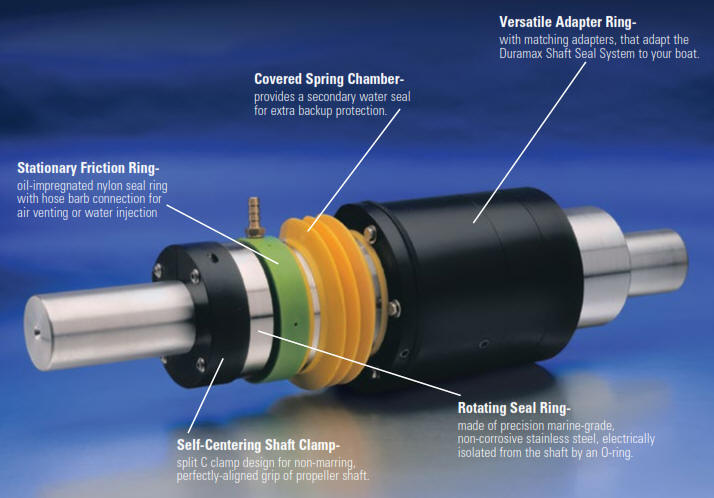
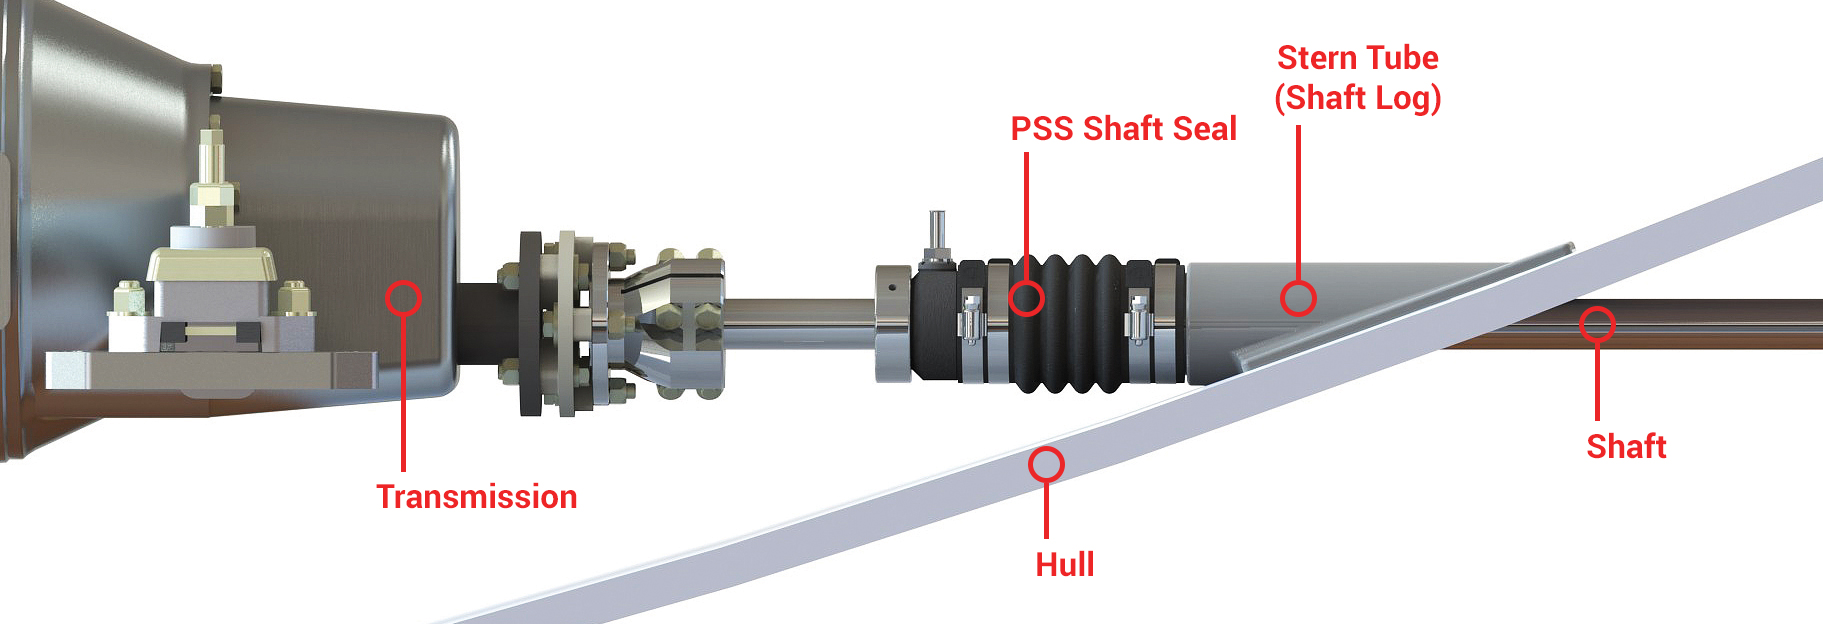
Every rotating propeller shaft punches straight through your Boat’s hull — and that gap needs sealing. That’s the job of the propeller shaft seal, also called a stern tube seal or marine shaft seal. The basic task: keep seawater out of the bilge while the shaft keeps spinning. Simple in theory. In practice, it’s one of the hardest-working parts on the entire drivetrain.
Oil-lubricated stern tubes run two seals in tandem — an aft water/oil seal and a forward oil seal. These two work as a pair to hold the line between seawater and the lubrication system. Most modern designs use multiple lip seals fitted with springs. The springs press the seal lips against the rotating shaft surface to maintain constant contact. Face-type systems work differently — a stationary face sits against a rotating face, and sealing happens right at that contact point.
One distinction worth knowing: a shaft seal is built to be nearly but not fully watertight. The goal isn’t zero drips. It’s controlled, minimal leakage. Dripless systems push this further — they stop water from entering the bilge at all during operation.
So what happens when this system breaks down? The failure chain moves fast:
-
Seal wear → seawater enters the stern tube
-
Water contamination → lubrication breaks down
-
Reduced lubrication → accelerated shaft and bearing wear
-
Bilge accumulation → pump overload and genuine safety risk
Catch the early warning signs before things get worse. Look for the bilge pump cycling more than normal, visible moisture weeping around the shaft exit, or rough, uneven shaft operation. These aren’t minor quirks to ignore — they’re the seal signaling it’s starting to fail.
How to Choose the Right Propeller Shaft Seal for Your Vessel
Shaft diameter, operating hours, budget, alignment condition — these four factors should drive your seal selection. Most boat owners skip this step and pick what’s familiar. That leads to replacing a seal two years too soon, or switching to a mechanical system the shaft can’t support.
Here’s a clear way to get it right the first time.
Match Seal Type to Your Vessel Profile
For recreational and light commercial vessels, the seal market breaks into three practical categories:
-
Traditional stuffing box (packed gland) — lowest entry cost, tolerant of minor misalignment, needs about 2 drops per minute at rest as a controlled drip. Best for older hulls, low-to-moderate use, and owners who want simple, field-serviceable maintenance.
-
Lip-type shaft seal — compact and affordable, common on small-to-medium boats with shaft diameters in the 25–40 mm range. Easier to install than a face seal, but the lip-wears-shaft feedback loop is real. Surface condition matters here.
-
Dripless mechanical face seal (PSS-type) — highest upfront cost, minimal leakage, best for vessels logging several hundred hours per season. This type needs precise alignment and a clean installation environment.
For large commercial or working vessels — shafts running 200–800 mm — the selection logic moves toward labyrinth seals, oil-lubricated stern tube systems, and certified mechanical face designs rated for high draft pressure. That’s a separate topic.
The Quick-Selection Matrix
|
Vessel Size |
Use Frequency |
Budget |
Recommended Seal |
|---|---|---|---|
|
Small powerboat / sailboat |
Weekend / occasional |
Low |
Traditional stuffing box |
|
Small boat |
Weekend |
Mid–high |
Lip seal or entry mechanical face seal |
|
Small–medium cruiser |
Heavy use (200+ hrs/yr) |
Mid–high |
Dripless mechanical face seal |
|
Medium–large workboat |
High hours |
Mid–high |
Mechanical face or labyrinth stern tube |
Propeller Shaft Lip Seal Replacement: A Streamlined Guide
A botched seal removal means a scratched shaft, and a crooked install guarantees a leak from day one. Honestly, the actual swap takes under two hours. It’s the prep work that separates a permanent fix from a job you’ll be repeating next season. Here is the no-nonsense, step-by-step process.
1. Gather Your Tools & Measurements
Get everything ready before the boat is on the hard. You don’t want to be making supply runs in the middle of this.
-
The Hardware: Seal puller (or hook tool), two small pry bars, low-speed drill with #4 self-tapping screws, dead-blow mallet, calipers, and a socket or PVC pipe exactly sized to the seal’s outer metal ring.
-
The Consumables: Masking tape, brake cleaner, 600–1200 grit wet-dry sandpaper, and waterproof silicone grease.
Pro tip: Always measure your old seal (Shaft OD × Bore ID × Thickness) using calipers at multiple points before ordering.
2. Safe Removal
First, wrap a few layers of masking tape around the shaft to protect it from stray tools.
Try working a hook tool under the seal’s inner metal skeleton (not the rubber) and gently walk it out. If it won’t budge, use the screw trick: drill a shallow 1-2mm hole into the metal outer shell, thread in a #4 screw, and use your pry bars against the screw head to lever it out. Add a second screw on the opposite side if needed. If the seal is glued, hit the housing with a torch for 30 seconds to soften the adhesive.
3. Shaft Inspection (Don’t Skip This)
Before installing anything new, run your fingernail exactly where the old seal used to sit. If your nail catches in a groove (anything over 0.1mm deep), a new seal won’t hold. You’ll either need a shaft sleeve or a completely new shaft.
For light surface corrosion, polish the area using 600-grit paper in circular strokes only—never lengthwise, as that creates tiny channels for water to leak through. Finally, make sure the shaft end is chamfered (slightly beveled); a sharp 90-degree edge will slice your new seal lip instantly.
4. Installing the New Seal
Getting this right is crucial. First, ensure the lip faces the pressure side (towards the water). Then, heavily coat the inner lip and the shaft with silicone grease. A dry start will permanently score the rubber in seconds.
Tape over any sharp splines on the shaft, slide the seal down, and place your PVC pipe or socket against the metal outer ring. Force goes on the metal only, never the rubber. Tap the pipe gently and evenly in a circle with your mallet until it sits flush against the housing shoulder.
5. Final Assembly & Leak Check
Take the tape off and wipe everything down with brake cleaner so your hose clamps will grip properly. If your setup uses a bellows or hose, torque the stainless clamps evenly—don’t crank one side all the way down before tightening the other.
Once everything is buttoned up, open the seacock and watch the area for a full 60 seconds. A perfectly dry setup or slightly misty moisture film is completely normal. However, if you see a steady drip, back up—something isn’t seated right and needs a redo.
Frequently Asked Questions About Propeller Shaft Seals
Six questions come up again and again in marine forums, boatyards, and chandlery conversations. Here are straight answers to all of them.
Are a lip seal and a mechanical seal the same thing?
No. A lip seal is a spring-loaded elastomer ring that rides the shaft surface on a thin lubricant film. A mechanical seal — PSS, Tides Marine, and similar designs — presses two precision-ground faces together: carbon-graphite against a stainless rotor. Sealing happens across that contact plane, not against the shaft surface. The physics are different. So are the installation steps and the ways each one fails.
Can I upgrade from a lip seal to a mechanical seal on the same shaft?
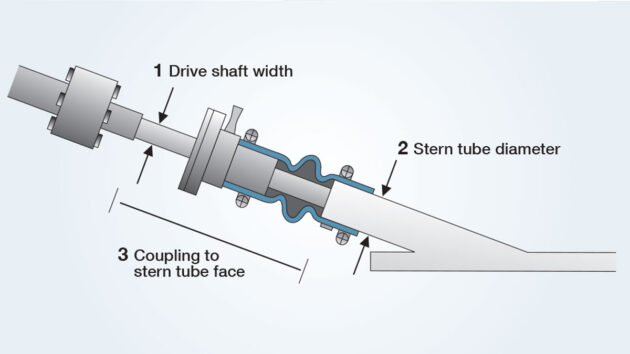
Yes, but it’s not a straight part swap. You need to match shaft diameter and stern tube OD to the mechanical seal bellows spec. Check axial clearance for the rotor and bellows after the old seal comes out. Plumbing matters too. Boats running under 10 knots can vent the seal 2–3 feet above the waterline. Faster boats need a positive water feed from the engine cooling circuit. Treat this as a full drivetrain review, not a quick afternoon job.
How long should a propeller shaft seal last?
-
Lip seals: Around 1,000 operating hours before weeping starts. After that, leakage increases bit by bit.
-
Mechanical seal bellows (PSS-type): Replace every 6 years on Type A units, every 8–10 years on PRO and Type B. The carbon stator and stainless rotor don’t need routine replacement.
-
Break-in note: Most mechanical seals need about 1 hour of running to polish the faces. Fine mist and black dust during that window are normal. Both stop on their own.
What causes premature seal failure?
Four factors cover most early failures:
-
Dry running — PSS seals making noise or misting are almost always starved of water. Fix the plumbing. Oil-lubricated lip seals need just 2–3 drops of ATF every 5–10 miles underway, and nothing at rest. Skip that, and the lips overheat.
-
Sustained heat — lip seals settle near 120°F after break-in. Run past that temperature on a regular basis and the elastomer hardens. The material limit sits around 325°F, but you don’t want to get close.
-
Misalignment and wrong compression — mechanical seals that leak at speed often need more axial compression. Add compression in 1/8–1/4 inch steps until mist stops. Don’t go too far.
-
Shaft damage and contamination — a groove under 0.1 mm defeats any lip seal. Debris between mechanical seal faces causes leaks at rest. Clean with a cloth or 600-grit paper while flushing with water, then reseat.
What does shaft seal replacement actually cost?
|
Scenario |
Parts |
Labor |
Total |
|---|---|---|---|
|
DIY lip seal swap |
USD 40–160 (two seals, sealant, grease) |
Your time (1–3 hrs) |
Parts only |
|
Professional lip seal service |
USD 40–160 |
2–3 hrs at USD 90–160/hr |
USD 300–640 |
|
Professional mechanical seal installation |
USD 300–700+ |
3–5 hrs at USD 90–160/hr |
USD 600–1,500+ |
Haul-out fees, shaft removal, and alignment work push the professional total higher. Many boat owners go with professional marine mechanical seal installation to get compression, venting, and post-install alignment handled right the first time.
What quick checks prevent a seal from leaking?
-
Mechanical seal leaking at rest? Suspect debris between the faces. Clean with a cloth or 600-grit paper while flushing with water, then reseat.
-
Misting under way? Increase bellows compression in 1/8–1/4 inch steps until it stops.
-
Slow boat (under 10 knots)? Check that the vent hose runs 2–3 feet above the waterline near centerline. This stops siphoning and lets air escape.
-
Fast boat? Confirm a positive raw-water feed is keeping the faces cooled and lubricated.
-
Lip seals: Around 1,000 operating hours before weeping starts (based on Tides Marine and Lasdrop technical bulletins, plus VIF’s service records). Mechanical seal bellows (PSS-type): Replace every 6 years on Type A units, every 8–10 years on PRO and Type B units — per PSS manufacturer recommendations.
Conclusion
Your propeller shaft seal is one of those parts that does its job without drawing attention — until something goes wrong.
Picking between a lip seal and a mechanical seal takes thought. Spotting an early leak takes attention. Tackling your first DIY replacement takes confidence. Each choice you make here has a real impact on your shaft, your bearings, and your time out on the water. Get it right, and you won’t give it a second thought for seasons. Get it wrong, and the repair bill speaks for itself.
The good news? You now have what you need to make a smart, informed choice.
Still not sure which marine shaft seal fits your specific setup? Need a trusted source for quality propeller parts? Check out the full range at vifpropellers.com — built for serious boaters who’d rather stop problems before they start.
A note from VIF Propellers: We manufacture and sell propeller shaft seals and related drivetrain components. This guide reflects our engineering team’s independent assessment based on real-world service data and industry standards. We sell multiple seal types — our recommendation depends on your vessel’s profile, not on our margin.
Protect the shaft. Protect the drive system. Keep moving.